Ultimate French Passion Fruit Tart Recipe: A Zesty & Creamy Delight
Embark on a delightful baking journey with this exquisite French Passion Fruit Tart. It’s an incredibly fresh and vibrant dessert that perfectly balances the crisp, buttery texture of a Pâte Sucrée (sweet shortcrust pastry) with the smooth, tangy richness of a Passion Fruit Crémeux (passion fruit cream filling). For an extra touch of elegance and a truly show-stopping presentation, consider topping it with a cloud of velvety Swiss meringue. This detailed recipe guides you through creating a dessert that’s as beautiful to behold as it is unforgettable to taste, making it ideal for special occasions or simply elevating your everyday.

Why You Will Adore This Passion Fruit Tart Recipe
If you’re a connoisseur of classic desserts like a lemon tart but yearn for something with a unique, exotic twist, this passion fruit tart is an absolute revelation. It transforms a familiar concept into an extraordinary culinary experience. We are confident you’ll fall head over heels for this recipe for several compelling reasons:
- A Symphony of Textures: Indulge in the perfect interplay of a wonderfully crispy, golden-brown, and buttery shortcrust pastry, which provides a delightful structural contrast to the incredibly smooth, rich, and creamy passion fruit filling. Every single bite offers a satisfying dance between crumbly and luscious.
- Vibrant and Tangy Flavor Profile: The passion fruit crémeux is an explosion of natural, intense tanginess that is exquisitely balanced by a subtle, underlying sweetness. It delivers a refreshing burst of tropical flavor that instantly brightens any palate and leaves a memorable impression.
- Effortless Elegance for Any Occasion: With its sophisticated flavor profile and undeniably stunning visual appeal – especially when crowned with a cloud of velvety Swiss meringue – this tart embodies the essence of a gourmet dessert. It’s perfectly suited for impressing guests at dinner parties, celebrating milestones, or simply elevating an ordinary weekend into something special.
- A Journey into Authentic French Patisserie: By following this recipe, you’ll not only create a spectacular dessert but also gain hands-on experience with fundamental French baking techniques like preparing Pâte Sucrée and Crémeux, thereby building your skills and confidence in the art of patisserie.
- Customizable Sweetness to Your Liking: While the recipe is meticulously designed to highlight the natural, invigorating tartness of passion fruit, it is also easily adaptable. If you have a sweeter preference, you can adjust the sugar content to suit your taste without compromising the integrity of the crémeux.
Understanding the Crémeux: A French Custard Masterpiece
At the very heart of this extraordinary tart lies the “Crémeux,” a term in classic French pastry that directly translates to “creamy.” This luxurious and intensely flavorful filling is an evolved version of a Crème Anglaise (a rich custard sauce), but significantly enriched with butter and carefully stabilized with gelatin. This combination is what gives the crémeux its signature silky-smooth texture that melts in your mouth, yet holds its shape beautifully.
Unlike a traditional fruit curd, which relies primarily on egg yolks and the natural pectin in fruit juice for its thickening, a crémeux achieves a more opulent and velvety mouthfeel due to the generous addition of butter and the controlled setting power of gelatin. For our Passion Fruit Tart, the conventional milk base of a Crème Anglaise is ingeniously replaced with vibrant, aromatic passion fruit pulp or purée. This clever substitution infuses the filling with an undeniable tropical zest and a delightful tang that truly makes the dessert sing.
The true beauty of the crémeux technique lies in its incredible versatility; once you master the basic principles, a world of flavored creams opens up to you. You can easily apply the same method to craft a luscious filling for a French Orange Tart, or create a truly decadent Chocolate Crémeux. The key to a perfect crémeux lies in precise temperature control during the cooking process and the meticulous incorporation of the butter. These steps are crucial for ensuring a stable, beautifully emulsified, and utterly smooth cream that will set perfectly when chilled, making it an ideal filling for tarts, verrines, or even as an elegant standalone dessert component.
Essential Ingredients for Your Homemade Passion Fruit Tart
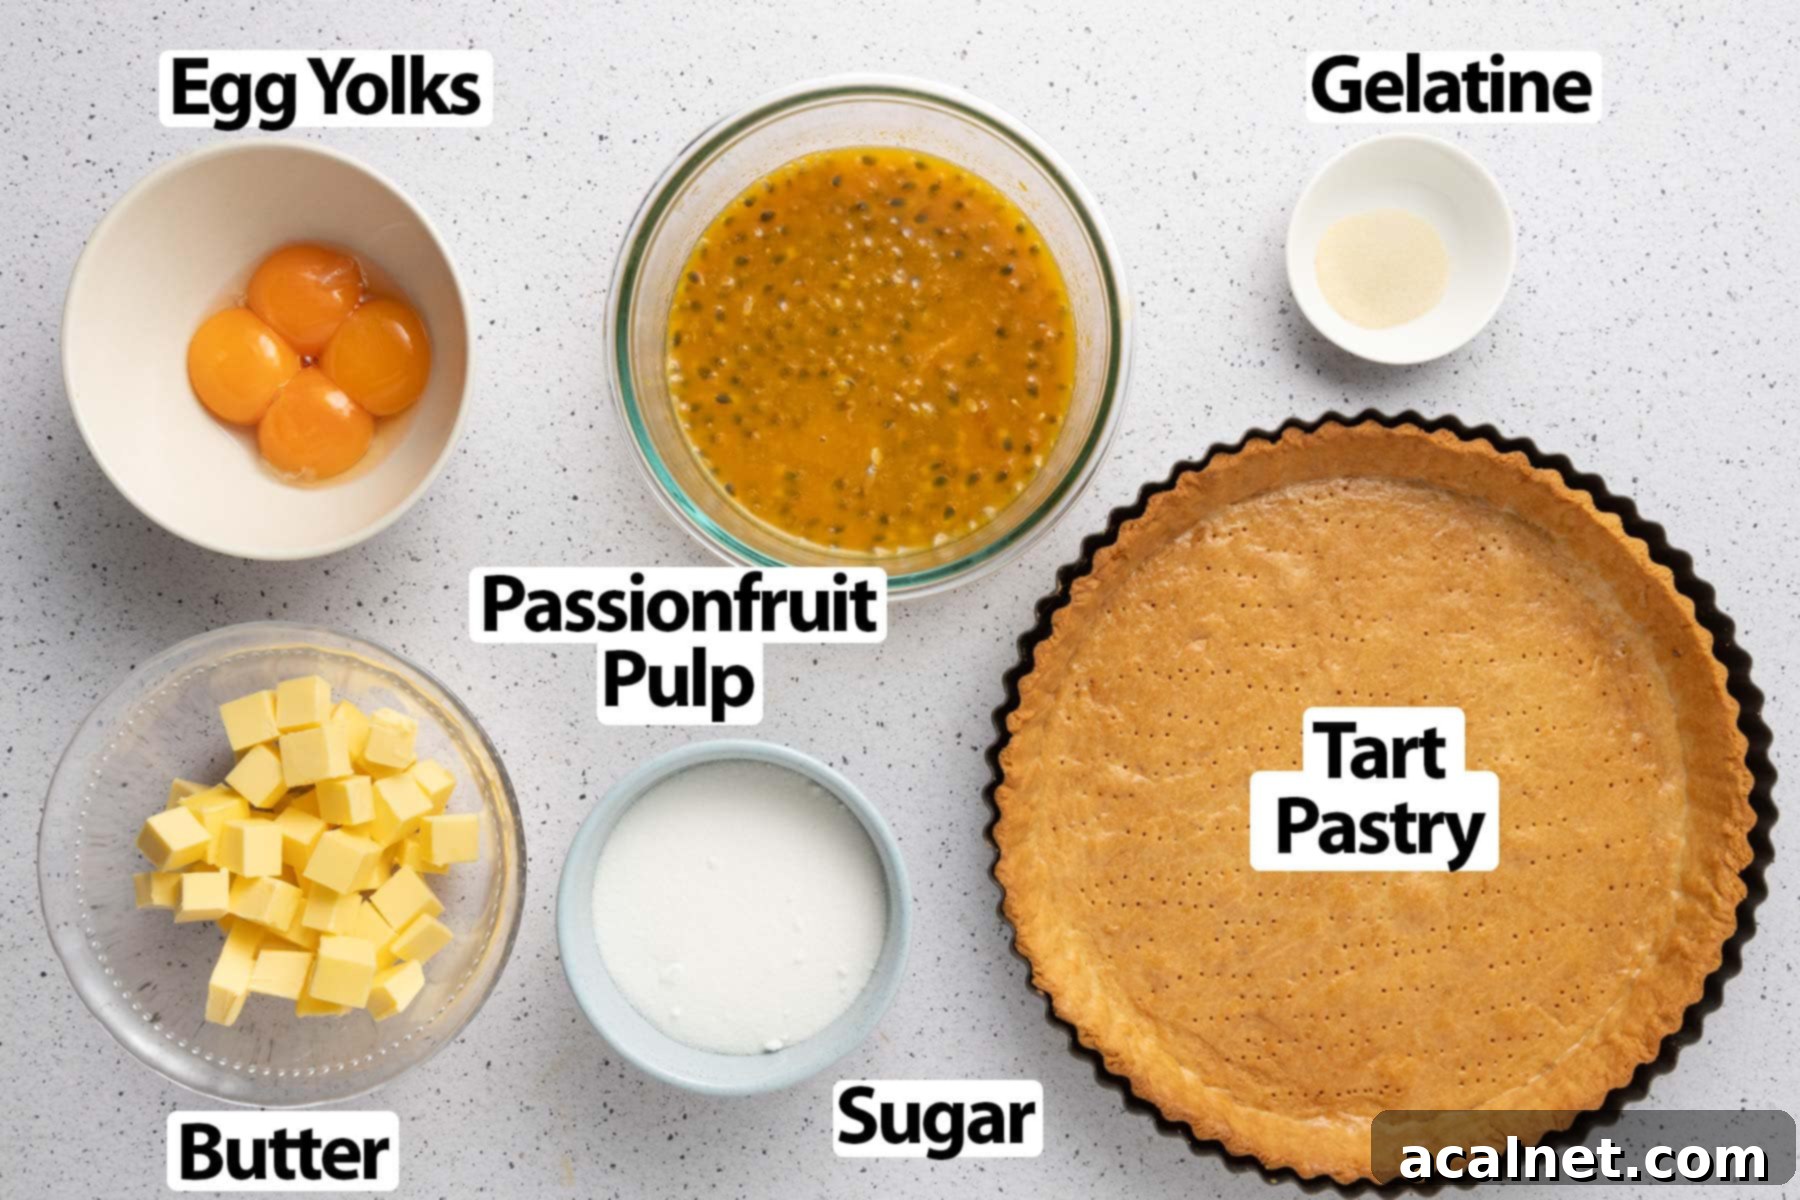
For precise measurements and quantities, please refer to the detailed recipe card below.
Crafting this exquisite French Passion Fruit Tart requires a thoughtful selection of fresh, high-quality ingredients, each playing a vital role in achieving the perfect balance of flavor and texture that defines this classic dessert.
For the Sweet Shortcrust Pastry (Pâte Sucrée):
- Wet Ingredients:
- Unsalted Butter (very soft): This is paramount for a rich flavor and a tender, melt-in-your-mouth crumb. It’s crucial that the butter is very soft and at room temperature, allowing it to cream effortlessly with the sugar.
- Icing Sugar (Powdered Sugar): Contributes to the pastry’s delicate sweetness and helps create a remarkably fine, smooth texture. Unlike granulated sugar, icing sugar prevents the dough from becoming gritty.
- Large Egg (room temperature): Acts as a crucial binding agent, providing essential moisture and structural integrity to the pastry. Using a room temperature egg ensures better emulsification with the other ingredients, leading to a more cohesive dough.
- Dry Ingredients:
- Almond Meal (or Almond Flour): A key ingredient that imparts a wonderful nutty flavor, enhances the pastry’s tenderness, and contributes to its slightly crumbly texture. It also plays a role in inhibiting excessive gluten development, resulting in a more delicate and short pastry. If almond meal is unavailable, you can substitute it with an equal quantity of plain (all-purpose) flour, though this will slightly alter the final texture and nutty flavor.
- Plain / All-Purpose Flour: Serves as the primary structural component of the pastry, providing the necessary body and foundation.
- Fine Salt: A small pinch of fine salt is incredibly important. It’s a flavor enhancer, crucial for balancing the sweetness, and rounding out the overall taste profile of the pastry, preventing it from tasting flat.
For the Passion Fruit Crémeux Filling:
- Passion Fruit Pulp or Puree: This is undeniably the star ingredient, delivering the tart’s signature vibrant tropical tang and aromatic profile. You can either scoop out the fresh pulp directly from ripened passion fruits, optionally including the seeds for a delightful textural crunch, or use a high-quality seedless purée for an impeccably smooth filling. It’s important to note that passion fruit pulp is naturally thicker and more concentrated than juice, contributing a richer and more intense flavor.
- Egg Yolks: These are indispensable for the crémeux’s luxurious richness, its beautiful golden color, and its thickening properties. This recipe specifically calls for only the yolks, leaving you with leftover egg whites, which can be wonderfully repurposed for the optional Swiss meringue topping or other delicious treats like delicate Financiers Cakes.
- Caster Sugar: Provides the necessary sweetness to balance the intense tartness of the passion fruit. Caster sugar, with its fine granules, dissolves easily and smoothly, ensuring a perfectly uniform custard.
- Gelatin: Functions as a vital stabilizer, imparting the crémeux with its desirable firm yet melt-in-your-mouth, creamy consistency. I typically use powdered gelatin, which is first “bloomed” by dissolving it in a small amount of very cold water. If you prefer using platinum strength gelatin sheets, typically 1.5 to 2 leaves (depending on their specific strength) will be equivalent to the powdered amount specified. Proper blooming and complete dissolution are critical for a lump-free and evenly set crémeux.
- Unsalted Butter (cubed, room temperature): Incorporated at a precise temperature, the butter emulsifies with the custard base, adding an incredible richness, a luxurious silky mouthfeel, and a beautiful glossy finish to the crémeux. It is absolutely vital that the butter is at true room temperature – neither too soft (which can lead to an oily separation) nor too cold (which will prevent proper emulsification) – to ensure a perfect, stable emulsion.
Optional Additions: Elevate Your Passion Fruit Tart
To truly transform this already delicious dessert into an even more spectacular and memorable creation, I highly recommend considering a topping. I frequently use the leftover egg whites from preparing the crémeux to create a glorious Swiss Meringue. This beautiful cloud of toasted sweetness not only adds another exquisite layer of texture and flavor but also contributes a stunning visual element that commands attention. Swiss Meringue is surprisingly straightforward to make, requiring just egg whites, caster sugar, and a mere pinch of salt. For a final, elegant flourish, a few fresh mint leaves can add a vibrant pop of color and an aromatic hint, making your tart even more enticing and visually appealing.
Step-by-Step Guide: Crafting Your Perfect French Passion Fruit Tart
Follow these meticulously detailed steps to create a flawless French Passion Fruit Tart that will undoubtedly impress everyone who tastes it. Precision in each stage ensures a professional-quality result.
Making the Pâte Sucrée: The Foundational Crust
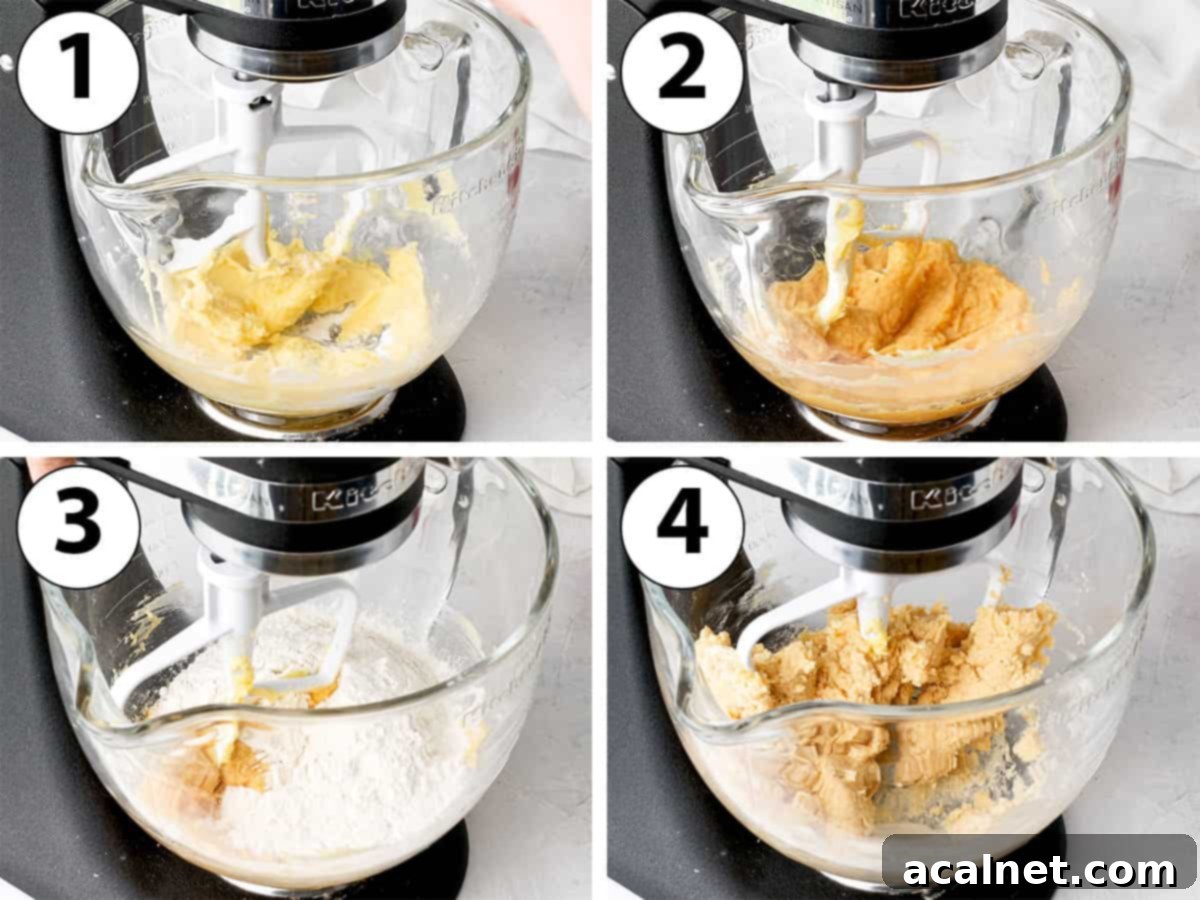
Preparing the Pâte Sucrée Dough:
- Photo 1: Begin by placing the very soft unsalted butter and finely sifted icing sugar into the bowl of a stand mixer fitted with the paddle attachment. Alternatively, use an electric hand mixer in a large mixing bowl. Mix on medium speed for a couple of minutes until the mixture is beautifully smooth, light, and creamy. Remember to pause and regularly scrape down the sides and bottom of the bowl with a spatula to ensure all ingredients are thoroughly and evenly combined.
- Photo 2: Next, add the room temperature egg and the almond meal to the butter-sugar mixture. Continue mixing until these ingredients are well incorporated, stopping to scrape the side of the bowl when required. At this stage, you should achieve a thick, slightly lumpy yet homogeneous mixture.
- Photo 3: Introduce the sifted plain (all-purpose) flour and the pinch of fine salt to the bowl.
- Photo 4: Mix on a low speed, being extremely careful to stop as soon as the dry ingredients are just combined and a rough dough comes together. It is absolutely crucial to avoid overmixing the pastry at this stage, as excessive mixing can develop too much gluten. This would result in a tough, chewy crust rather than the desired delicate and crumbly Pâte Sucrée, making it significantly more challenging to work with later on.
Optional but Highly Recommended “Fraisage” Technique for Professional Smoothness: To ensure a perfectly smooth and uniform dough consistency, you can perform a classic French technique known as “fraisage” (or “frasage”). This involves gently pressing small portions of the rough dough against your clean kitchen counter with the palm of your hand, moving it forward to smear it, then gathering it back to the center. Repeat this process a few times until the dough achieves a very smooth, supple, and consistent texture. This step helps to evenly distribute the butter throughout the dough without overworking it and developing excess gluten.
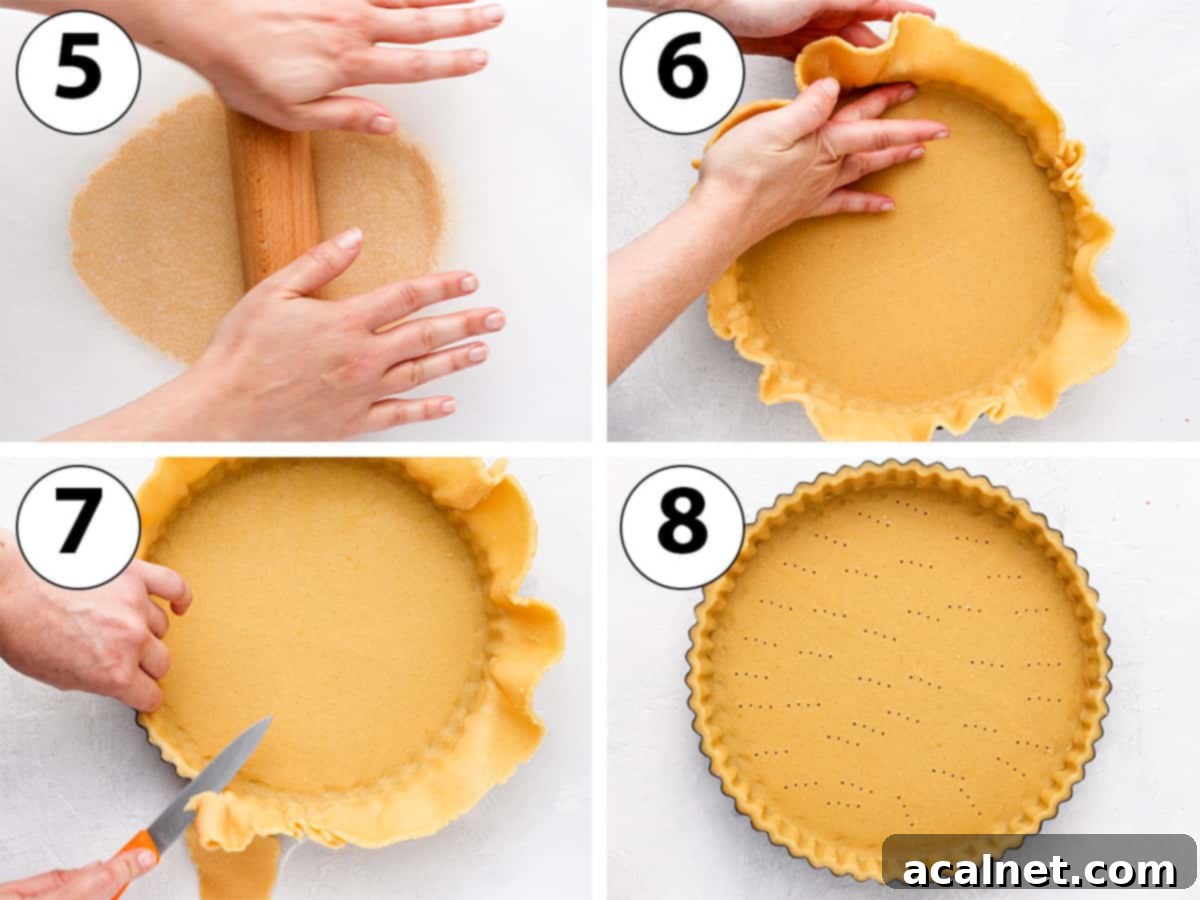
Rolling the Dough & Lining the Tart Pan:
- Gather the finished pastry dough into a cohesive ball and gently flatten it into a disc. Place this disc between two large sheets of baking paper (parchment paper).
- Photo 5: Using a rolling pin, roll the pastry evenly to a thickness of approximately 4 mm (about 1/6 inch). Achieving a consistent thickness is paramount for ensuring the tart crust bakes evenly. Transfer the flat, rolled pastry, still sandwiched between the parchment paper, onto a large baking sheet and chill it thoroughly in the refrigerator for at least 1 hour, or ideally up to 24 hours. This initial chilling period is absolutely essential to relax the gluten and prevent the pastry from shrinking excessively during baking.
Pro Baker’s Tip: For flawlessly even pastry thickness every single time, consider investing in a rolling pin equipped with adjustable thickness rings. It’s a small tool that makes a huge difference, ensuring your tart crusts are perfectly uniform!
- Photo 6: Once adequately chilled, carefully remove one sheet of baking paper and gently invert the pastry over a 24 cm (9.5-inch) tart tin. Using a tart tin with a removable bottom is highly recommended as it greatly simplifies the demolding process. Gently press the pastry down into the corners of the tart tin, ensuring it forms a crisp 90-degree angle between the bottom and the sides. Do not fret if the pastry cracks during this process; Pâte Sucrée is remarkably forgiving. Any tears or breaks can be easily patched up and smoothed over with your fingertips, using the warmth of your hands to meld the dough back together seamlessly.
Troubleshooting Pastry Handling & Consistency: If your pastry feels excessively hard and prone to cracking when you attempt to line the tart pan, it’s typically a sign that the dough is too cold. Allow it to rest at room temperature for a few minutes to soften slightly, making it more pliable and easier to handle. Conversely, if the dough becomes too soft, sticky, or difficult to manage, simply return it to the fridge for a short period until it firms up sufficiently to be workable again. Remember, the resilience of this dough means minor imperfections can always be easily corrected!
- Photo 7: Using a small paring knife, meticulously trim any excess pastry from the edges of the tart tin, creating a neat and clean finish. Place the lined tart pan back into the refrigerator to chill and rest for a minimum of 2 hours, or ideally overnight (up to 24 hours). This second, crucial chilling period is vital for further relaxing the gluten, which is the ultimate secret to preventing the crust from shrinking during the baking process and ensuring a perfectly sized tart.
- Photo 8: Preheat your oven to 160°C / 325°F. While the oven is preheating, “dock” the pastry by gently pricking the bottom of the tart shell all over with a fork. This essential step creates small vents, preventing air bubbles from forming underneath and puffing up the crust unevenly during baking. For an even better result, place the docked pastry in the freezer for a few minutes just before it goes into the oven – this quick chill helps it hold its pristine shape even more effectively.
- Bake the pastry for 30 to 40 minutes, or until it achieves a beautiful golden-brown color and feels completely dry to the touch. Once baked to perfection, carefully transfer the hot tart shell to a wire rack and allow it to cool down completely to room temperature before proceeding with the filling.
A note on blind baking: It is my consistent practice not to use baking beans, rice, or pie weights to blind bake this sweet shortcrust pastry. Experience has shown that as long as the pastry has been properly chilled and allowed to rest for the recommended durations, it will naturally hold its shape perfectly in the oven without any significant shrinkage or puffing up. Trust in the dough’s preparation!
Smart Baking Tip for a Leak-Proof Crust: To create a perfectly sealed bottom crust that acts as an impermeable barrier, preventing any of the luscious filling from seeping through, here’s a clever trick: remove the tart from the oven approximately 3 minutes before it’s fully baked. Lightly brush the bottom and inner sides of the crust with some of the remaining egg whites (from your crémeux preparation) and then return it to the oven to finish baking. This creates a thin, protective, and virtually waterproof layer.
Crafting the Luscious Passion Fruit Crémeux Filling
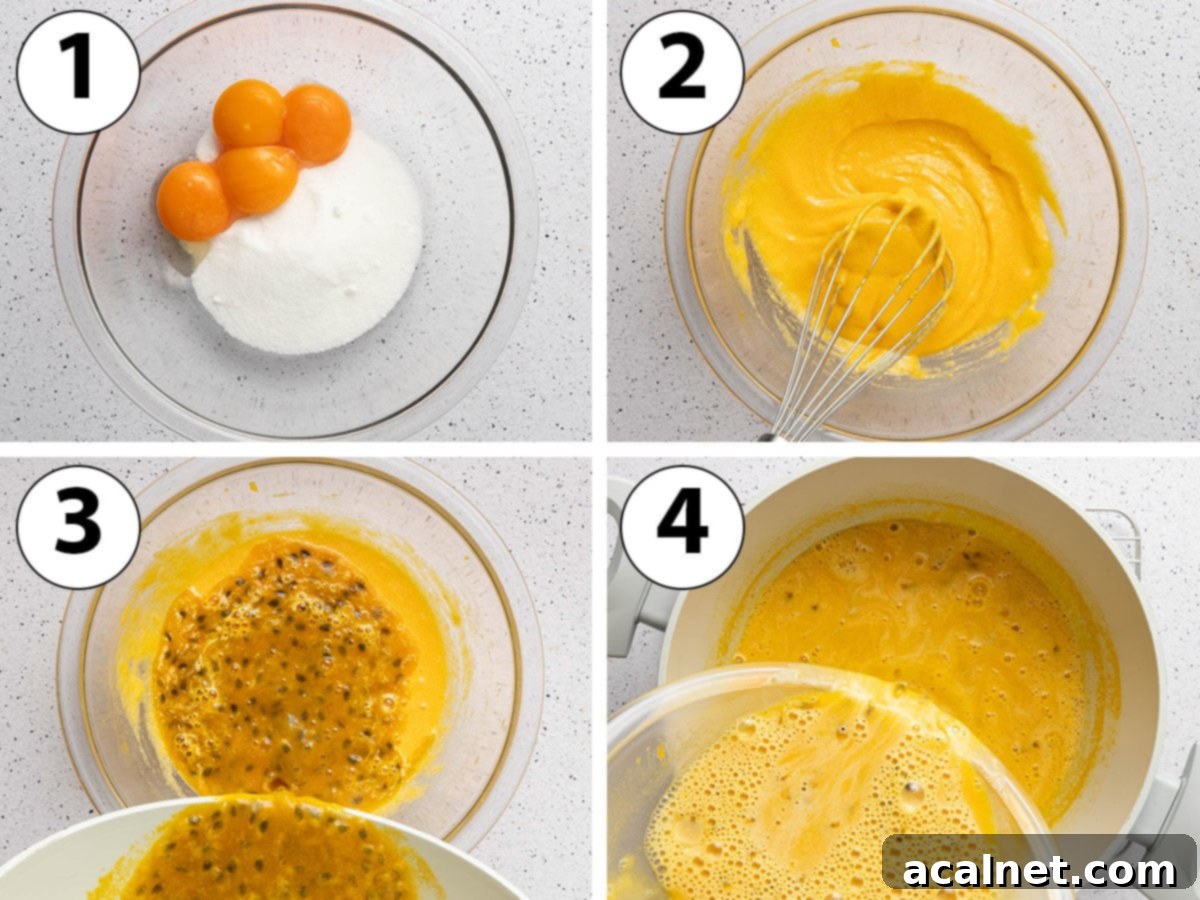
- Pour the passion fruit puree into a medium-sized saucepan. Place it over low to medium-low heat and gently bring it to a simmer, ensuring it does not come to a full rolling boil.
- Photo 1 & 2: In the meantime, in a large heatproof bowl, vigorously whisk together the egg yolks and caster sugar. Initially, the mixture will be quite thick and vibrant yellow, but it should gradually thin out, become pale, and attain a creamy consistency after approximately one minute of consistent whisking. This step helps dissolve the sugar and prepares the yolks for the tempering process.
- Photo 3: This is the crucial “tempering” step, designed to prevent your eggs from scrambling. Slowly, in a thin, steady stream, pour the hot passion fruit purée into the egg yolk and sugar mixture while continuously and vigorously whisking. This gradual addition incrementally raises the temperature of the eggs, gently acclimatizing them before they are exposed to more direct heat.
- Photo 4: Once the hot purée has been fully incorporated into the egg mixture, pour the entire combined mixture back into the same saucepan. Place it back on the stove over a low heat.
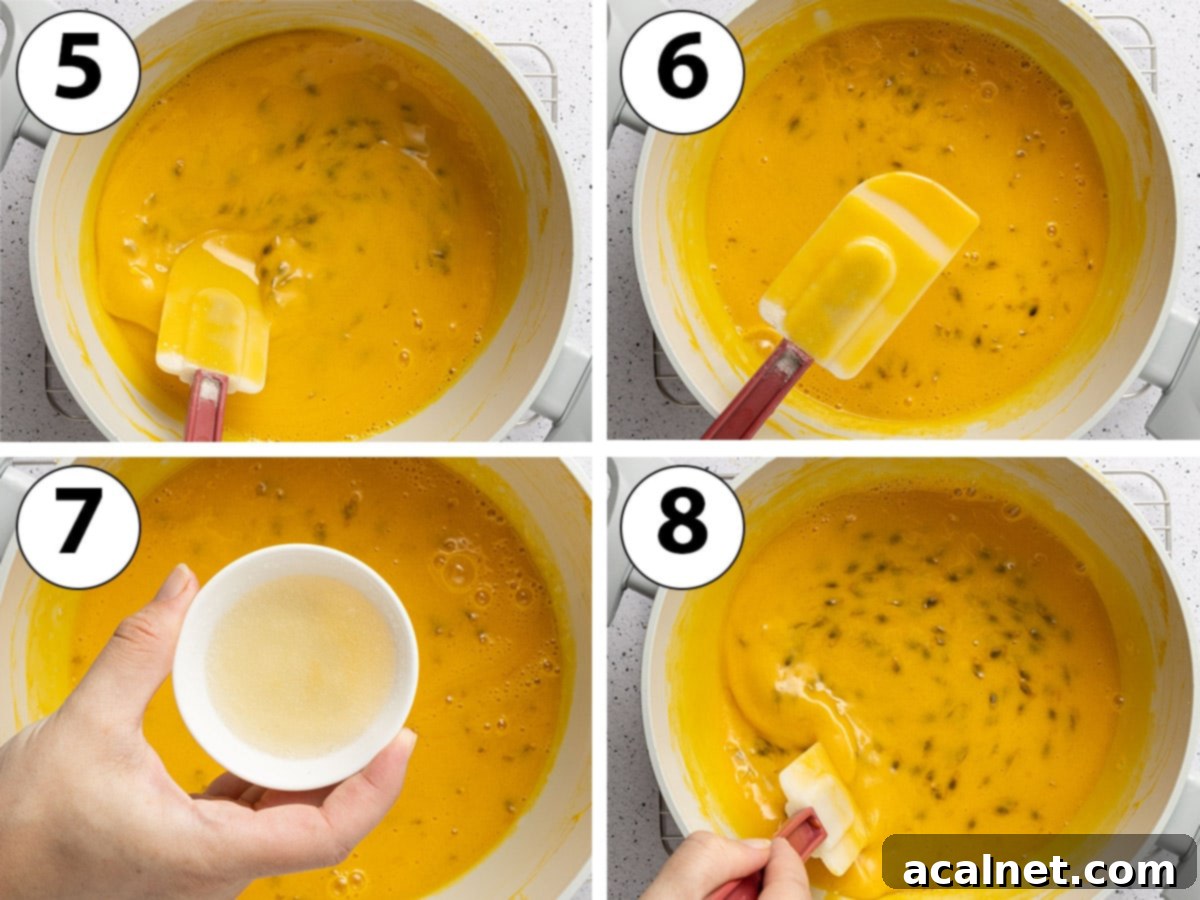
- Photo 5: Cook the mixture over consistently low heat, stirring continuously with a heatproof spatula or whisk, for approximately 5 minutes. During this time, the custard will gradually thicken to a light coating consistency. Be extremely vigilant and under no circumstances allow the mixture to boil, as a rapid increase in temperature will cause the egg yolks to curdle, resulting in a gritty and lumpy crémeux. The precise cooking time can fluctuate slightly based on your specific stove’s temperature and the size of your saucepan.
Checking for Perfect Doneness: There are two highly reliable methods to ensure your crème anglaise base is cooked to the ideal consistency and temperature:
- The Classic Spoon Test (Photo 6): Dip the back of a spoon into the custard until it’s evenly coated. Carefully draw a clear horizontal line across the spoon with your finger (exercise caution as it will be hot!). If the line holds its shape cleanly and the custard doesn’t immediately drip back into the gap, it indicates the custard is thick enough and ready. If it’s still runny and the line doesn’t hold, continue cooking for a short while longer, stirring constantly.
- The Precise Temperature Check: For a more accurate and foolproof method, utilize a reliable kitchen thermometer. The custard should reach a target temperature range of 82°C to 84°C (180°F to 184°F). Once this specific temperature is achieved, remove the saucepan from the heat immediately to prevent overcooking.
- Photo 7: In a small, separate bowl, combine the gelatin powder with a small amount of very cold water. Let it sit undisturbed for 2 to 3 minutes until it “blooms” and transforms into a thick, jelly-like paste. Immediately add this bloomed gelatin directly to the hot passion fruit cream (which you’ve just removed from the heat).
- Photo 8: Whisk vigorously and continuously until the gelatin is completely dissolved and thoroughly incorporated into the warm custard. This crucial step ensures an even and consistent set throughout your crémeux.
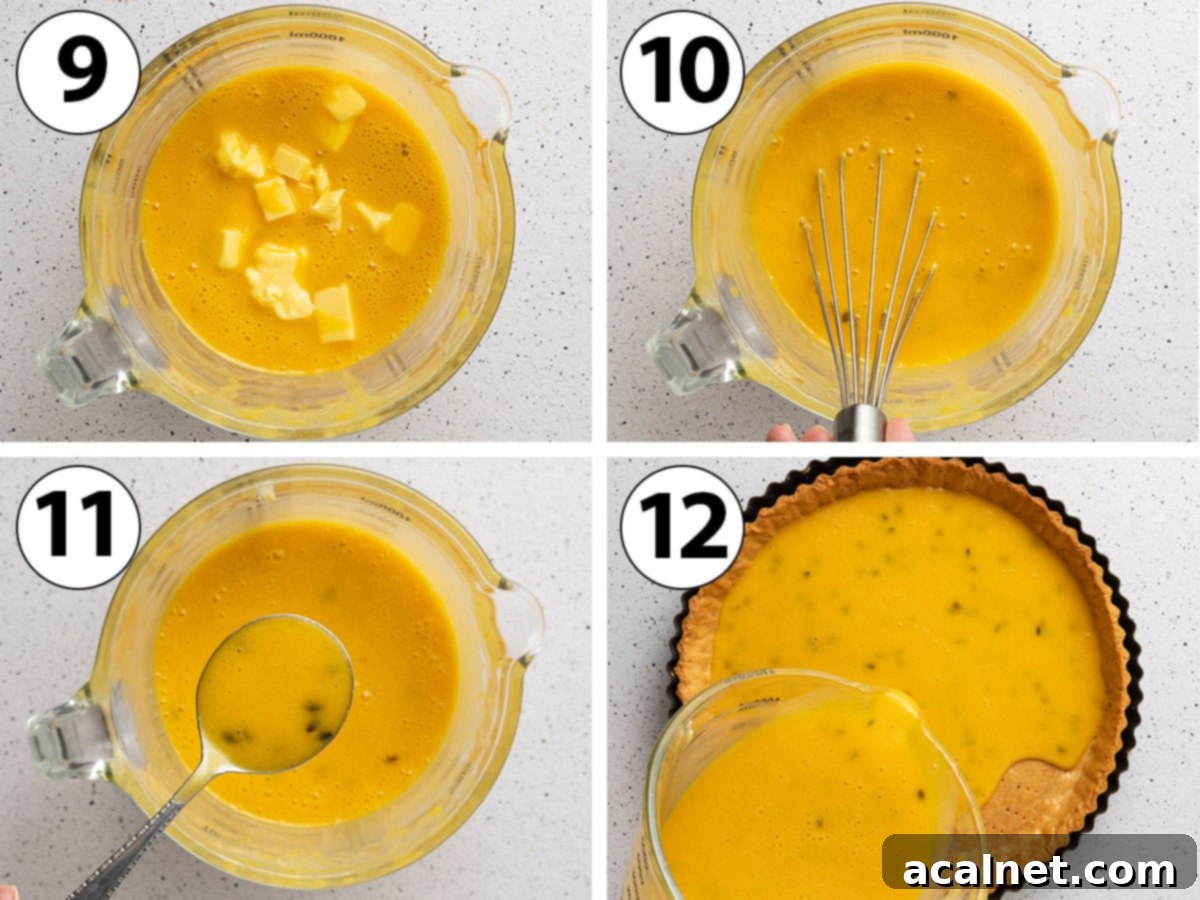
- Transfer the hot passion fruit mixture into a clean bowl or a large measuring jug for easier pouring. Set it aside and allow it to cool down gradually for 10 to 15 minutes, or until its temperature has dropped to approximately 40°C (105°F).
Crucial Step: The Perfect Butter Emulsification: It is absolutely imperative to allow the custard to cool to the specified temperature range before you begin adding the butter. If the custard is too hot when the butter is introduced, the butter will simply melt and separate from the mixture, rather than emulsify. This will result in a greasy, potentially split, or unpleasantly thin crémeux rather than a beautifully smooth, stable, and rich cream.
- Photo 9: Begin adding the soft, cubed unsalted butter into the lukewarm passion fruit custard, a small portion at a time.
- Photo 10: Whisk thoroughly after each addition until the butter is completely incorporated and the mixture appears smooth before you add the next batch. This gradual incorporation and thorough whisking are key to creating a stable emulsion.
- Photo 11: Continue this process diligently until all the butter has been successfully added and fully emulsified. At this point, you should have a rather fluid, but perfectly uniform, glossy, and beautifully emulsified mixture.
Pro-Grade Technique Tip: For the silkiest and smoothest crémeux possible, an immersion blender is typically the most effective tool for incorporating the butter into the lukewarm custard, creating a perfect emulsion. However, if you, like me, appreciate the delightful textural contrast of whole passion fruit seeds in your tart, I recommend performing this step by hand with a whisk to avoid crushing the seeds. If you’re using seedless passion fruit pulp, feel free to use an immersion blender for maximum smoothness and ease.
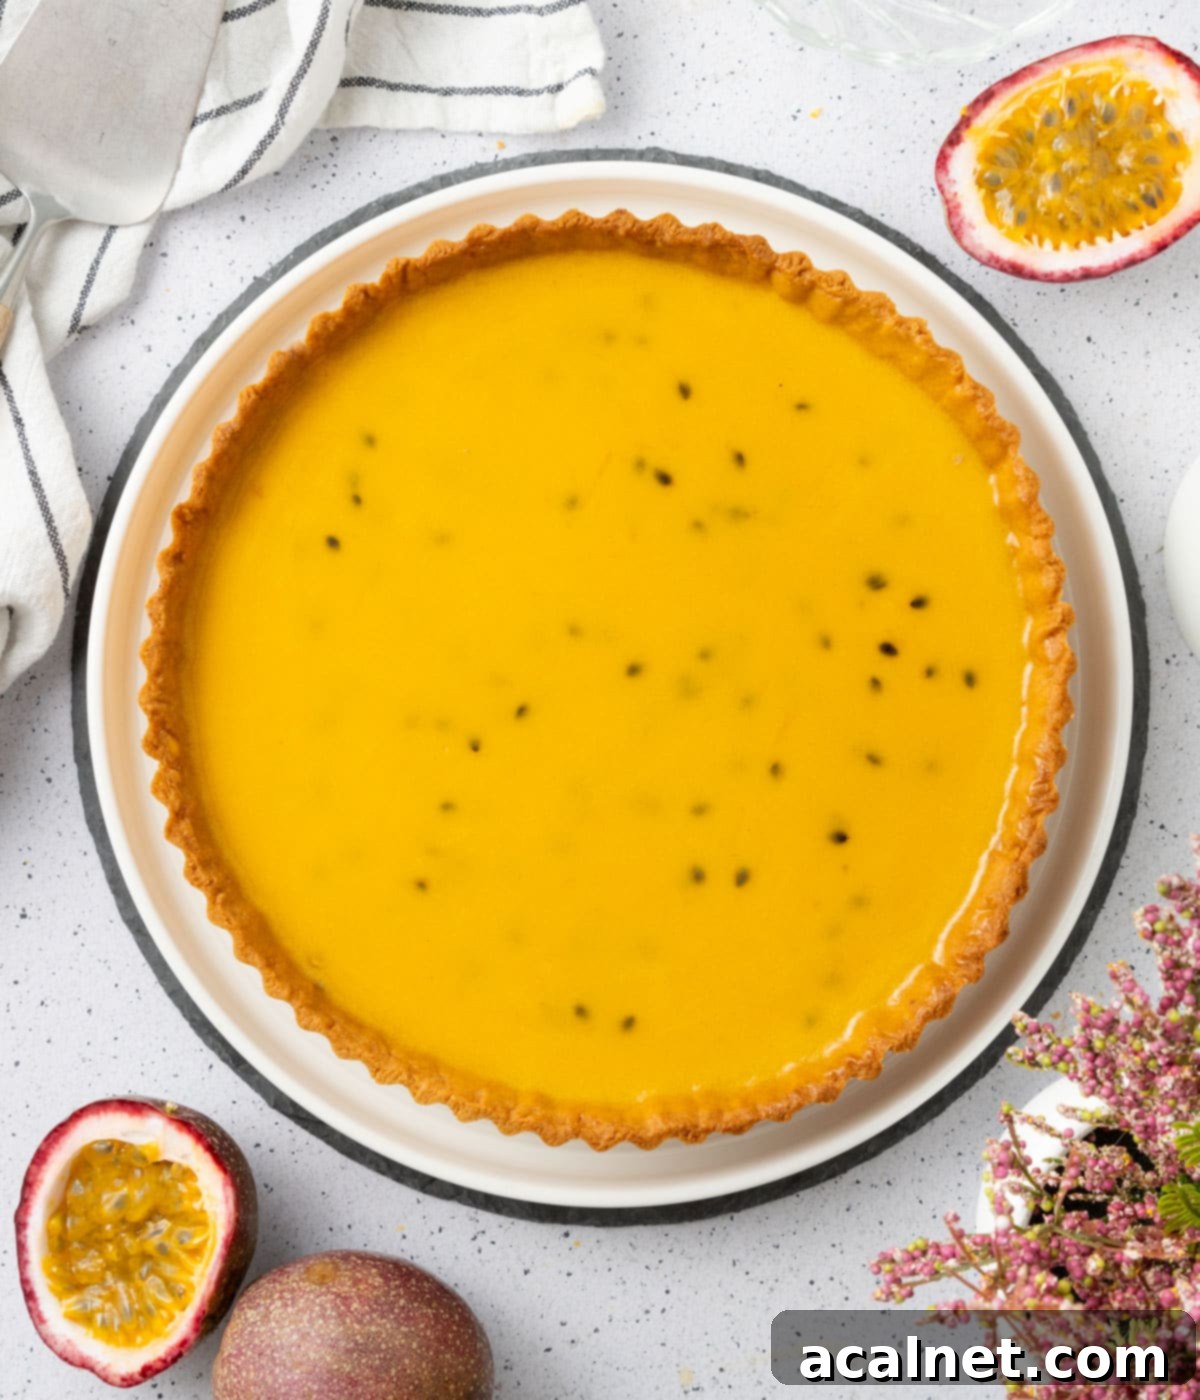
- Photo 12: Carefully pour the liquid passion fruit crémeux into your completely cooled and baked tart shell. Very gently tap the tart pan a few times on your counter surface to encourage any trapped air bubbles to rise and pop, ensuring a perfectly smooth and pristine surface. Transfer the tart to the refrigerator and allow it to chill and set for at least 3 to 4 hours, though preferably overnight, to achieve the ideal firm, yet creamy and sliceable consistency.
Your elegant French Passion Fruit Tart is now almost ready to be enjoyed in all its glory! For additional serving ideas and to enhance its gourmet appeal, you could drizzle it with a homemade Passion Fruit Coulis for an extra layer of concentrated fruit flavor, or elevate its sweetness and depth with a dollop of rich Passion Fruit Curd. Alternatively, a simple accompaniment of lightly sweetened Chantilly Cream (classic whipped cream) offers a wonderful, delicate counterpoint to the tartness of the passion fruit crémeux.
As mentioned, I frequently utilize the leftover egg whites from the crémeux preparation to create a luscious Swiss Meringue topping. This adds an incredible extra layer of texture, a beautiful visual contrast, and a delightful touch of caramelized sweetness to the tart.
Optional Swiss Meringue Topping for a Gourmet Finish
Adding a beautifully crafted Swiss Meringue topping transforms this already delightful tart into an even more impressive and visually stunning dessert. The Swiss method, known for its stability and silky texture, creates a glossy and sturdy meringue that is perfect for elegant piping and toasting.
To Make a Velvety Swiss Meringue:
- Begin by combining the egg whites, caster sugar, and a pinch of salt in a meticulously clean, heatproof bowl. Whisk them briefly by hand just until combined. Place this bowl over a double-boiler setup (a saucepan with about an inch or two of simmering water, ensuring the bottom of the bowl does not directly touch the water).
- Over medium heat, continuously whisk the mixture for a consistent 5 to 10 minutes. The objective is for the egg whites to gently cook and reach a temperature of 70°C (about 160°F). During this gradual heating and whisking, the mixture will visibly turn opaque white, thicken significantly, and noticeably increase in volume.
- To confirm the meringue is ready for whipping, take a small amount of the mixture and rub it carefully between your thumb and forefinger. You should no longer feel any discernible sugar grains; it should be perfectly smooth, indicating that the sugar has completely dissolved into the egg whites.
- Once the sugar is dissolved and the correct temperature is reached, immediately remove the bowl from the double-boiler. Using either a hand mixer or a stand mixer fitted with the whisk attachment, begin whipping the warm meringue on medium to high speed. Continue to whip the meringue vigorously until it cools completely, forms stiff, glossy peaks, and appears brilliantly white and incredibly fluffy.
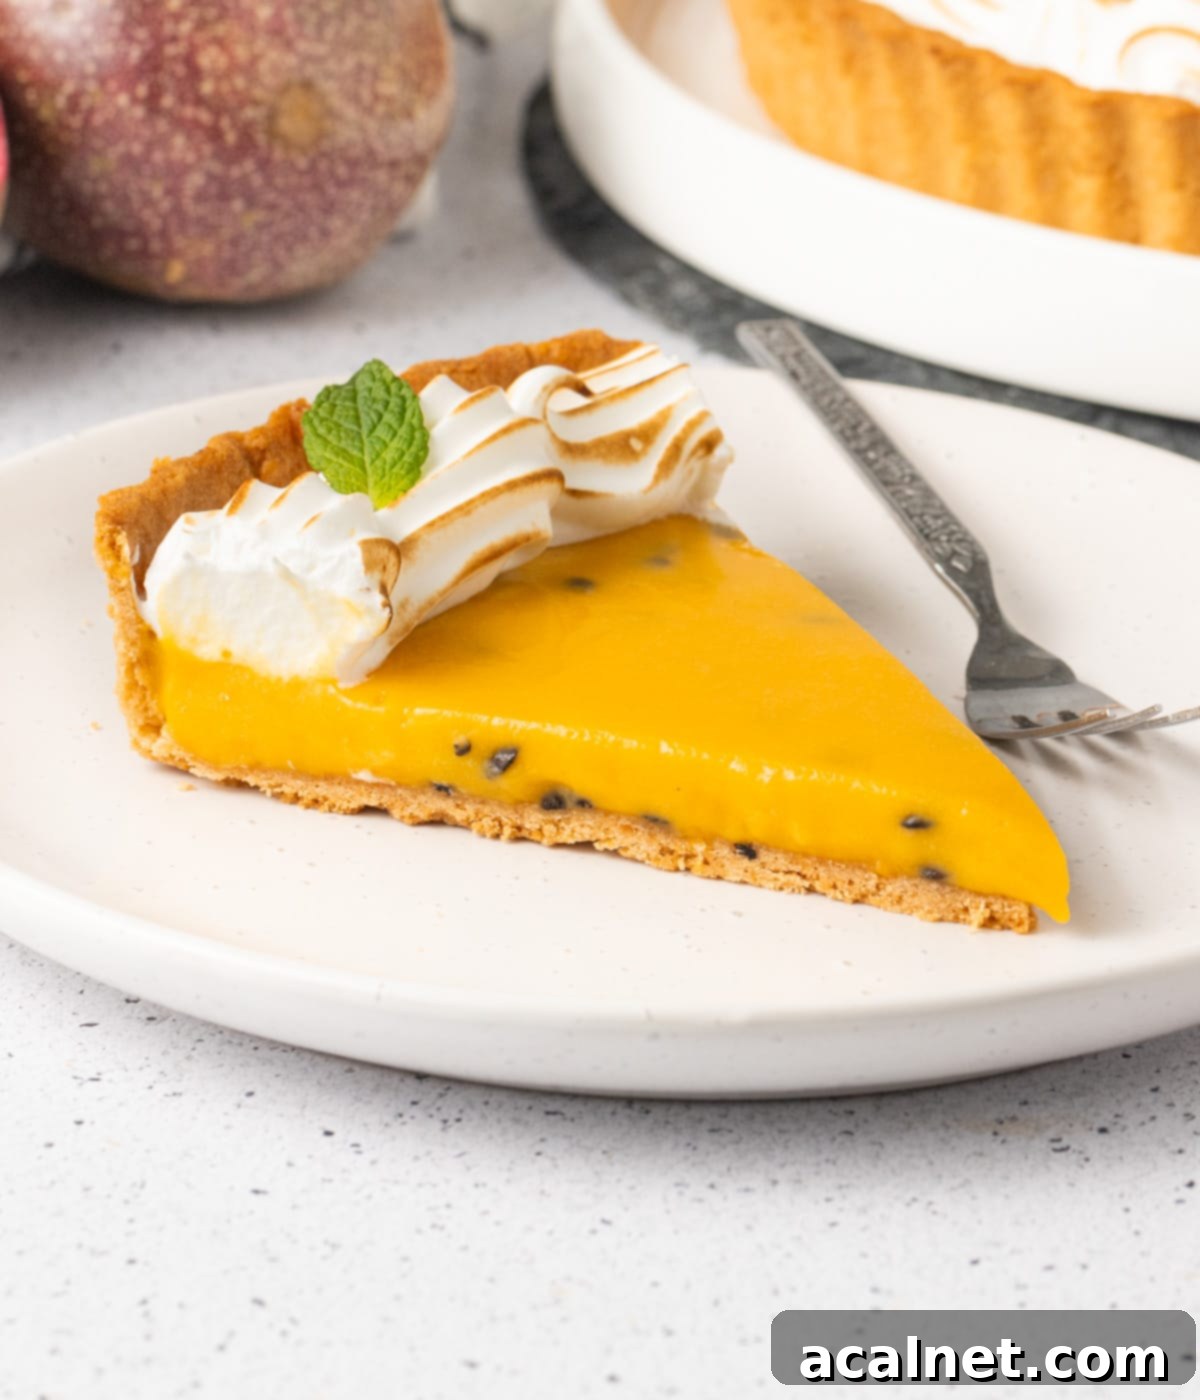
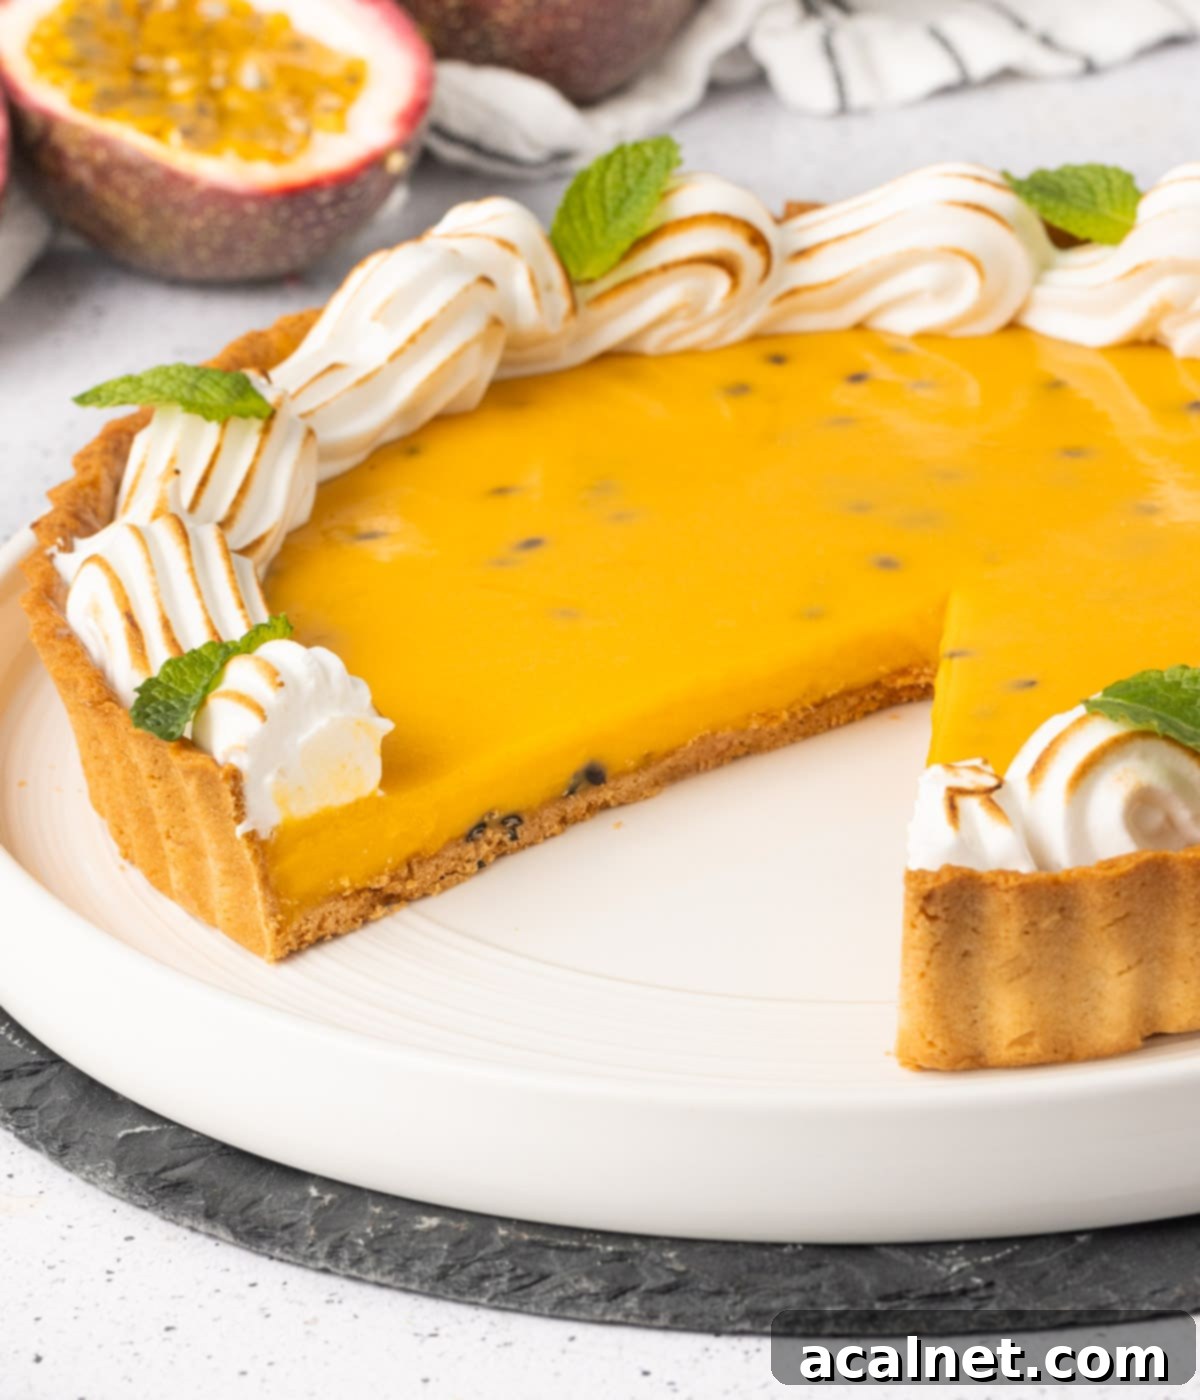
- Transfer the perfectly prepared Swiss meringue into a piping bag fitted with your desired star-shaped nozzle (or any decorative tip you prefer). Elegantly pipe the meringue over the thoroughly set passion fruit tart in your preferred pattern, creating beautiful swirls or peaks. For a dramatic and professional touch, use a kitchen blowtorch to lightly toast the meringue until it achieves appealing golden-brown tips (this step is optional but highly recommended for both flavor and visual appeal). If you prefer a more rustic or simple aesthetic, you can also just spread the meringue evenly over the tart using an offset spatula. Finish your masterpiece with a few sprigs of fresh mint for a final touch of color and a subtle aromatic contrast.
Frequently Asked Questions About Passion Fruit Tart
While a Pâte Sucrée crust is my absolute top recommendation for this recipe due to its superior texture, perfect level of sweetness, and satisfying crunch that beautifully complements the creamy, tangy filling, you certainly have alternatives. Pâte Sucrée is also inherently sturdy, ensuring your tart base won’t become soggy when filled. If you prefer, you could opt for a traditional shortcrust pastry, either by following my Pâte Sablée recipe, which offers a lovely delicate snap, or by utilizing a good quality store-bought shortcrust pastry for maximum convenience. Just be aware that the texture and overall culinary experience might differ slightly from the intended authentic French patisserie style.
Transforming this into a no-bake tart is quite straightforward, primarily because the vibrant passion fruit crémeux filling itself doesn’t require any baking in the oven. The simplest and most effective way to achieve a no-bake version is to substitute the baked Pâte Sucrée shell with your favorite no-bake pie crust. Popular and delicious options include a classic crushed digestive biscuit (graham cracker) crust mixed with melted butter, or a flavorful nut-based crust. The key is to ensure your chosen no-bake crust is firm enough to adequately hold the creamy filling once it’s thoroughly chilled. This modification makes it an ideal dessert for warmer weather, or when oven access or time is limited.
Absolutely, and this is often the most practical and convenient approach! Using frozen passion fruit purée or pulp is not only perfectly acceptable but often the easiest way to make this exquisite tart. In fact, it allows you to savor this delightful tropical dessert all year round, regardless of whether fresh passion fruits are in season or readily available. Simply ensure you thaw the frozen pulp or purée thoroughly in the refrigerator overnight, or gently on the stovetop over low heat, before proceeding with the recipe. The intense flavor and ideal consistency will remain excellent, delivering that signature tropical zest.
I strongly advise against using canned passion fruit syrup for this particular recipe. Canned syrups are typically heavily sweetened with added sugars and often contain artificial flavors or preservatives, which will drastically alter the delicate and authentic taste profile of your tart. The high sugar content of such syrups would significantly throw off the finely balanced ratio of sweetness and tanginess in the passion fruit crémeux, diminishing its natural vibrancy. Furthermore, the texture of the cream filling would likely be compromised, potentially becoming too thin, overly sweet, or lacking the desired richness. For the very best and most authentic results, always stick to fresh or good-quality frozen passion fruit pulp/purée to achieve that genuine, vibrant tropical flavor.
Expert Tips & Troubleshooting for a Perfect Passion Fruit Tart
Achieving a flawless and delicious French Passion Fruit Tart is made considerably easier with these expert tips and solutions to common baking challenges. Keep these in mind to ensure your tart turns out perfectly every time:
- Passion Fruit Seeds: To Keep or Not to Keep? This is entirely a matter of personal preference and desired texture! I personally adore the slight, delightful textural crunch that the small, edible passion fruit seeds add to the creamy filling. They also enhance the visual appeal, giving a homemade tart a more rustic and authentic look. However, if you prefer a completely smooth crémeux, simply pass the passion fruit pulp through a fine-mesh sieve to remove all the seeds before incorporating it into your custard base. Both options yield a delicious result.
- Adjusting Sweetness Levels: This recipe is thoughtfully crafted to highlight the bright, invigorating, and naturally tangy flavor of passion fruit, resulting in a crémeux that is relatively low in added sugar. If you have a sweeter tooth or simply prefer a less intense tang, you can absolutely increase the sugar quantity. The ideal time to make this adjustment is after the crémeux has finished cooking on the stove but before you add the gelatin and butter. At this point, taste the warm custard, and add more caster sugar, a tablespoon at a time, whisking until it fully dissolves and suits your preferred level of sweetness. Remember the golden rule: you can always add more sweetness, but you cannot take it away!
- My Tart Crust is Breaking or Too Soft to Line the Pan: The excellent news is that Pâte Sucrée is an incredibly forgiving pastry dough. If your tart crust is breaking excessively or feels too stiff to line the tart pan smoothly, it’s usually a clear indication that the dough is too cold. Allow it to sit at room temperature for a few minutes (5-10 minutes) to allow it to soften just enough, making it more pliable and cooperative. Conversely, if the dough becomes too soft, sticky, or difficult to handle, simply pop it back into the fridge for a short period (10-15 minutes) to firm up again. Even if it cracks or tears significantly during handling, do not despair! Simply use the warmth of your fingertips to gently press the dough back together, smoothing out any imperfections – it will bake up beautifully and seamlessly.
- The Passion Fruit Crémeux is Gritty or Lumpy: If your crémeux turns out with an undesirable gritty or lumpy texture, the most common culprit is overcooking the custard base. This can cause the delicate egg yolks to scramble, creating small cooked bits. To meticulously prevent this, always cook the crémeux over consistently low heat and, crucially, never allow it to come to a rolling boil. For professional-level precision and peace of mind, using a reliable kitchen thermometer to monitor the custard’s temperature (aiming for 82-84°C or 180-184°F) is highly recommended. If, despite your best efforts, you do encounter any small lumps, you can salvage the crémeux by straining it through a fine-mesh sieve immediately after cooking and before adding the gelatin and butter.
- My Filling Isn’t Setting: A properly made passion fruit crémeux requires a significant chilling period to fully set into its creamy, yet sliceable and firm consistency. If, after several hours in the refrigerator, your filling is still liquid or unacceptably soft, it likely indicates one of two issues: either you did not use a sufficient quantity of gelatin as specified in the recipe, or the gelatin wasn’t thoroughly mixed in or melted properly into the warm custard. Double-check your gelatin measurements and ensure it is fully bloomed and completely dissolved before incorporating the butter. Patience during the chilling phase is also key!
Storing & Freezing Your Passion Fruit Tart
To ensure your exquisite French Passion Fruit Tart remains at its very best, proper storage techniques are essential for maintaining its freshness, texture, and vibrant flavor.
- Refrigeration Storage: This delightful passion fruit tart should always be stored in the refrigerator. While it is undeniably best enjoyed within 24 hours of assembly for optimal freshness and texture, it will remain perfectly delicious and safe to eat for up to 3 days when properly refrigerated. To prevent it from drying out or absorbing any undesirable odors from the fridge, ensure it is covered loosely with plastic wrap or placed under a cake dome.
- Meringue Topping Considerations: If you choose to enhance your tart with the optional Swiss Meringue topping, I highly recommend piping and toasting it as close to the time of serving as practically possible. Meringue, and Swiss Meringue in particular, has a natural tendency to “weep” (release moisture) or become sticky and soften when exposed to the humid environment of a refrigerator for extended periods. For the freshest appearance and a perfectly crisp, toasted texture, apply the meringue just before you plan to present and serve the tart.
- Freezing Recommendations: I generally do not recommend freezing the fully assembled passion fruit tart. The delicate, creamy texture of the crémeux and the intricate structure of the meringue (if used) can be negatively affected by the freezing and thawing process. This can potentially lead to a watery, grainy, or otherwise compromised filling. However, the Pâte Sucrée crust itself is exceptionally freezer-friendly! You can prepare the tart crust in advance and freeze it either raw (rolled flat between two sheets of baking paper or already lined in the tart pan) or once it has been fully baked. If freezing a baked crust, ensure it is completely cooled to room temperature, then wrap it meticulously and tightly in plastic wrap and/or aluminum foil to prevent any freezer burn. When ready to use, thaw it thoroughly in the refrigerator before filling.
Serving Suggestions & Delightful Variations
While this French Passion Fruit Tart is an absolute star on its own, there are numerous ways to serve it to enhance its appeal and delightful variations you can explore to make it uniquely yours:
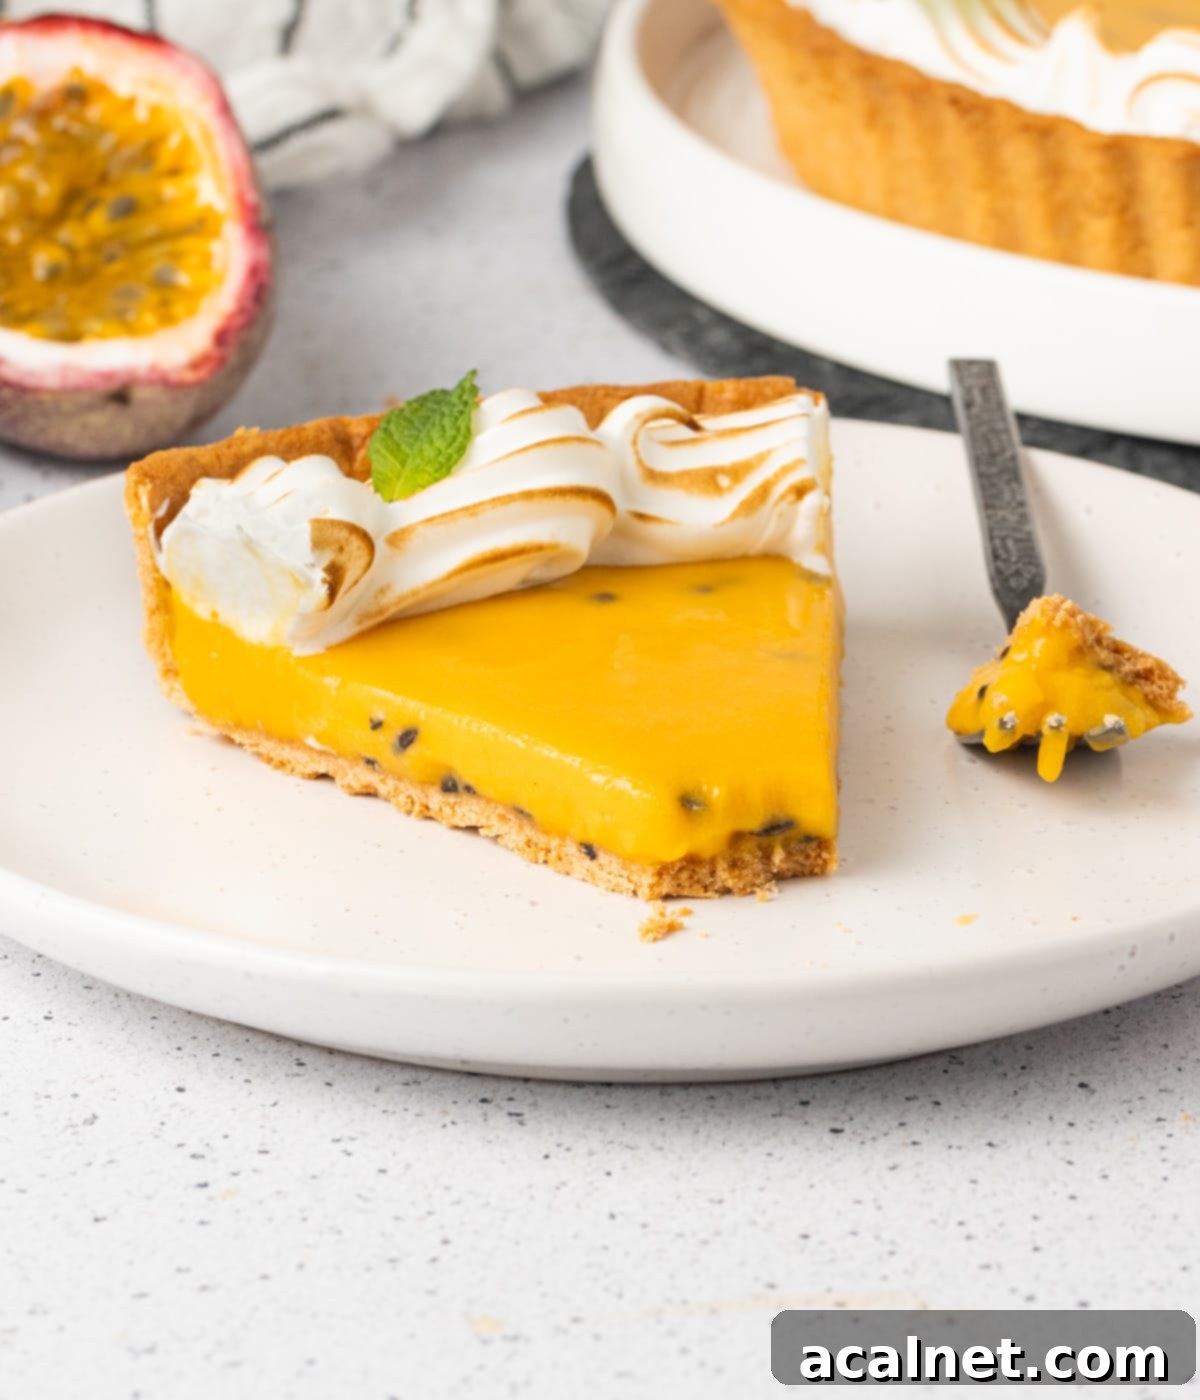
- Classic French Plating: For a sophisticated presentation, serve a single slice on a pristine white plate, perhaps with a delicate dusting of icing sugar. The vibrant yellow of the crémeux contrasted with the golden crust is often beautiful enough to stand alone.
- Fresh Fruit Garnish: Elevate the freshness and visual appeal with a few fresh passion fruit halves, a scattering of colorful berries (such as raspberries or blueberries), or a medley of both. Fresh mint leaves also provide a lovely contrasting green hue and an aromatic hint.
- Chantilly Cream Companion: A generous dollop of lightly sweetened Chantilly Cream (classic whipped cream with a whisper of vanilla) offers a smooth, ethereal, and delicate counterpoint to the invigorating tartness of the passion fruit.
- Extra Passion Fruit Intensity with Coulis: For those who simply can’t get enough passion fruit flavor, consider drizzling a homemade passion fruit coulis over each slice just before serving. This adds an extra layer of concentrated fruit essence and a beautiful, glossy sheen.
- Tropical Coconut Twist: To introduce an additional layer of tropical flavor, consider incorporating a subtle hint of coconut extract into your Pâte Sucrée dough or, for a textural element, sprinkling beautifully toasted coconut flakes over the finished tart as a garnish.
- Subtle Chocolate Pairing: For a truly decadent yet balanced variation, spread a very thin layer of high-quality white chocolate ganache over the baked and cooled tart crust before adding the passion fruit crémeux. This adds a delightful, subtle sweetness and another dimension of flavor that harmonizes wonderfully with the tart fruit.
More Exquisite Tart Recipes to Explore
If you’ve thoroughly enjoyed the process of mastering this French Passion Fruit Tart and are eager to expand your patisserie repertoire, you might love exploring other exquisite French tart recipes from our extensive collection:
- Pear Frangipane Tart: A classic, comforting French dessert featuring tender pears atop a rich almond cream.
- Chocolate Ganache Tart: The ultimate indulgence for any serious chocolate lover, with a smooth, dark, and intensely flavored filling.
- Apricot Frangipane Tart: A delightful creation showcasing sweet, juicy apricots baked atop a fragrant almond frangipane.
- Raspberry Tart: A vibrant, fresh, and irresistibly elegant tart, always a guaranteed crowd-pleaser with its beautiful color and tangy berries.
- Apple Frangipane Tart: A rustic yet sophisticated combination of tender spiced apples and a luscious almond cream, perfect for any season.
- Chocolate Raspberry Tart: The perfect pairing of rich, decadent chocolate and bright, tart raspberries, creating a harmonious flavor profile.
- Parisian Flan: A deceptively simple yet incredibly sophisticated baked custard tart, known for its smooth texture and subtle vanilla notes.
- Strawberry Custard Tart: A delightful treat featuring fresh, ripe strawberries nestled over a creamy, velvety vanilla custard.
I am so excited to share that my debut cookbook
“Bite-Sized French Pastries for the Beginner Baker”
is now available for purchase!

Recipe

Passion Fruit Tart
Print Recipe
Ingredients
Pâte Sucrée Pastry
- 100 gr Unsalted Butter, very soft, at room temperature
- 50 gr Icing Sugar
- 1 large Egg, at room temperature
- 40 gr Almond Meal
- 200 gr Plain / All-Purpose Flour
- 1 pinch Fine Table Salt
Passion Fruit Crémeux
- 300 gr Passion Fruit Pulp or Purée
- 4 large Egg Yolks, at room temperature (approx 80 grams)
- 120 gr Caster Sugar
- 5 gr (1 1/2 teaspoon ) Gelatin Powder, plus 1 tablespoon cold water
- 120 gr Unsalted Butter, cubed, at room temperature
Meringue Topping (optional)
- 2 large Egg Whites, (approx 60 grams)
- 60 gr Caster Sugar
- 1 pinch Fine Table Salt
Instructions
Pâte Sucrée Pastry
- Place the very soft unsalted butter and sifted icing sugar in the bowl of a stand mixer fitted with the paddle attachment. Mix on medium speed for a couple of minutes or until completely smooth. Scrape the bowl with a spatula if / when required.
- Add the egg and almond meal. Mix until well combined, stopping to scrape the side of the bowl when required.
- Add sifted flour and salt. Mix on low speed, stopping as soon as a rough dough comes together (see note 1).
- Bring the pastry together and place it between two large sheets of baking paper / parchment paper. Slightly press on the pastry ball to flatten it. Roll the pastry to a thickness of about 4 mm or 1/6 inch (see note 2). Place the flat pastry on a large baking sheet and chill for at least 1 hour (or up to 24 hours).
- Remove the baking paper and place the pastry over a 24 cm (9,5-inch) tart tin with removable bottom. Gently press the pastry down into the corner of the tart tin to create a 90 degree angle (see note 3).
- Cut off any excess pastry with a small pairing knife. Place back in the fridge to chill and rest for at least 2 hour, preferably overnight (or for up to 24 hours).
- Preheat your oven on 160 degree Celsius / 325 degree Fahrenheit. Dock the pastry (prick the bottom of the pastry with a fork) and place the pastry in the freezer while the oven is preheating. Bake for 30 to 40 minutes or until the pastry is golden and feels dry to the touch (see note 4). Place on a wire rack and leave to cool down completely.
Passion Fruit Crémeux
- Place the passion fruit puree in a medium saucepan. Turn on low to medium-low heat and bring to a simmer.
- In the meantime, whisk together the egg yolks and sugar in a large heatproof bowl. Slowly pour the hot passion fruit over the egg/sugar mixture while continuously whisking. Pour the whole mixture back in the saucepan.
- Place back on the stove over a low-heat. Continuously stir with a heatproof spatula or whisk for about 5 minutes, or until the custard mixture has slightly thickened (see note 5). Remove from the heat.
- In a small bowl, mix the gelatine powder with a little bit of very cold water. Once it has solidified into a thick paste (2 to 3 minutes), add it to the hot passion fruit custard. Whisk well until the gelatine has completely melted.
- Transfer the mixture into a clean bowl or large jug. Leave to cool down for 10 to 15 minutes, or until the temperature of the custard has dropped to about 40 degrees Celsius (105 degrees Fahrenheit) (see note 6).
- Add the soft butter cubes into the passion fruit custard a little bit at a time, whisk well until the butter has been completely incorporated before adding more.
- Once all the butter has been incorporated, pour the liquid passion fruit crémeux into the baked tart shell. Very gently tap the pan to pop any air bubbles. Place in the fridge for at least 3 to 4 hours (preferably overnight) or until the filling has set.
Meringue Topping (optional)
- Place the egg whites, caster sugar and salt in a heat-proof bowl. Whisk to combine then place over a double-boiler. On a medium heat, continuously whisk for 5 to 10 minutes or until the egg whites have reached the temperature of 70 degrees Celsius (about 160 degrees Fahrenheit). The mixture should have turned white, thickened and increased in size (see note 7).
- Remove the bowl from the double-boiler and whip on medium to high speed, either using a hand mixer or a stand mixer fitted with the whisk attachment. Continue to whip until you reach stiff peaks and the meringue is glossy and fluffy.
- Transfer the Swiss meringue into a piping bag fitted with a star-shaped nozzle. Piped over the set passion fruit tart in your preferred pattern then use a kitchen blowtorch to toast the meringue (optional). You can also just spread the meringue straight onto the tart if you don’t want to pipe it. Finish with a few leaves of fresh mint (optional).
Would you like to save this recipe?
We’ll email this post to you, so you can come back to it later!
Notes
- You want to avoid mixing the pastry for too long or it will develop too much gluten, making it hard to work with later on. Optionally at this stage, you can do a “fraisage” (or “frasage”) to finish combining the pastry. With the palm of your hand, gently press the dough against your kitchen table and move it forward. Pick it back up and place back over the centre of the pastry. Keep on going until the dough is very smooth.
- To get a perfect, even thickness, use a rolling pin with thickness rings.
- If the pastry is too hard to be handled (cracks quickly, is too stiff), leave it at room temperature for a few minutes to let it soften a bit. If it gets too soft, place back in the fridge for a few minutes. This pastry is very forgiving so even if it cracks or breaks, you can simply use the warmth of your fingers to put it back together!
- I do not use beans, rice or baking weights to bake the pastry. As long as it has been properly chilled and rested, it will not move in the oven.
- The exact time can vary based on the exact temperature of your stove and the size of your pan. Make sure not to let the mixture boil or the egg yolks might curdle and turn the crémeux lumpy. There are two ways to check that the crème anglaise base is properly cooked:
– Coat the back of a spoon with the custard. Carefully draw an horizontal line (it will be hot) and tip the spoon down. If the line stays clear, the custard is thick enough and ready to be used.– Use a thermometer to check that the cream has reached the temperature of 82 to 84 degree celsius (180 to 184 degree Fahrenheit).
- It is very important to let the custard cool down before you add the butter. If too hot, the butter will melt into the custard (rather than emulsify) which could make the whole mixture split or look greasy.
- If you rub some of the mixture between your fingers, you shouldn’t feel any grains of sugar anymore; it should have completely melted into the egg whites.
Nutrition (per serving)
