Decadent Mini Chocolate Caramel Tarts: Your Guide to Irresistible Homemade Delights
Prepare to fall in love with these utterly decadent Mini Caramel Chocolate Tarts! This recipe guides you through crafting delicate homemade tartlet shells, filling them with a luscious, gooey salted caramel, and topping them with an intensely rich dark chocolate ganache. The perfect blend of sweet and salty, rich and tender, these bite-sized treats are guaranteed to be the star of any party, afternoon tea, or special celebration. Get ready to impress with this show-stopping dessert that’s surprisingly fun to make!

[feast_advanced_jump_to]
Why You’ll Adore This Mini Chocolate Caramel Tart Recipe
If you’ve ever dreamt of taking your beloved Salted Caramel Tartlets to a whole new level of indulgence, then these Mini Chocolate Caramel Tarts are your answer! Each bite offers an exquisite symphony of textures and flavors: a perfectly buttery, crisp tart crust, a deeply satisfying gooey salted caramel filling, and a luxurious, rich dark chocolate ganache topping. It’s a combination that truly sings!
Beyond their incredible taste, these mini tarts are a delight to make and an absolute joy to share. They are ideally sized for entertaining, making them a fantastic addition to dessert buffets, potlucks, elegant afternoon teas, or holiday gatherings. Their impressive appearance belies how manageable they are to prepare, and the best part? They keep beautifully in the fridge, meaning you can easily bake them in advance, taking the stress out of last-minute preparations. Prepare for an outpouring of compliments!
Essential Ingredients for Perfect Mini Chocolate Caramel Tarts
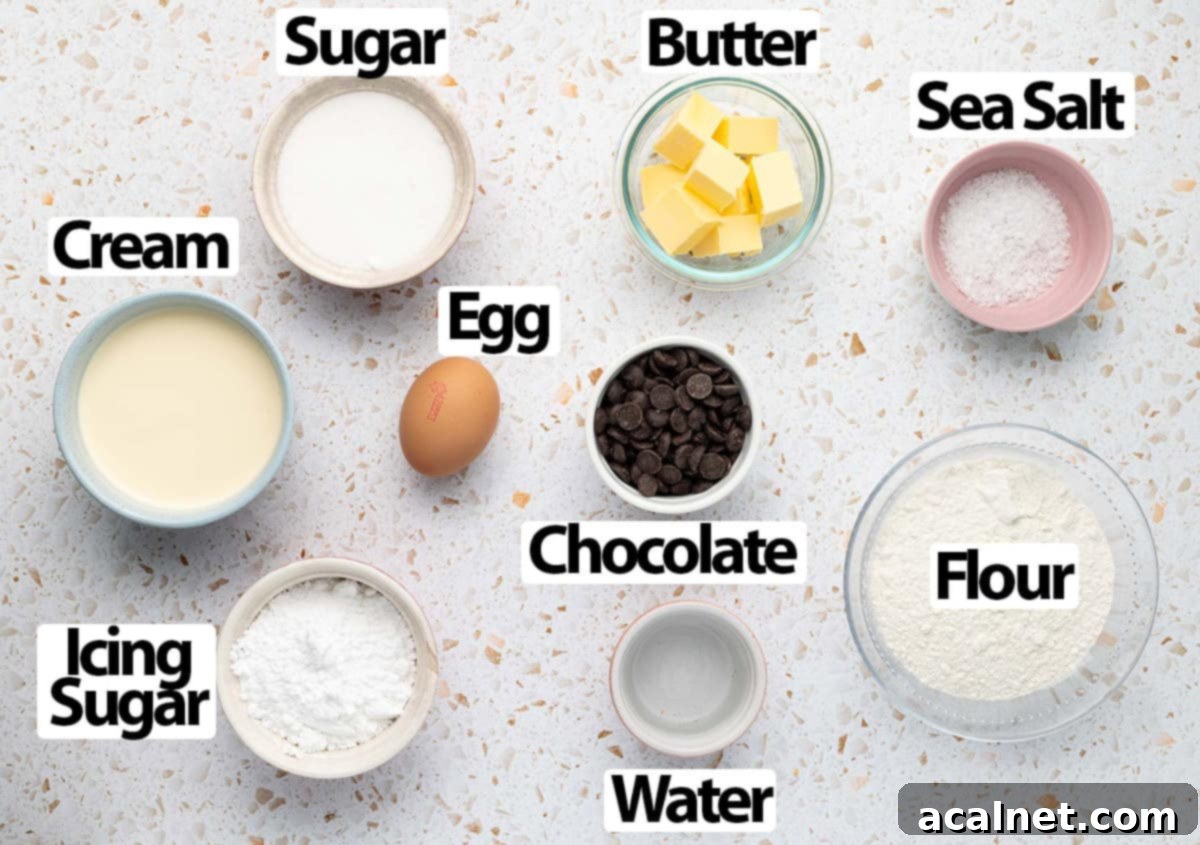
Scroll down to the recipe card below for all exact quantities and measurements.
For the Tartlet Crust Dough:
The foundation of these exquisite tarts is a classic French Shortcrust Pastry, known as Pâte Sablée. This pastry is famed for its delicate, sandy texture and rich buttery flavor. It’s made from:
- Plain / All-Purpose Flour: The primary structural component.
- An essential pinch of Salt: Balances the sweetness and enhances flavor.
- Icing Sugar (Confectioners’ Sugar): Provides sweetness and contributes to the tender, melt-in-your-mouth texture, unlike granulated sugar which can make pastry tougher.
- Very cold Unsalted Butter: The secret to a flaky (but not too flaky for a tart base) and tender pastry. Keeping it cold is crucial to prevent it from fully incorporating into the flour too soon.
- One Egg: Acts as a binder, bringing the dough together and adding richness.
For the Salted Caramel Sauce Filling:
This luscious, gooey filling is the heart of our tarts, offering a perfect balance of sweet and salty.
- Sugar: For the best results, use Caster Sugar or a fine White Granulated Sugar. The small crystals dissolve more easily and caramelize evenly. A small amount of water is added to help the sugar melt consistently and reduce the risk of crystallization. For an extra safeguard against sugar crystal formation, you can substitute a tiny portion of the sugar with glucose syrup or corn syrup.
- Thickened / Heavy Cream: It’s absolutely vital that your cream is at room temperature or lukewarm before adding it to the hot sugar. If the cream is too cold, it will shock the hot sugar, causing it to seize and crystallize, leading to a lumpy caramel.
- Unsalted Butter: Ensure your butter is at room temperature. Cutting it into small cubes beforehand allows it to melt quickly and smoothly into the hot caramel, creating a beautifully emulsified sauce. If you prefer a more pronounced salty butter caramel (like a classic French “caramel au beurre salé”), you can use salted butter.
- Sea Salt: The signature “Fleur de Sel” addition is key to balancing the sweetness of the caramel, creating that irresistible sweet and salty contrast. Adjust the amount to your personal taste; some prefer a subtle hint, while others enjoy a more pronounced saltiness.
I also like to add some Vanilla Paste for an extra layer of fragrant flavor, but this is entirely optional. Vanilla extract can be used as a substitute if preferred.
For the Chocolate Ganache Topping:
A rich, glossy ganache provides the perfect intense chocolate counterpoint to the sweet caramel.
- Chocolate: The quality of your chocolate makes a huge difference here. Opt for a good quality Cooking Chocolate or Couverture Chocolate (often found as callets or pistoles) for the smoothest, most professional finish. Regular eating chocolate bars or chocolate chips contain stabilizers that prevent them from melting as smoothly, which can result in a grainy ganache. I used an intense 70% Cocoa Dark Chocolate for a deep, bittersweet flavor that beautifully cuts through the caramel’s sweetness, but you can choose a less intense dark chocolate if you prefer.
- Thickened / Heavy Cream: This cream should have at least 30% fat content to create a stable and luxurious ganache.
Optionally, a little bit of Honey can be added. This not only enhances the sweetness of the ganache but also contributes to a wonderfully smooth and glossy texture, making it even more appealing.
How to Master Making These Mini Chocolate Caramel Tarts
Crafting the Perfect Tart Shells
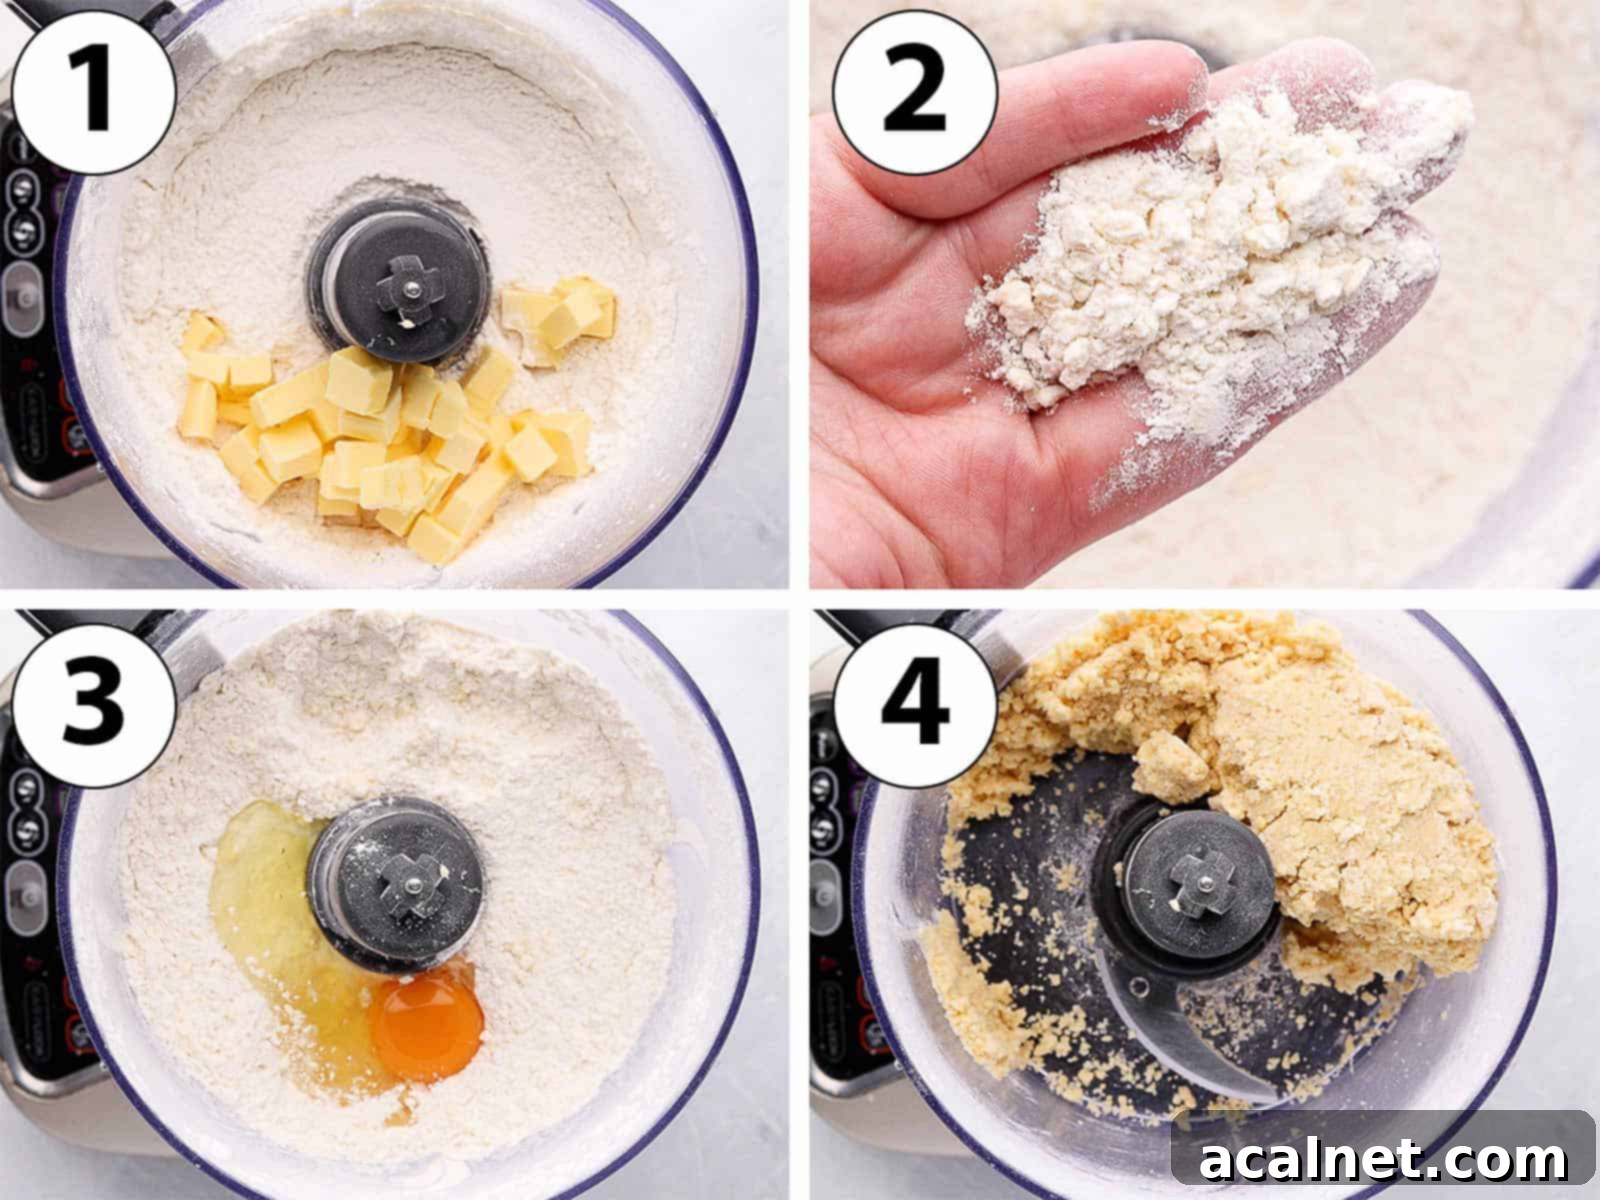
While I prefer the convenience of a food processor for making tartlet shells, you can absolutely make them by hand. For detailed instructions on the hand-mixing method, refer to my comprehensive Pâte Sablée recipe.
- Photo 1: Begin by combining the Plain / All-Purpose Flour, sifted Icing Sugar, and a pinch of Salt in the bowl of your food processor. Give it a few quick pulses to ensure all the dry ingredients are thoroughly mixed. Next, add the very cold Unsalted Butter, cut into small, even cubes. The coldness of the butter is paramount for creating the right pastry texture.
- Photo 2: Process the mixture until the butter is incorporated into small, uniform crumbs. These crumbs should be evenly distributed throughout the flour mixture. For this Pâte Sablée recipe, we’re aiming for a “sandy” texture, where the butter crumbs are quite small. This prevents excessive flakiness, which is not ideal for a tart base that needs to hold a filling.
- Photo 3: Once the butter and flour mixture resembles fine sand, add the large Egg.
- Photo 4: Continue to mix until a rough dough just begins to come together. To check if the dough has achieved the perfect consistency, press a small handful of the crumbs together in your palm. If they easily stick and form a cohesive mass, your pastry is ready. If it feels too dry or crumbly to stick, add a tiny amount of very cold water, a teaspoon at a time, and pulse briefly until the desired consistency is reached.
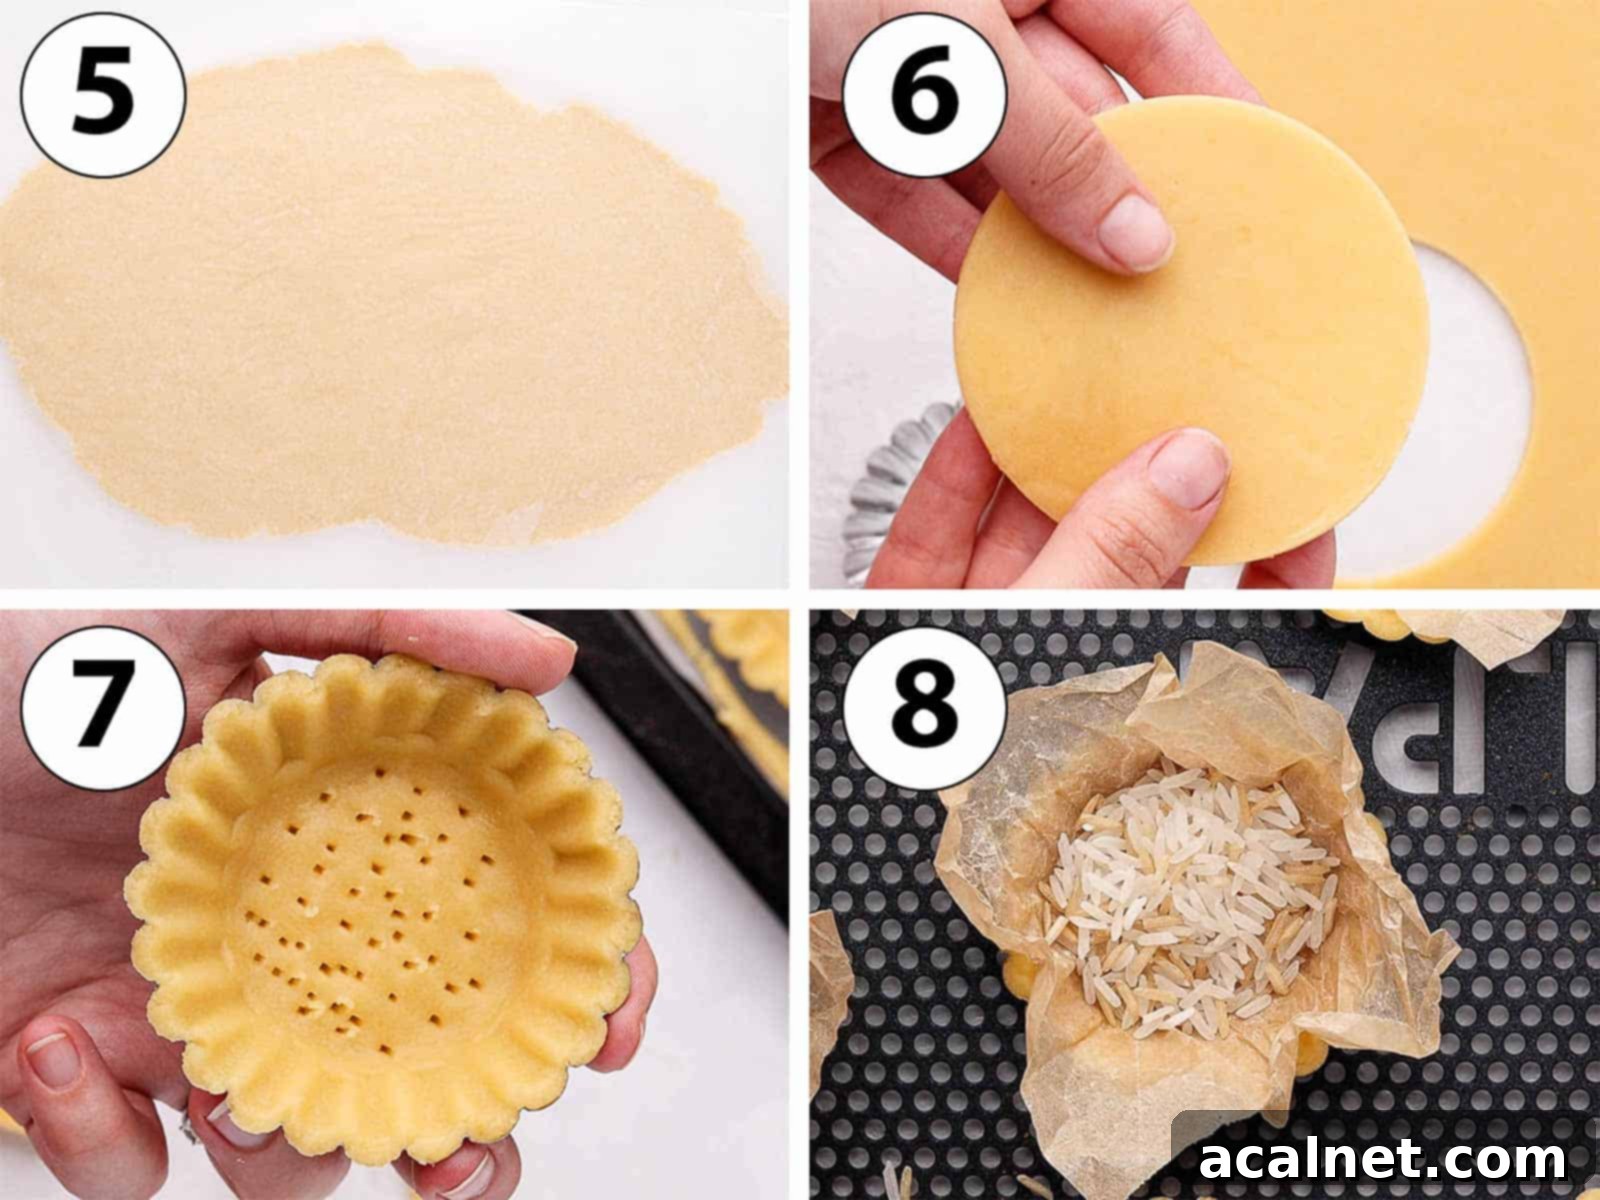
- Photo 5: Gently gather the dough into a ball. Place it between two large sheets of baking or parchment paper. Using your hands, lightly flatten the ball, then use a rolling pin to roll it evenly into a large disk, approximately 3 to 4mm (about 1/8 inch) thick. Transfer the rolled dough, still between the parchment paper, onto a flat tray and place it in the fridge to chill and rest for at least one hour, or ideally, overnight. This chilling period is crucial as it allows the gluten to relax and the butter to firm up, preventing the tart shells from shrinking during baking.
- Photo 6: Once the dough is properly chilled, remove it from the fridge and peel off the baking paper. Using a round cookie cutter, cut out small disks of pastry. These disks should be slightly larger than your tartlet tins to allow enough pastry to line the sides. I used Mini Tart Pans that are 7 cm (approximately 2.75 inches) wide and cut out pastry disks measuring about 10 to 12 cm (4 to 4.75 inches) wide. Any leftover dough can be gently re-assembled, re-rolled, and chilled for at least 2 hours to make additional tartlet crusts.
- Photo 7: Carefully line each tartlet pan with a pastry disk, gently easing it down the sides of the pan. Press firmly but gently on the edge where the side meets the bottom to ensure the pastry is flush with the pan, creating a neat corner. If the pastry feels a bit stiff and hard to work with, allow it to sit at room temperature for a few minutes to soften the butter slightly. Conversely, if it becomes too soft and difficult to handle or starts tearing, pop it back into the fridge for a few minutes to firm up.
- After lining, place the tartlet pans back in the fridge to chill again for at least 1 hour, or even better, overnight. This second chilling period is key to preventing the pastry from slumping or shrinking in the oven.
- Preheat your oven to 160°C (325°F). Before baking, gently dock the bottom of each pastry shell with a small fork. This creates small holes that allow steam to escape, preventing the crust from puffing up. For an extra crisp crust, you can optionally place the lined tartlet shells in the freezer for 10 to 15 minutes while your oven preheats.
- Photo 8: Line each chilled crust with a small piece of crumpled baking paper or parchment paper, then fill with baking weights, dried beans, or rice. These weights prevent the pastry from bubbling up during blind baking. Bake for 15 minutes. After this initial bake, carefully remove the pie weights and baking paper, then return the shells to the oven for an additional 12 to 15 minutes. The edges should turn a beautiful light golden brown, and the bottom of the crust should feel dry and firm to the touch.
- Once baked, transfer the tartlet shells to a wire rack and allow them to cool down completely before attempting to remove them from the tart pans. This prevents breakage and ensures a perfectly crisp shell.
Creating the Silky Salted Caramel Filling
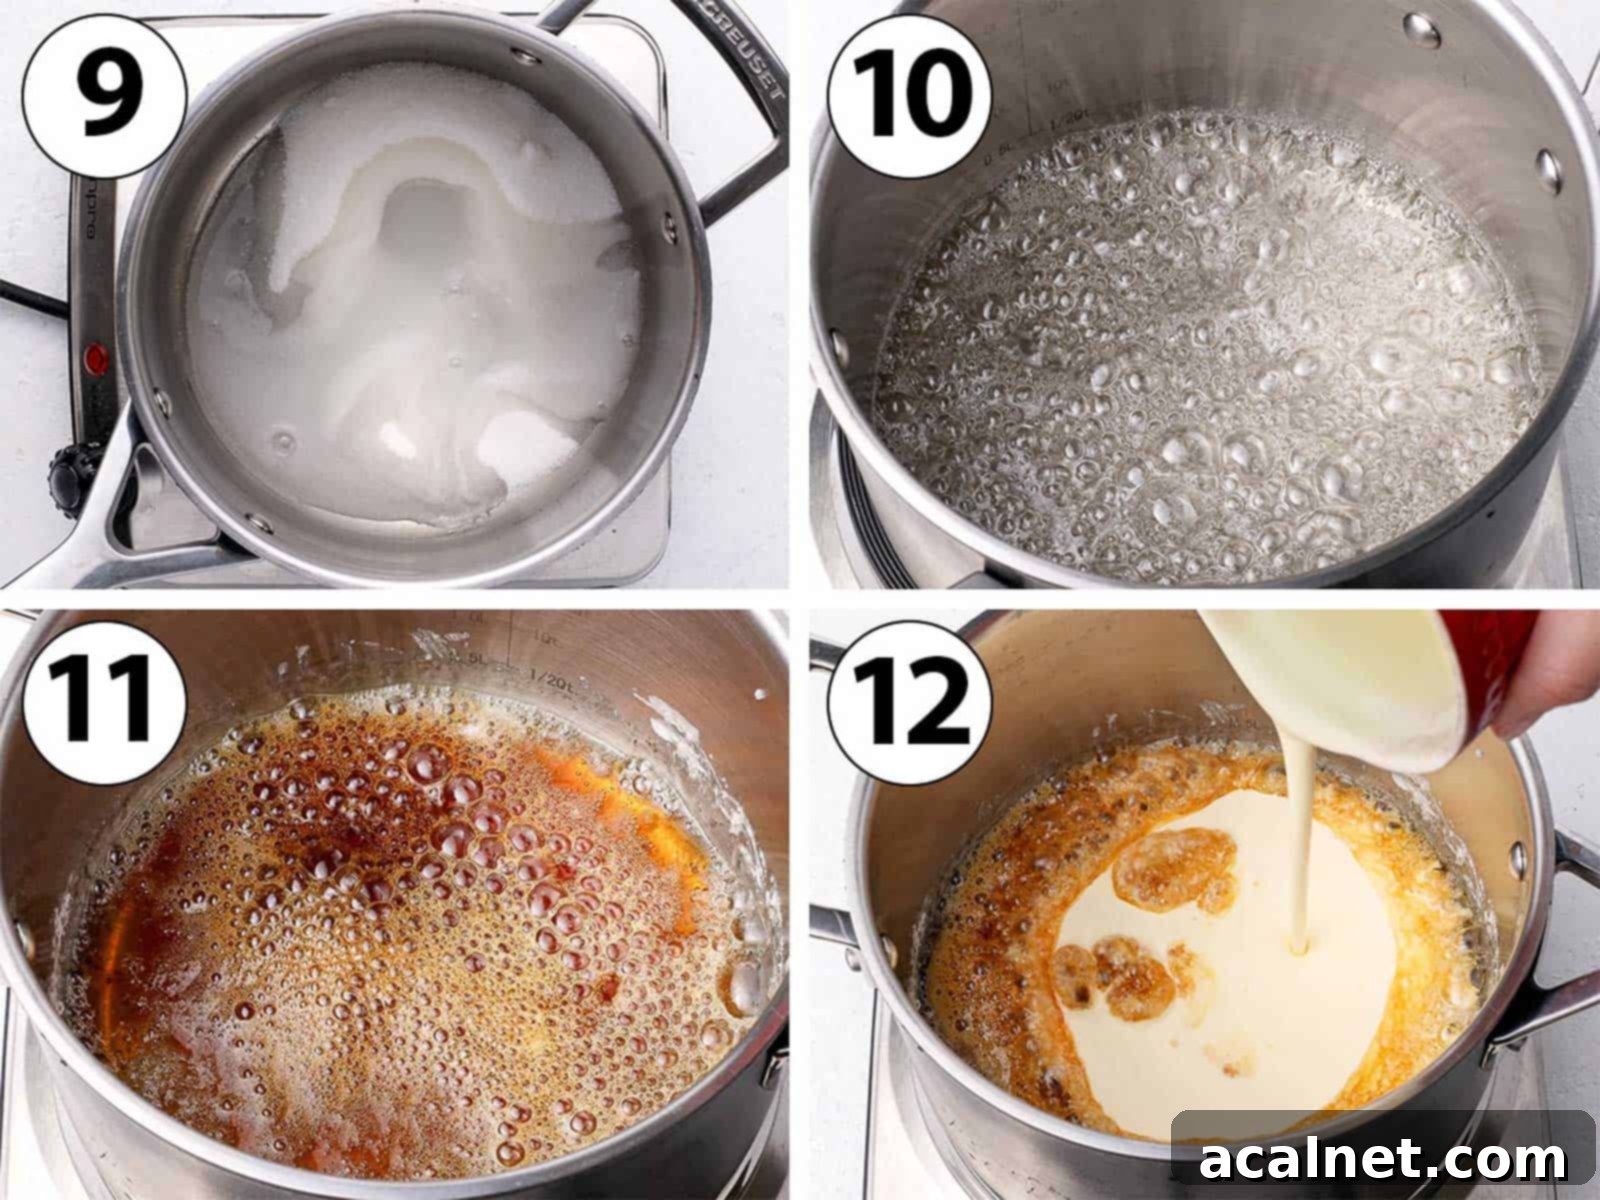
Once your tart shells have completely cooled, it’s time to prepare the star of the show: the salted caramel layer.
- Photo 9: Place the Caster Sugar and Water in a medium to large saucepan, preferably a heavy-bottomed one, as this helps distribute heat evenly and prevents burning. Stir briefly to ensure the water is evenly distributed over the sugar, then turn the heat to low. It’s crucial not to use high heat at this stage, as the sugar could melt too quickly and burn before caramelizing properly. Resist the urge to stir once the heating process begins.
- Photo 10: Allow the sugar to melt slowly and undisturbed. It will first start to boil and form large, clear bubbles. Don’t be alarmed if you notice the sugar clumping or crystallizing initially; this is a common occurrence, but it should eventually melt into a clear syrup. If you see stubborn sugar crystals clinging to the sides of the saucepan, gently brush them down with a small pastry brush dipped in water to help them dissolve back into the syrup.
- Photo 11: Continue cooking the sugar slowly until its color transforms from clear to a beautiful orange, then to a rich light brown, almost amber hue. The exact time for this can vary based on your stove’s temperature, but it typically takes between 5 and 10 minutes. To prevent over-cooking and burning the caramel, which can lead to an overly bitter taste, consider using a candy thermometer. Aim for a temperature that does not exceed 180°C (350°F). Remember, the longer you cook the sugar, the less sweet and more pronouncedly bitter the caramel will taste. Experiment to find your preferred flavor balance.
- Photo 12: Gently warm your Heavy / Thickened Cream before adding it to the melted sugar. This step is critical; if the cream is too cold, the sudden temperature shock can cause the hot sugar to seize up and crystallize. Pour the lukewarm cream carefully into the hot caramel. Be extremely cautious, as the mixture will bubble up vigorously and rise quickly in the saucepan.
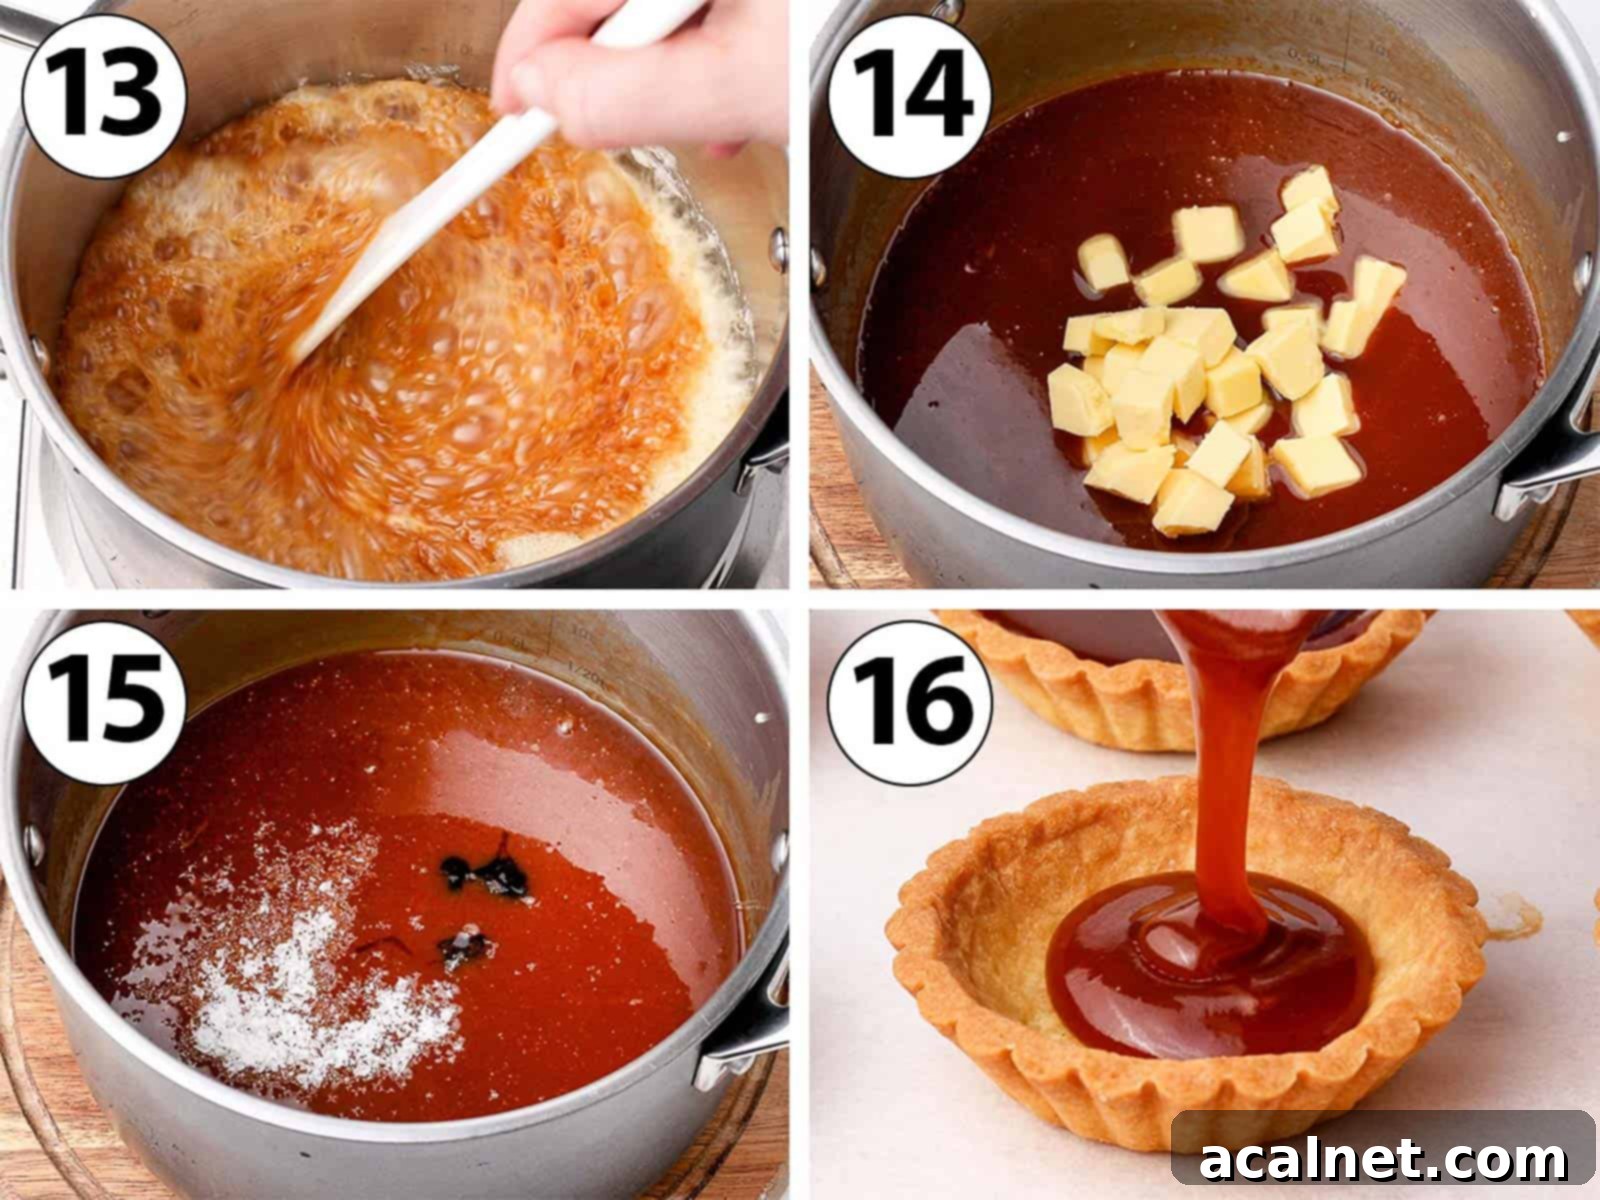
- Photo 13: Immediately and quickly stir the mixture with a heat-proof spatula until all the cream is thoroughly incorporated and you achieve a perfectly smooth and shiny caramel sauce.
- Photo 14 & 15: Remove the saucepan from the heat and allow the caramel sauce to cool for approximately 5 minutes. This slight cooling helps the butter incorporate more easily. Gradually stir in the cubed room temperature butter, a little at a time, until it is completely melted and emulsified into the caramel. Finish by stirring in the Sea Salt and the optional Vanilla Paste.
- Photo 16: Carefully transfer the warm, fluid caramel into a clean jug with a spout (or a pastry bag for more precision). Pour the caramel into the cooled tartlet crusts, filling each about two-thirds of the way up. It’s important to fill the shells while the caramel is still warm and quite fluid to ensure an even distribution.
- Place the filled tartlets in the fridge to set for 1 to 2 hours, or ideally, overnight. This chilling process allows the caramel to firm up to a wonderfully gooey consistency.
Preparing the Luxurious Chocolate Ganache Topping
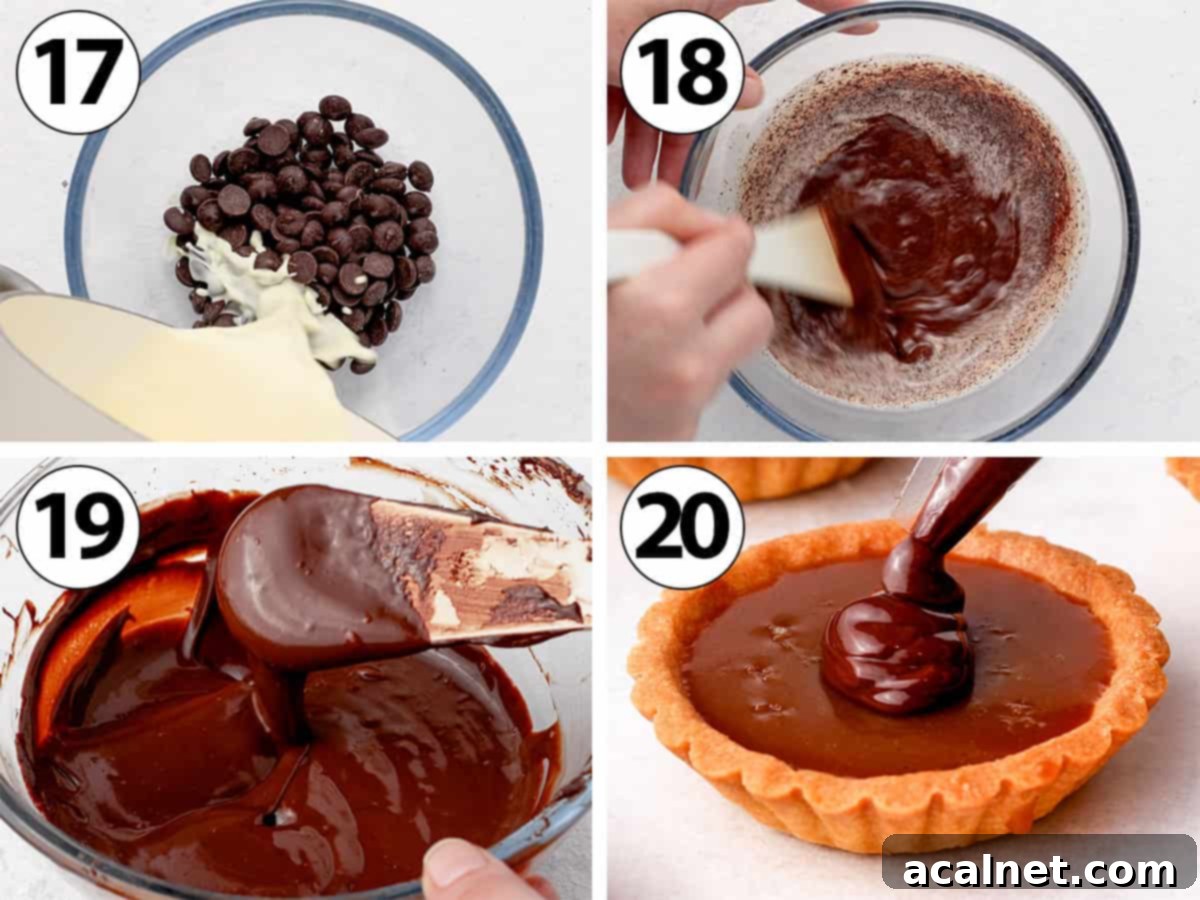
Once your salted caramel layer has sufficiently chilled and set, you can move on to preparing the elegant chocolate ganache topping.
- Finely chop your good quality Cooking Chocolate (or use couverture chocolate callets/pistoles if you have them). Place the chopped chocolate in a small, heat-proof bowl. Briefly microwave it for 30 seconds to a minute, just until the bottom layer of chocolate begins to slightly melt. This initial softening helps the chocolate emulsify more easily with the hot cream.
- In a small saucepan, combine the Heavy / Thickened Cream and the optional Honey. Place the saucepan over low heat and stir gently to help the honey dissolve and mix into the cream. Bring the mixture to a gentle simmer, just until small bubbles appear around the edges, then immediately remove it from the heat.
- Photo 17: Carefully pour the hot cream mixture directly over the partially melted chopped chocolate in the bowl. Resist the urge to stir immediately! Let it sit undisturbed for 2 minutes. This allows the heat from the cream to thoroughly melt the remaining chocolate, ensuring a smooth ganache.
- Photo 18: After 2 minutes, using a stiff spatula, gently begin stirring the mixture in a slow, circular motion, starting from the center of the bowl and gradually working your way outwards. This technique helps to create a stable emulsion, resulting in a perfectly smooth and shiny ganache.
- Photo 19: Continue stirring until all the chocolate has completely melted and is fully incorporated with the cream, forming a beautiful, glossy ganache. If, after stirring, you still notice any small, unmelted pieces of chocolate, you can place the bowl back in the microwave for another 15-30 seconds, then stir again until smooth.
- Photo 20: Transfer the prepared ganache into a pastry bag. Snip off the tip of the bag to create a small opening, then carefully pipe the ganache over the set caramel layer in each tartlet shell. For a perfectly flat surface, gently tap each tartlet on a hard counter surface a few times, then tilt and swirl it around to help the ganache spread out evenly to the edges. Alternatively, for a more rustic look, you can simply drizzle the chocolate over the caramel.
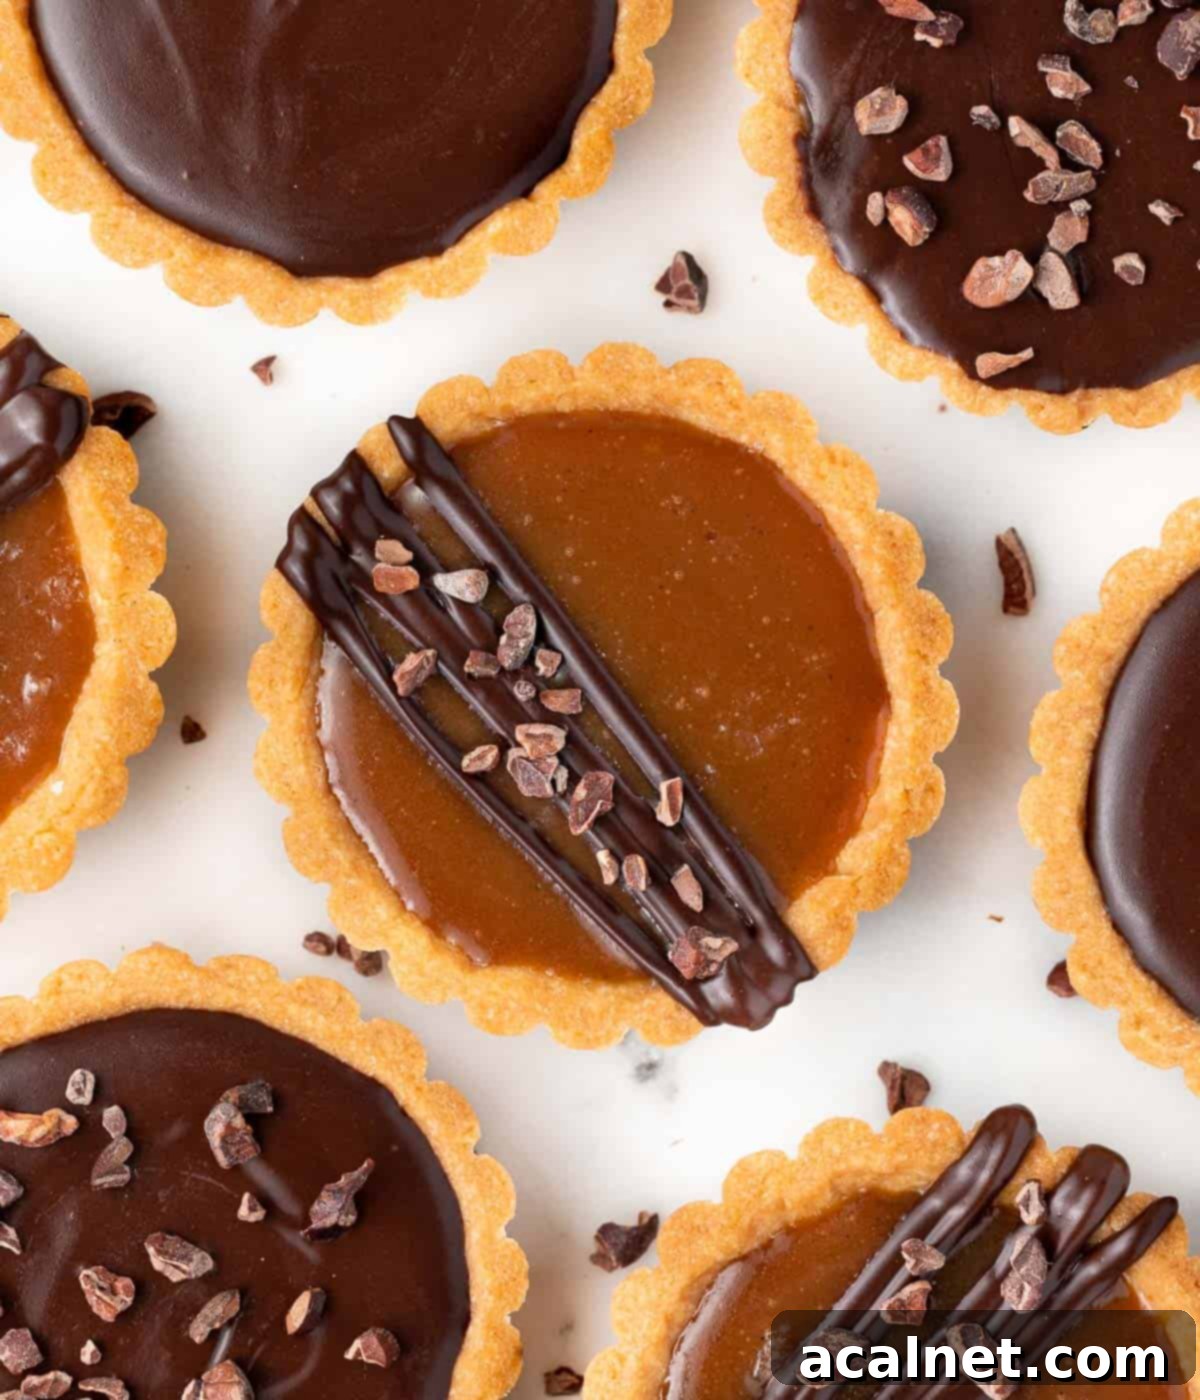
- At this stage, you have the opportunity to add any preferred toppings or garnishes to your chocolate and caramel tarts. I often simply use a sprinkle of Cocoa Nibs for a textural contrast, but you could also add delicate chocolate shavings, a dusting of cocoa powder, or an additional sprinkle of flaky sea salt to enhance the flavor profile.
- Place the assembled tarts back in the fridge to set for at least 1 hour, or up to 24 hours, before serving. This ensures all layers are perfectly firm and ready to be enjoyed.
Recipe FAQs: Your Questions Answered
Absolutely! If you’re short on time or prefer a simpler baking project, using pre-made tartlet shells is a perfectly acceptable shortcut. For those who want to make their own but don’t have tartlet pans, I also have a helpful tutorial showing you how to make tartlet shells in a muffin pan!
For the silkiest texture and most authentic flavor, it’s highly recommended to use a high-quality Cooking Chocolate or Couverture Chocolate. These are formulated to melt smoothly and create a stable emulsion. Couverture chocolate typically comes in callets or pistoles, which are convenient for melting. I personally opt for a 70% Dark Chocolate to achieve a robust chocolate flavor that perfectly balances the sweetness of the caramel, but feel free to choose a dark chocolate with a lower cocoa percentage if you prefer a milder taste.
While I love the striking contrast between the intense dark chocolate and the sweet caramel, you can certainly experiment with Milk Chocolate or White Chocolate if you desire a sweeter, creamier, or more mellow flavor profile. Just bear in mind that the ratio of cream to chocolate will need to be adjusted for milk or white chocolate ganache, as they contain different amounts of cocoa solids and fat. You’ll generally need less cream for milk chocolate and even less for white chocolate to achieve a similar consistency.
These chocolate caramel tarts are quite exquisite on their own and don’t require much embellishment! My favorite simple decoration is a light sprinkle of Flaky Sea Salt, which amplifies the “salted caramel” experience, and a few Cocoa Nibs for an elegant crunch and a hint of bitterness. Other delightful options include chocolate shavings, a dusting of cocoa powder, a tiny dollop of whipped cream, or even a single candied pecan.

Pro Tips & Troubleshooting for Success
Even experienced bakers can encounter a few common challenges. Here are some solutions and tips to ensure your mini chocolate caramel tarts turn out perfect every time:
- My pastry dough is too hard or too soft to handle: If your dough is too stiff straight from the fridge, let it sit at room temperature for a few minutes to allow the butter to soften slightly before attempting to line the tartlet pans. If, on the other hand, the pastry becomes too soft, sticky, or starts ripping, pop it back into the fridge for 5 to 10 minutes to firm up. Working with dough at the right temperature is key for easy handling.
- My tart crusts shrank or collapsed when baked: This common issue almost always stems from insufficient chilling time for the pastry. The most important tip for perfect, non-shrinking tart shells is to chill the pastry dough *twice* for extended periods. After rolling, chill for at least an hour. After lining the tartlet pans, chill again, ideally overnight, before blind baking. This allows the gluten to relax completely and the butter to firm up, maintaining the pastry’s shape in the heat of the oven.
- My caramel filling is grainy, lumpy, or has crystallized: Caramel can be notoriously tricky! The most frequent culprit is disturbing the sugar while it’s melting. To prevent crystallization, ensure you leave the sugar completely undisturbed once you start heating it. If you notice crystals forming on the sides of the pan, use a wet pastry brush to gently brush them down. Additionally, incorporating an inverted sugar like glucose syrup, corn syrup, or even a small amount of honey with your caster sugar can significantly reduce the risk of crystallization. Using a candy thermometer to monitor the sugar’s temperature is also highly recommended.
- My chocolate ganache is not smooth or has split: For an impeccably smooth and shiny ganache, the quality of your chocolate matters. Always opt for a good quality cooking chocolate or couverture chocolate. Chocolate chips often contain stabilizers that prevent them from melting as smoothly as desired, leading to a slightly grainy texture. If your ganache does split (looks oily and curdled), don’t despair! A quick fix is to use an immersion blender (or whisk vigorously by hand) to emulsify it again. Start blending slowly, gradually increasing speed, and watch it come back together.
Storing & Freezing Your Mini Tarts
Planning ahead makes baking even more enjoyable! The tartlet shells can be prepared in advance and stored unbaked in the fridge for up to 24 hours. Once baked and fully cooled, store them at room temperature in an airtight container for up to 24 hours. You can even freeze the tartlet shells, both baked or unbaked, for longer storage. Simply wrap them well to prevent freezer burn.
Once your mini chocolate caramel tarts are fully assembled with their delicious fillings and toppings, store them in an airtight container in the fridge. For the absolute best texture and flavor, aim to serve them within 24 hours. They will, however, remain delightful for up to 3 days in the refrigerator after assembly, making them an excellent make-ahead dessert option.

Explore More Delicious Tartlet Recipes
- Mini Fruit Tarts
- Salted Caramel Tartlets
- Lemon Curd Tartlets
- Orange Tartlets
- Chocolate Orange Tartlets
- Easy Cherry Tartlets
- Mini Chocolate Tarts
- Pear Frangipane Tartlets
- Mini Butterscotch Tartlets
Did you make this recipe?
We’d love to hear from you! Let us know if you liked it by leaving a comment below, and don’t forget to tag us on Instagram @a.baking.journey with a photo of your delicious creation!
Recipe Card

Mini Chocolate Caramel Tarts
Print Recipe
Ingredients
Tartlet Shells
- 250 gr Plain / All-Purpose Flour
- 50 gr Icing Sugar, sifted
- 1 pinch Fine Table Salt
- 120 gr Unsalted Butter, very cold, cut into small cubes
- 1 large Egg
Salted Caramel Filling
- 200 gr Caster Sugar
- 30 ml Water
- 120 ml Heavy / Thickened Cream, lukewarm
- 50 gr Unsalted Butter, at room temperature, cubed
- 1 1/2 teaspoon Sea Salt, or to taste (e.g., Fleur de Sel)
- 1/2 teaspoon Vanilla Paste, optional (or vanilla extract)
Chocolate Ganache Topping
- 50 gr Dark Cooking Chocolate, 70% cocoa, finely chopped (or couverture callets)
- 80 ml Heavy / Thickened Cream, at least 30% fat content
- 15 ml Honey, optional, for shine and smoothness
Instructions
Tartlet Shells
- In a food processor, combine the sifted Plain Flour, Icing Sugar, and Salt. Pulse briefly to mix. Add the very cold, cubed Unsalted Butter and blend until the mixture forms very small, even crumbs, resembling coarse sand (see note 1).
- Add the Egg and continue to mix until a rough dough just begins to clump together. To test for readiness, press a small amount of crumbs in your hand; if they stick, the dough is ready. If too dry, add a few drops of very cold water (see note 2).
- Gather the dough into a ball and flatten it slightly between two large sheets of baking paper. Use a rolling pin to roll it into a uniform disk, about 3 to 4mm (1/8 inch) thick. Transfer to a flat tray and chill in the fridge for at least one hour, or preferably overnight.
- Remove the chilled dough from the fridge and peel off the baking paper. Using a round cookie cutter, cut out disks of pastry slightly larger than your tartlet pans. For 7 cm (approx. 2.75 inch) wide mini tart pans, cut disks about 10 to 12 cm (4 to 4.75 inches) wide.
- Carefully line each tartlet pan with a pastry disk, gently pressing it down the sides and into the bottom edge to ensure it’s flush. Place the lined pans back in the fridge to chill again for at least 1 hour, or ideally overnight. Excess dough can be re-rolled after chilling for at least 2 hours.
- Preheat your oven to 160°C (325°F). Dock the bottom of each pastry crust with a small fork. Crumple a small piece of baking paper and place it inside each crust, then fill with baking weights, dried beans, or rice.
- Bake for 15 minutes. Carefully remove the weights and baking paper, then bake for an additional 12 to 15 minutes, or until the bottom is dry to the touch and the edges are lightly golden. Let cool completely on a wire rack before removing from pans.
Salted Caramel
- In a heavy-bottomed saucepan, combine the Caster Sugar and Water. Stir briefly to distribute the water evenly, then place over low heat. Avoid stirring once heating begins to prevent crystallization.
- Allow the sugar to melt undisturbed. It will boil and turn into large, clear bubbles, then slowly caramelize to an orange-to-amber color, taking about 5 to 10 minutes (see note 3).
- Carefully pour in the lukewarm Heavy / Thickened Cream (see note 4). The mixture will bubble and rise vigorously. Immediately and vigorously stir with a heat-proof spatula until all the cream is incorporated and the sauce is smooth and shiny.
- Remove from heat and let cool for 5 minutes. Stir in the cubed room temperature Butter until fully melted, then add the Sea Salt and Vanilla Paste.
- Transfer the warm, fluid caramel into a clean jug or pastry bag. Pour into the cooled tartlet crusts, filling each to about 2/3 of its depth. Gently tap the tarts on a hard surface to release any air bubbles. Refrigerate for 1 to 2 hours, or overnight, to set.
Chocolate Ganache Topping
- Finely chop the Dark Cooking Chocolate. Place it in a small heat-proof bowl and microwave for 30 seconds to 1 minute, until the bottom of the chocolate begins to soften slightly (see note 5).
- In a small saucepan, combine the Heavy / Thickened Cream and optional Honey. Heat over low heat until simmering, then remove from heat. Pour the hot cream over the partially melted chocolate and let stand for 2 minutes, without stirring.
- Using a stiff spatula, gently stir in a circular motion, starting from the center, to mix the cream and chocolate. Continue stirring until the chocolate is fully melted and incorporated, resulting in a smooth, shiny ganache (see note 6).
- Transfer the ganache to a pastry bag, snip the tip to create a small opening, and pipe it over the set caramel layer. Gently tap the tartlets on a hard surface and tilt to help the ganache spread evenly. Alternatively, drizzle for a different aesthetic.
- Optional: Garnish with a sprinkle of Flaky Sea Salt and some Cocoa Nibs.
- Place the finished tarts back in the fridge to set for at least 1 hour, or up to 24 hours, before serving.
Video
Would you like to save this recipe?
We’ll email this post to you, so you can come back to it later!
Notes
- The size of the butter crumbs directly impacts the pastry’s flakiness. For these tarts, we aim for a “sandy” texture with very small crumbs, which creates a tender but stable crust, rather than a very flaky one.
- To verify the dough’s consistency, firmly press a small amount of the mixed crumbs together in your hand. If they form a solid mass, the dough is ready. If it remains crumbly and won’t hold together, add a few drops of very cold water, one teaspoon at a time, and pulse until the desired consistency is achieved.
- Exercise caution when caramelizing sugar, as it can burn quickly. Using a candy thermometer is highly recommended to prevent the sugar from exceeding 180°C (350°F), where it can develop a bitter, burnt taste. It is crucial to leave the sugar completely undisturbed as it melts to prevent crystallization.
- When adding the cream to the hot caramel, be extremely careful. Caramel is very hot, and if the cream is cold, it can cause violent bubbling and splashing. Always use lukewarm cream and wear protective gloves if you are concerned about splashes. This reaction can also cause the sugar to seize or crystallize if the temperature shock is too great.
- The goal here isn’t to fully melt the chocolate in the microwave, but rather to soften it just enough so that it emulsifies smoothly and easily when the hot cream is poured over it. This initial softening helps create a uniform ganache.
- If, after stirring, you still find small, unmelted pieces of chocolate in your ganache, place the bowl back into the microwave for a very short interval (15-30 seconds). Then, continue stirring gently until the ganache is completely smooth and glossy.
Nutrition (per serving)
