Easy Biscoff Cake: The Ultimate Cookie Butter Dessert Recipe for Every Occasion
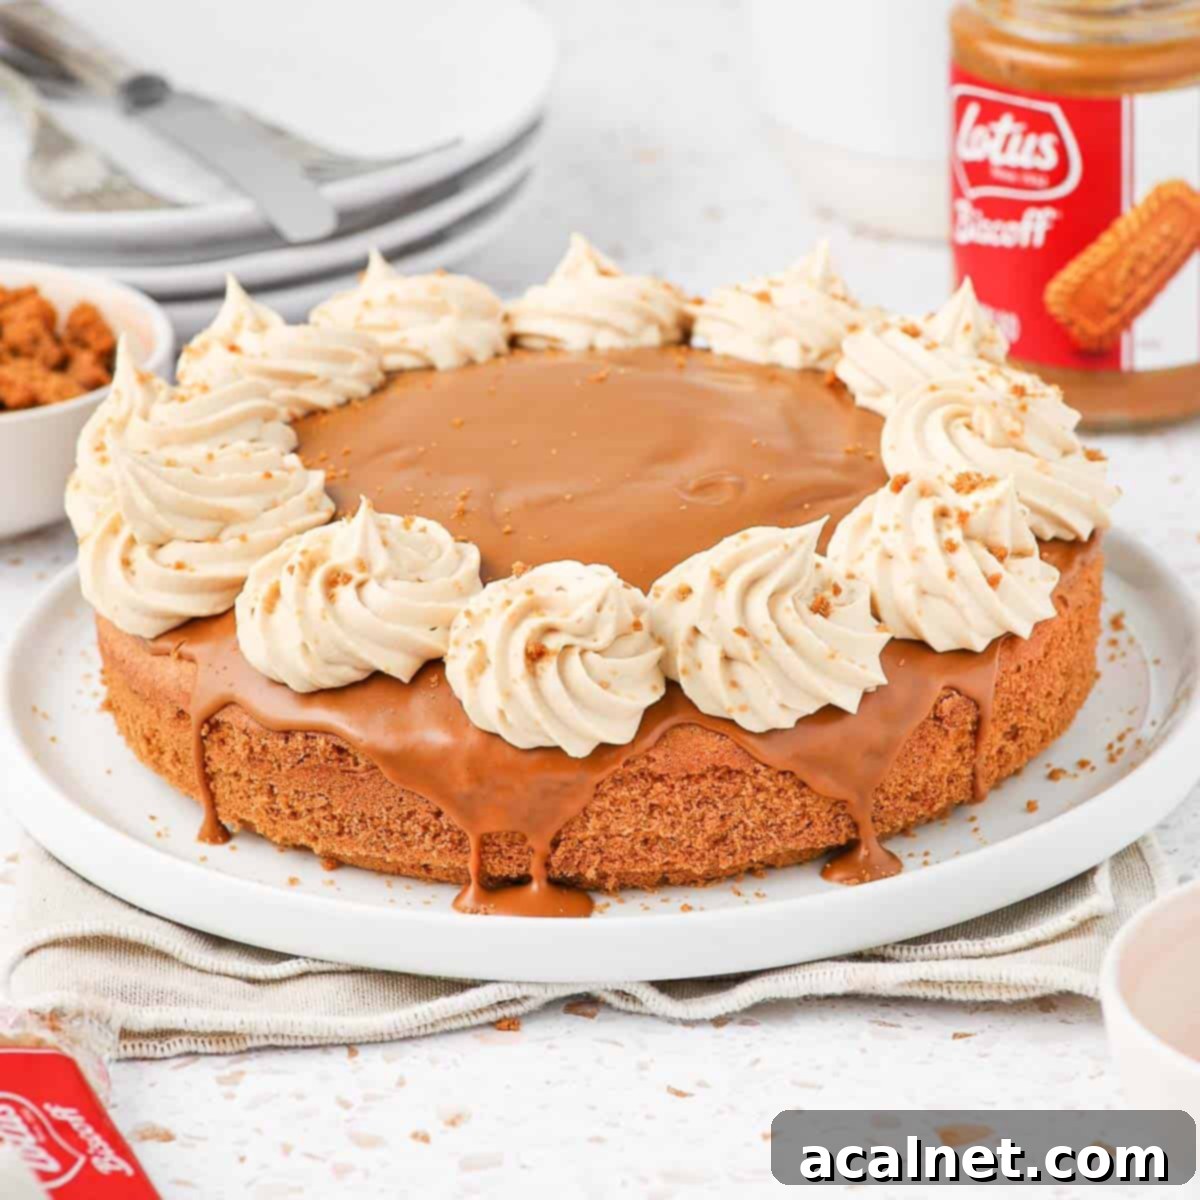
Indulge in the irresistible flavors of this super easy Biscoff Cake, a delightful dessert perfect for any special occasion or a cozy afternoon tea. This recipe features a wonderfully light and airy cookie butter cake base, generously adorned with a silky, melted Biscoff spread glaze, and crowned with a luxurious Biscoff whipped cream frosting. Prepare to captivate your taste buds with every spiced, caramel-infused bite of this effortlessly elegant confection.
Why You’ll Adore This Easy Biscoff Cake Recipe
If you’re searching for a simple yet show-stopping dessert that delivers an explosion of flavor, this easy Biscoff cake is your answer! What makes this recipe truly special is its incredible depth of cookie butter taste. Biscoff spread, also known as speculoos spread, isn’t just a topping here; it’s intricately woven into the cake batter itself, infusing every crumb with its distinctive spiced caramel notes and a delightful richness that takes a classic vanilla butter cake to an entirely new level.
This recipe focuses on simplicity without compromising on presentation or taste. You’ll love that it’s a single-layer cake, making it less intimidating to bake compared to multi-tiered creations. Despite its straightforward preparation, the finished Biscoff cake looks incredibly sophisticated and fancy, making it perfectly suited for special celebrations like birthdays, anniversaries, or holiday gatherings. Yet, it’s also wonderfully unfussy, ideal for a relaxed afternoon tea with friends or simply as an everyday treat to satisfy your sweet cravings. The combination of a gooey, one-ingredient Biscoff glaze (creating a beautiful drip effect!) and a light, two-ingredient Biscoff whipped cream frosting ensures that the robust flavor of Lotus Biscoff cookies shines through in every component, creating a truly harmonious and irresistible dessert experience.
Explore More Easy Cake Ideas:
- Easy French Apple Cake
- Lemon Ricotta Cake
- Easy Yogurt Plum Cake
- French Chocolate Fondant Cake
- Pear and Chocolate Cake
Essential Ingredients for Your Biscoff Cookie Butter Cake
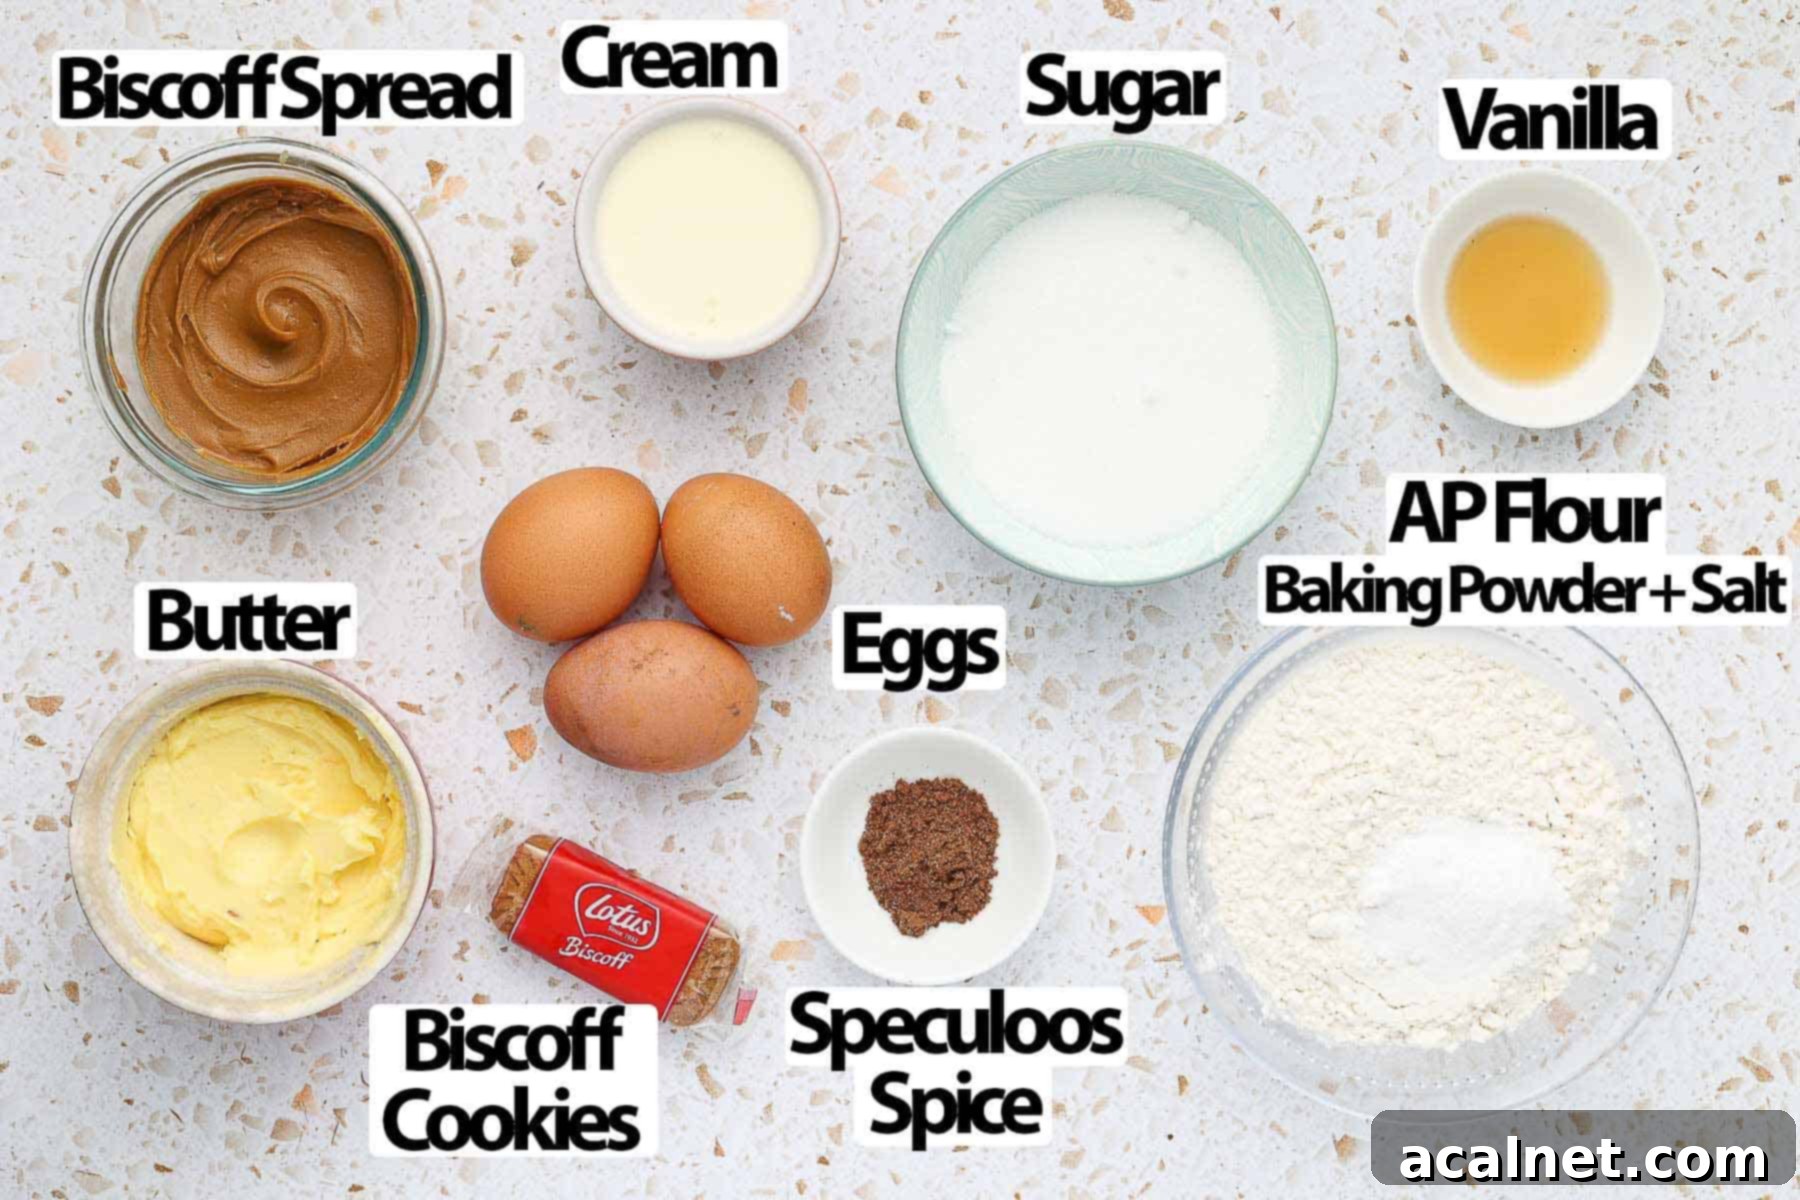
Crafting this delectable Biscoff cake requires a handful of common baking ingredients, plus the star of the show: Biscoff spread! Ensure all your perishable ingredients are at room temperature for the best results, as this promotes smoother mixing and a more consistent cake texture.
For the Biscoff Cake Base:
- Butter: Opt for unsalted butter, softened to room temperature. This is crucial for creaming properly with the sugar, incorporating air, and creating a light, tender crumb. If your butter is too cold, it won’t cream effectively, and if it’s too warm, the mixture might split.
- Sugar: White caster sugar (fine granulated sugar) is recommended for its delicate texture, which dissolves beautifully into the batter. However, for a deeper, more pronounced caramel flavor that beautifully complements the Biscoff, you could experiment with light brown sugar.
- Eggs: Use medium-sized eggs, also at room temperature. Room temperature eggs emulsify better with the butter and sugar, preventing the batter from splitting and contributing to a smoother, more uniform cake structure.
- Smooth Biscoff Spread: This is the heart of our cookie butter cake! While Lotus Biscoff is the original, any smooth cookie butter spread or speculoos spread will work perfectly. Remember to melt it slightly in the microwave until it’s pourable and then allow it to cool down before adding it to your batter. This ensures it blends seamlessly with the other ingredients without cooking the eggs or butter.
- Dry Ingredients: A precise blend of Plain / All-Purpose Flour, Baking Powder, and a pinch of Salt forms the cake’s structure. The baking powder acts as a leavening agent, giving the cake its lift, while salt balances the sweetness. For convenience, you can substitute the plain flour and baking powder with an equal amount of self-raising flour if preferred, just omit the extra baking powder.
- Speculoos Spice Mix (optional): This traditional Belgian spice blend is a game-changer for authentic speculoos flavor. It typically includes cinnamon, nutmeg, ginger, cloves, and sometimes cardamom or white pepper. If you can’t find it, a good “mixed spice” blend is an acceptable substitute. For a DIY alternative, combine a generous amount of ground cinnamon with smaller pinches of ground ginger, nutmeg, cloves, and a tiny dash of white pepper. This will significantly elevate the cake’s spiced profile.
- Vanilla Extract: A touch of pure vanilla extract enhances the overall sweetness and aromatic complexity, harmonizing beautifully with the spiced Biscoff notes.
For Decorating Your Biscoff Masterpiece:
- Biscoff Glaze: This simple, yet effective glaze is just more Biscoff Spread, melted until it’s very fluid and pourable. For an added textural contrast and a slight crunch, consider using a crunchy cookie butter spread here. The warmth of the melted spread is key for an easy, even application and those coveted drips down the sides of the cake.
- Biscoff Whipped Cream Frosting: A light and fluffy topping made from cold Heavy / Thickened Cream (whipping cream) combined with a little cooled, melted Biscoff Cookie Butter. It’s crucial that your cream has at least 30% fat content to ensure it whips up properly into stable peaks. While this recipe often uses no added sugar for a less sweet balance, for a sweeter and more stable frosting, feel free to add a tablespoon or two of icing sugar (powdered sugar) to the cream while whipping. Finish with a sprinkle of crushed Lotus Biscoff biscuits for an inviting crunch and visual appeal.
Step-by-Step Guide: How to Make This Irresistible Cookie Butter Cake
Creating this single-layer Biscoff cake is surprisingly simple, following the classic butter cake method with a delightful cookie butter twist. Take your time with each step, and you’ll be rewarded with a perfectly moist and flavorful cake.
Crafting the Biscoff Butter Cake Base
This Biscoff-infused cake layer is the foundation of our dessert and follows a method similar to most vanilla butter cake recipes, ensuring a tender and flavorful crumb.
- Begin by preheating your oven to 160°C / 325°F. Prepare a 20cm / 8-inch springform pan by lining the bottom with baking paper (parchment paper). Lightly grease the sides of the pan – a vegetable oil spray works wonders for this, or you can use a dab of butter. This preparation ensures easy release of your beautifully baked cake.
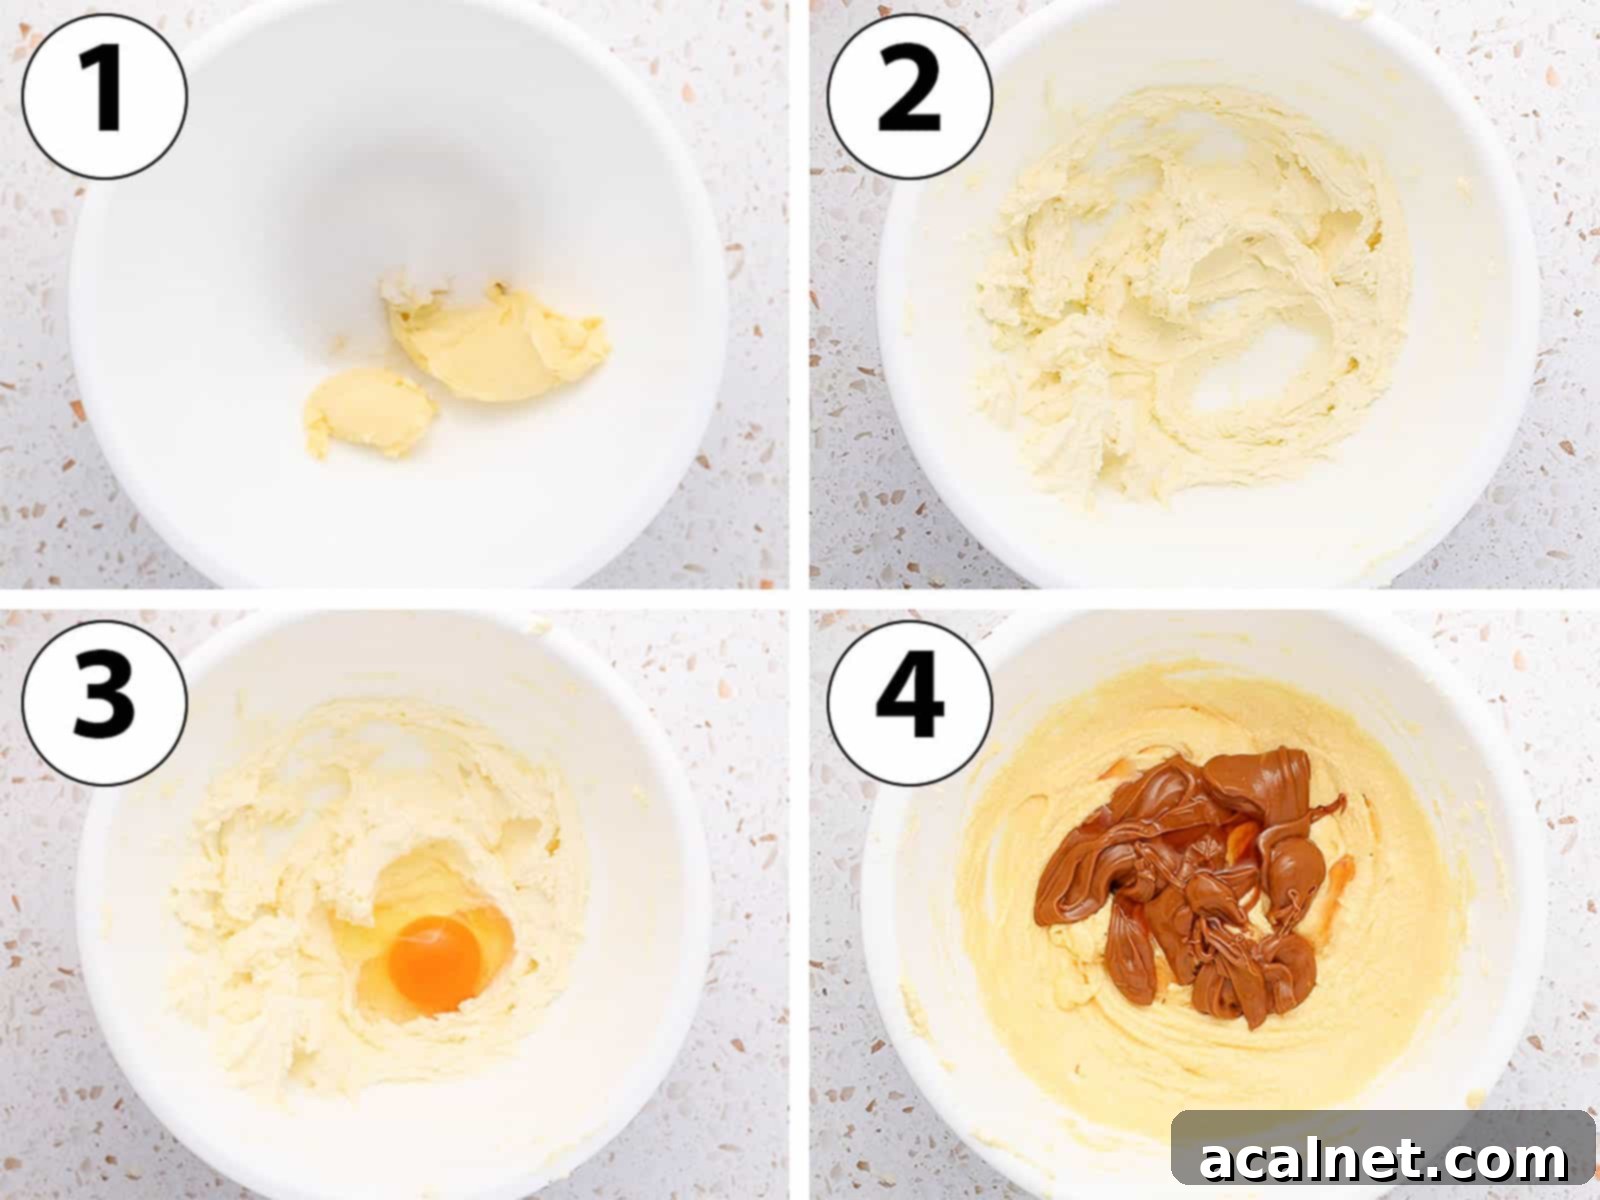
- Photo 1 (Creaming): In a large mixing bowl, or the bowl of a stand mixer fitted with the paddle attachment, combine the softened unsalted butter and caster sugar.
- Photo 2 (Fluffy Mixture): Cream these two ingredients together on medium speed for a good 5 minutes. The goal is a mixture that is light, fluffy, and significantly paler in color. When you rub a small amount between your fingers, you should barely feel any sugar granules, indicating the sugar has dissolved and air has been incorporated. This step is crucial for a tender cake.
- Photo 3 (Adding Eggs): Add the room temperature eggs, one at a time. Mix on low speed until each egg is fully incorporated into the batter before adding the next. Don’t be alarmed if the mixture appears to split slightly; this can happen if the butter was a bit too cold or warm, or if it wasn’t creamed perfectly. Rest assured, the batter will come back together smoothly once the flour is added.
- Photo 4 (Biscoff & Vanilla): Introduce the slightly melted (and importantly, cooled) Biscoff Spread and vanilla extract to the mixture. It’s vital that the Biscoff spread isn’t hot, as this could curdle the eggs.
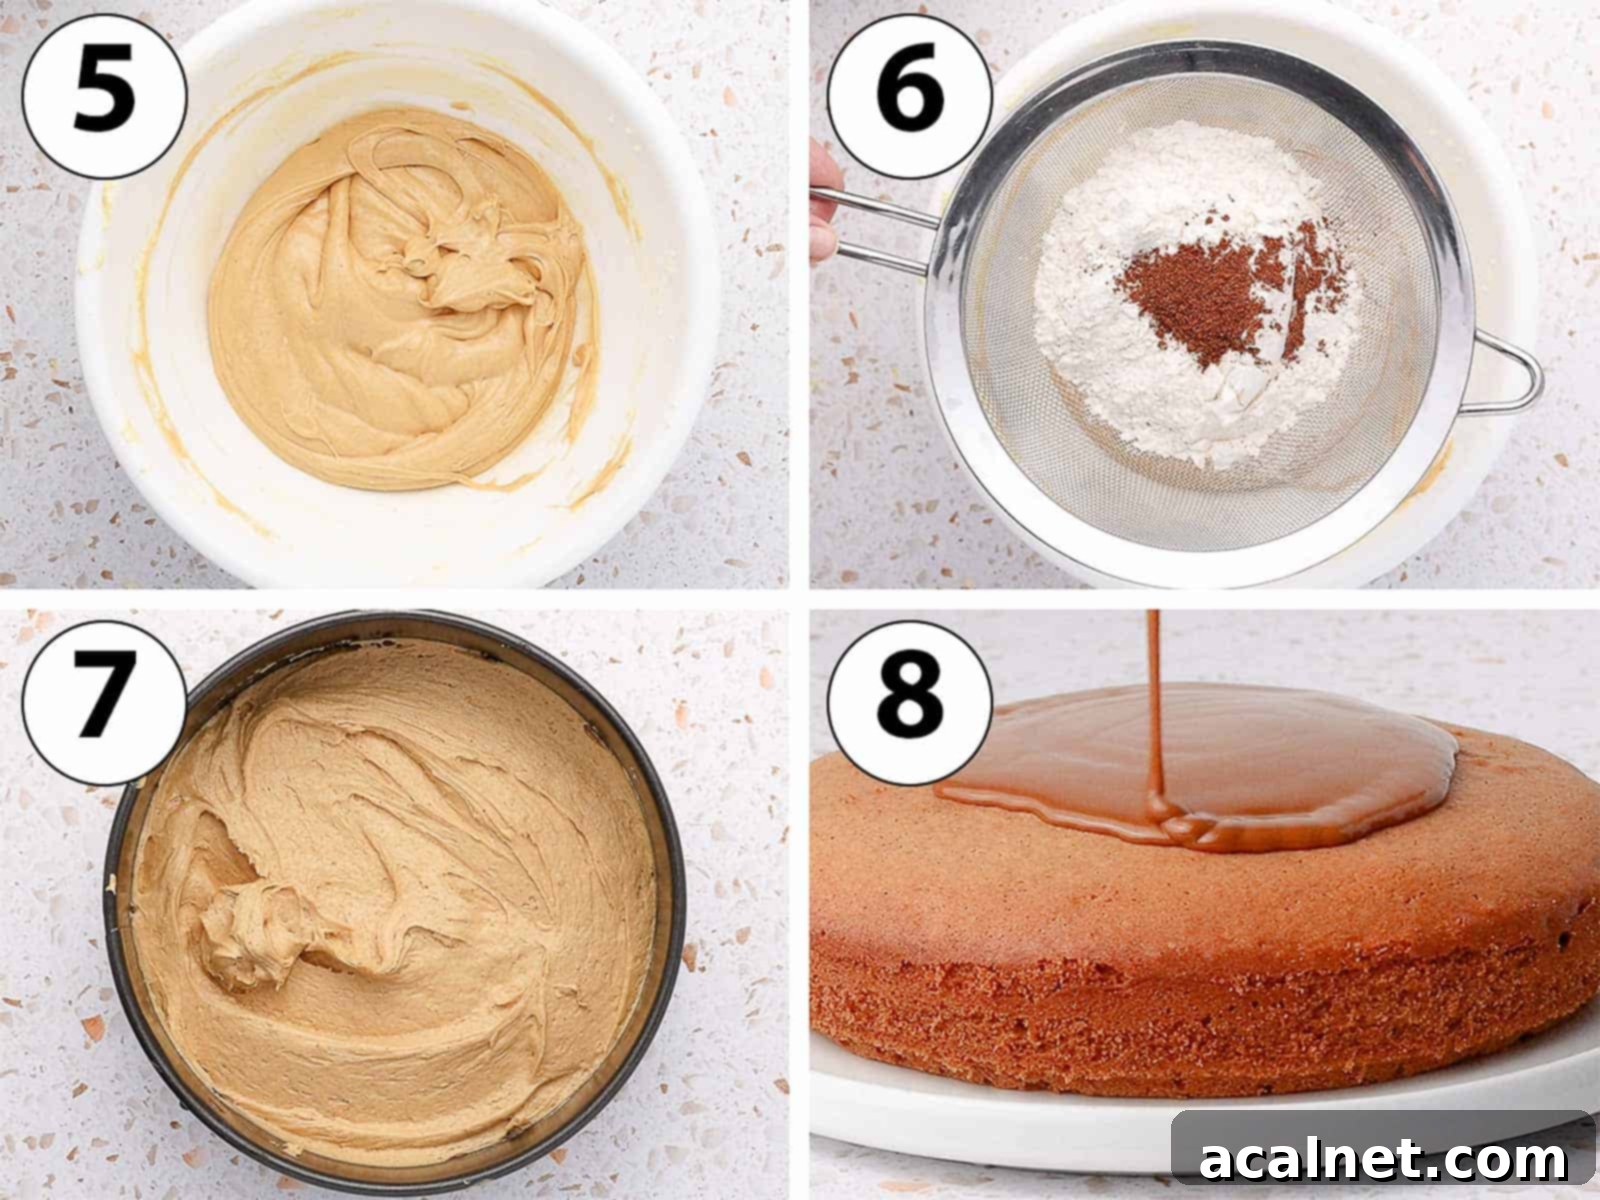
- Photo 5 (Combine Wet Ingredients): Mix the wet ingredients on medium speed until they are just combined and homogeneous. Take a moment to stop the mixer and use a spatula to scrape down the bottom and sides of the bowl, ensuring everything is thoroughly mixed.
- Photo 6 (Adding Dry Ingredients): Carefully sift in the dry ingredients: plain flour, baking powder, salt, and the optional speculoos spice. This sifting step helps prevent lumps and aerates the flour. Mix on the lowest speed of your mixer or, ideally, gently fold by hand with a spatula until just combined. Over-mixing at this stage can develop the gluten in the flour, resulting in a tough, dense cake. Mix only until no streaks of flour remain.
- Photo 7 (Pouring Batter): Pour the finished cake batter into your prepared springform pan. Use the back of a spoon or a small offset spatula to gently spread the batter, creating a relatively even layer across the bottom of the pan. This promotes even baking.
- Bake for 35 to 40 minutes. The cake is done when a wooden skewer or toothpick inserted into the center comes out clean. Transfer the baked cake onto a wire cooling rack and allow it to cool in the pan for at least 30 minutes before attempting to move it.
- Once sufficiently cooled in the pan, carefully release the springform sides and transfer the cake onto your chosen serving plate or stand. It’s crucial that the cake is cool enough to handle; if it still feels warm to the touch, let it cool a bit longer to prevent the delicate crumb from breaking.
- Photo 8 (Biscoff Glaze): For the luscious Biscoff glaze, melt the remaining Biscoff spread in the microwave for 30 seconds to 1 minute, stirring until it becomes very smooth and perfectly fluid. Ensure it’s warm enough to pour and spread easily.
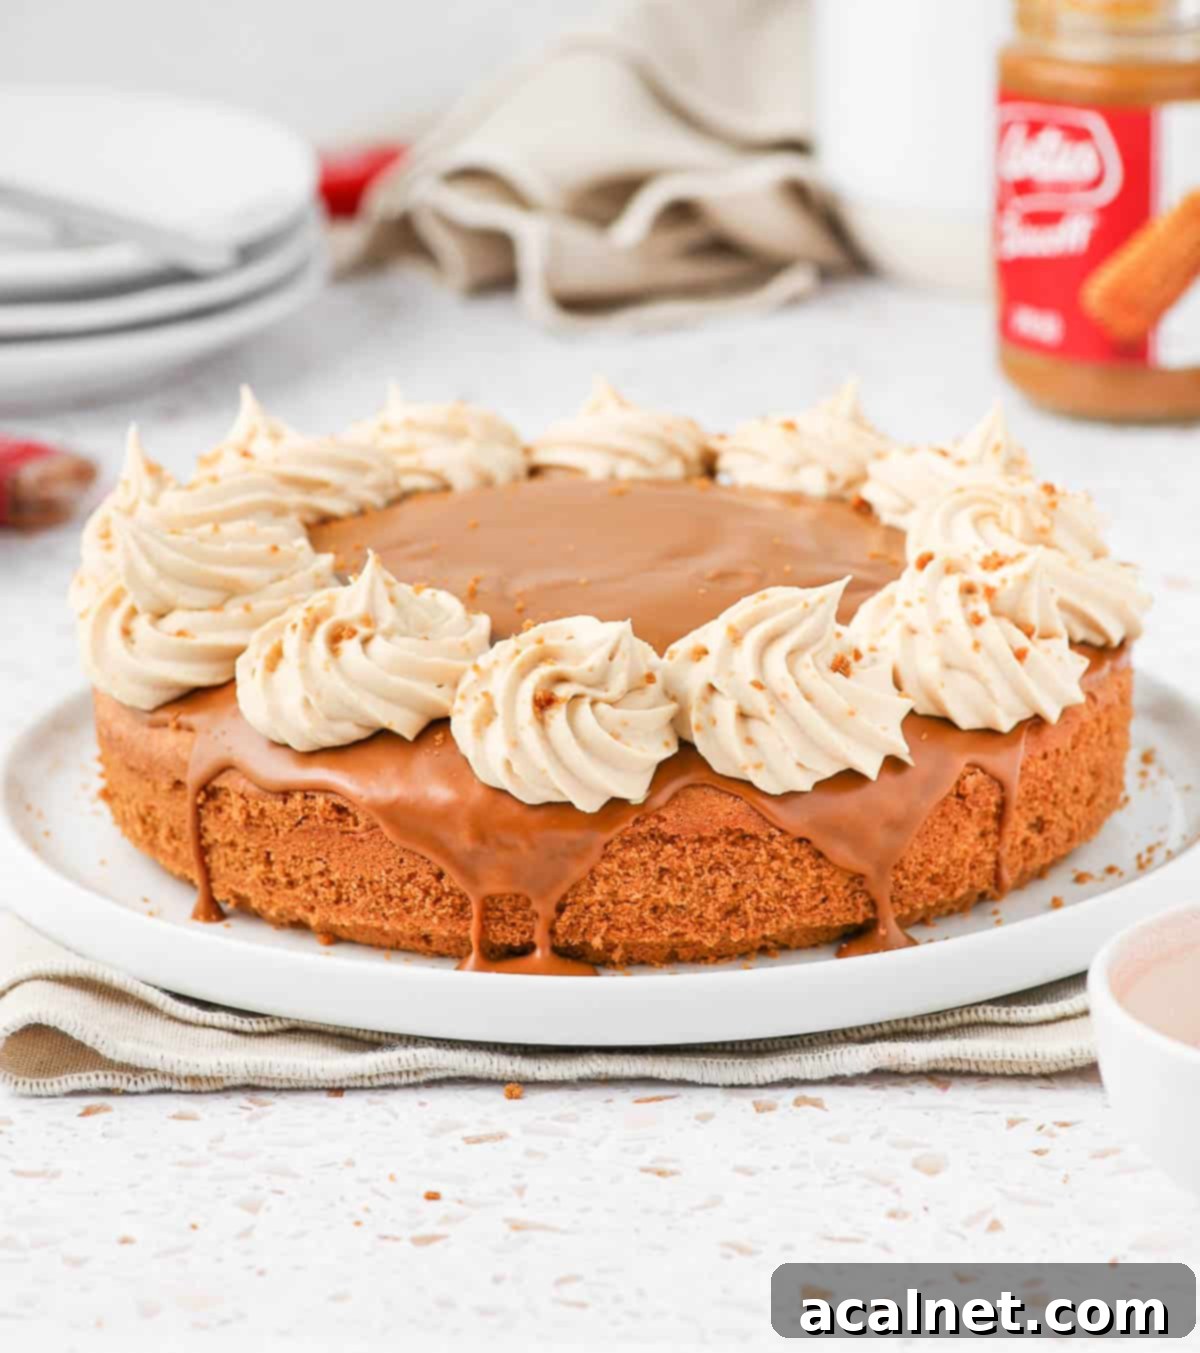
- Pour the melted Biscoff glaze generously over the top of the cooled cake. Using the back of a spoon, gently spread it around to cover the entire surface, subtly pushing some of it over the edges to create an elegant drip effect down the sides. Allow the glaze to set for a few minutes. As it cools, it will slightly harden, creating a beautiful finish.
Preparing the Fluffy Biscoff Whipped Cream Topping
This light and airy whipped cream topping is the perfect complement to the rich Biscoff cake. For optimal freshness and stability, it’s best to prepare and add this topping as close to serving time as possible. Once the cake is adorned with cream, it will need to be stored in the refrigerator.
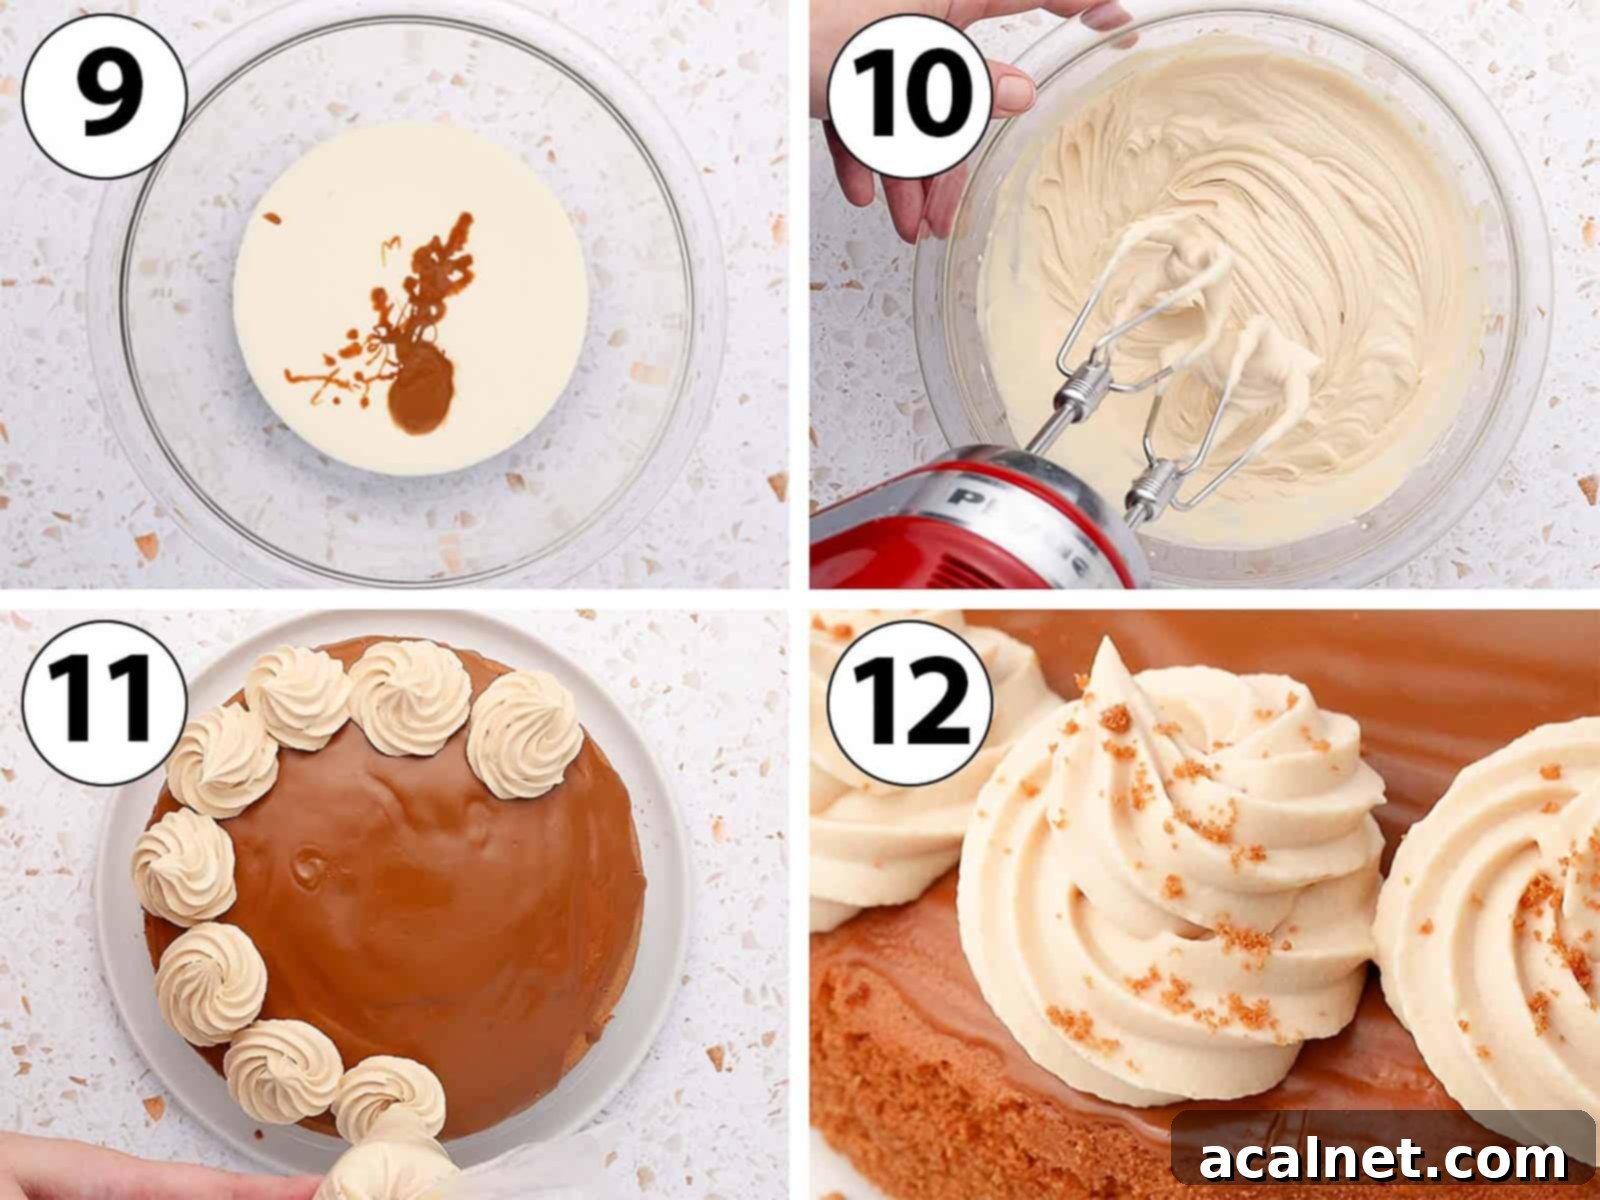
- Photo 9 (Combine Cream & Biscoff): In a large mixing bowl (preferably chilled) or the bowl of your stand mixer (with a chilled whisk attachment), combine the very cold heavy/thickened cream with the melted Biscoff spread that has been cooled down to room temperature. Starting with cold cream and a cold bowl/whisk helps achieve stiffer peaks more quickly.
- Photo 10 (Whip to Stiff Peaks): Begin whipping on medium speed, gradually increasing to high speed. Continue whipping until you achieve stiff peaks. The cream should hold its shape firmly when the whisk is lifted. A helpful tip is to whip to medium peaks with the mixer, then finish by hand with a whisk. This gives you greater control and helps prevent over-whipping, which can result in a grainy or curdled texture.
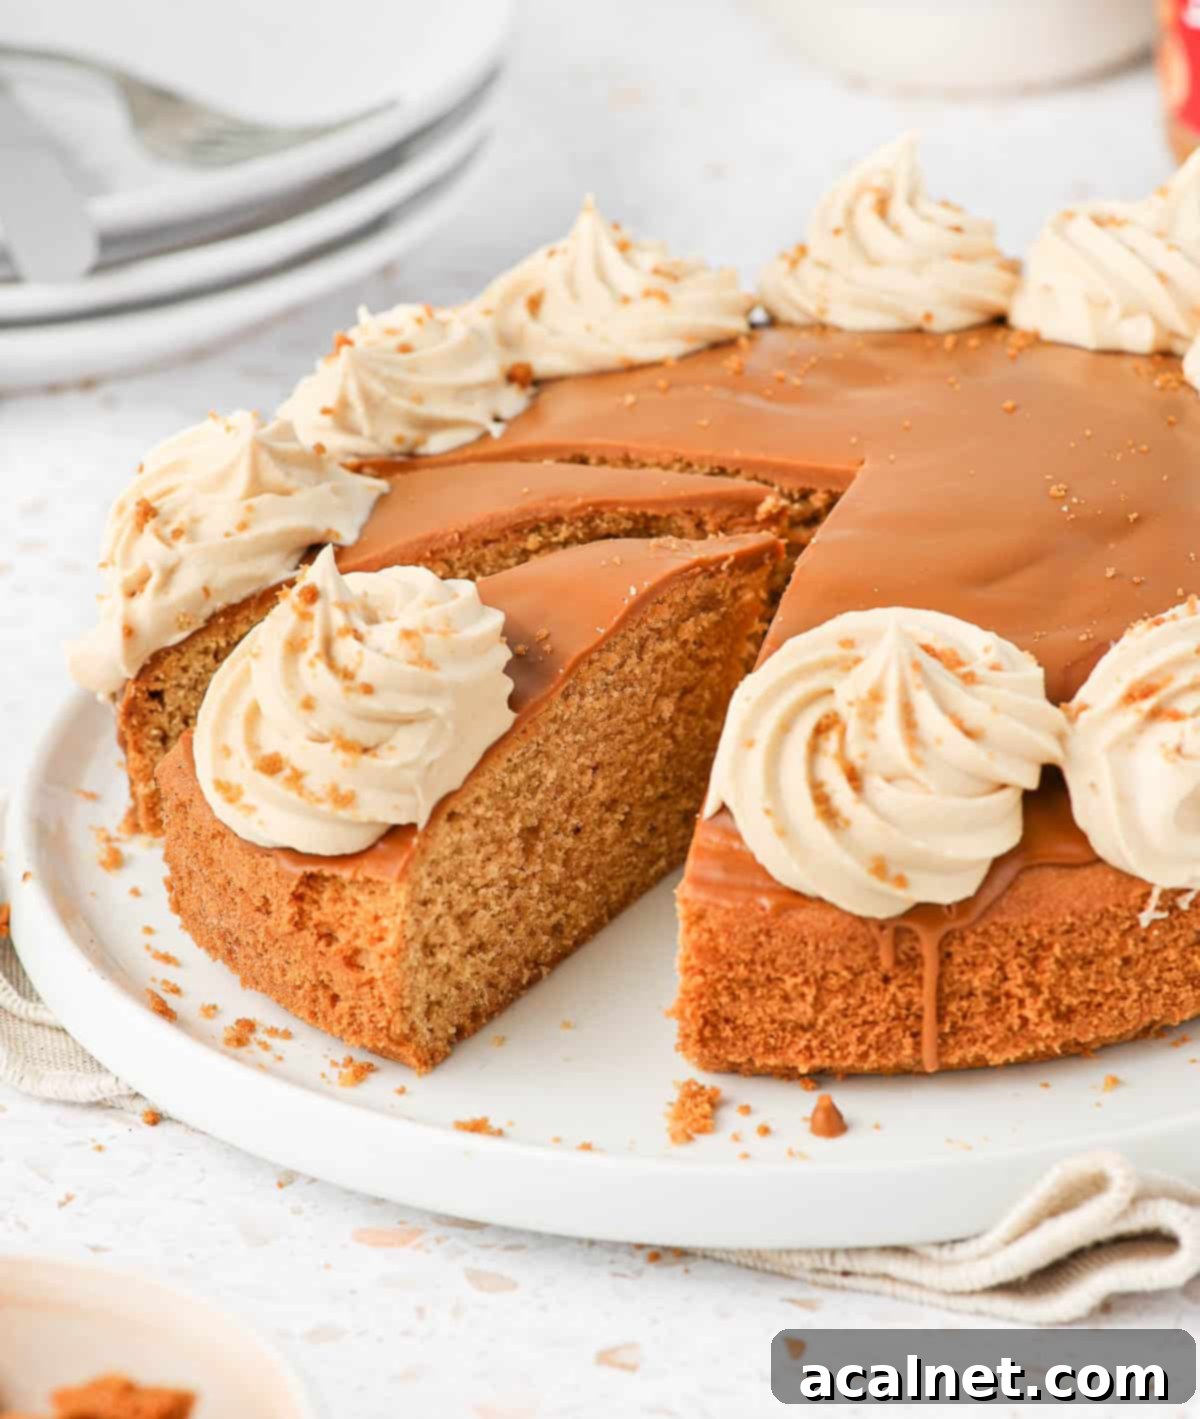
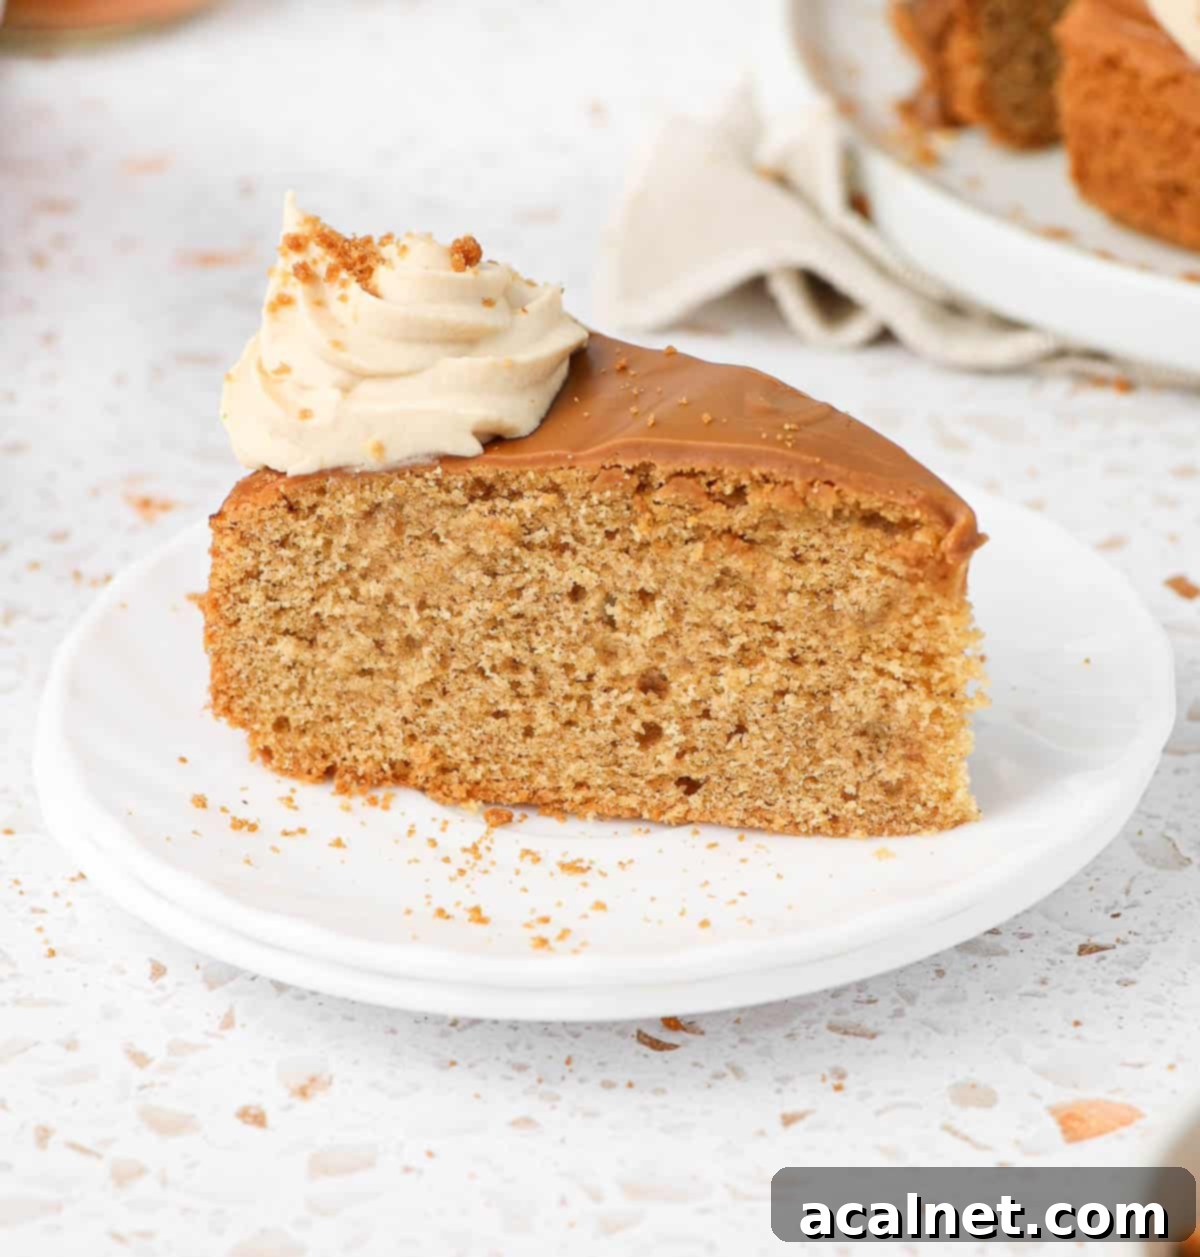
- Photo 11 (Piping Cream): Transfer the prepared Biscoff whipped cream into a piping bag fitted with your favorite star piping tip (or any decorative tip you prefer). Carefully pipe small, elegant dollops of whipped cream around the entire edge of the cake, directly on top of the set Biscoff glaze. For visual consistency, you might aim for an even number of dollops, perhaps 12, so each slice of cake gets an equal share of cream.
- Photo 12 (Garnish): To add an extra touch of crunch and authentic Biscoff flavor, take one or two Lotus Biscoff cookies (or homemade Speculoos) and crush them into fine crumbs. Gently sprinkle these crumbs over the piped whipped cream.
- Serve your stunning Biscoff cake immediately to enjoy the freshest whipped cream.
Pro Tip: If you’re looking for a slightly more robust or stable frosting, particularly if the cake will be out for an extended period, you could use this Cookie Butter Cream Cheese Frosting as an alternative to the whipped cream.
Frequently Asked Questions About Biscoff Cake
Biscoff, famously known as Speculoos, are traditional Belgian spiced shortcrust biscuits. Their unique flavor profile comes from a blend of specific spices and a special type of caramelized brown sugar, often derived from sugar beet (“vergeoise brune“). The taste is distinctive and complex: a rich, deep caramel sweetness intertwined with warm, aromatic spices like cinnamon, nutmeg, ginger, and cloves. Many describe it as being similar to gingerbread cookies, but with its own unique, addictive character.
Speculoos spice is the quintessential blend used to give Speculoos cookies their signature flavor. While the precise ratios can vary slightly, a typical mix usually combines a prominent amount of Cinnamon with Coriander Seed, Nutmeg, Ginger, Caraway Seed, and Cloves. It creates a warm, sweet, and slightly peppery aroma. Finding a pre-made Speculoos spice mix can be challenging outside of Belgium or specialty stores. If you don’t have it, you can simply omit it, or substitute with “Mixed Spice” for a similar, though not identical, warm spice profile. For a more authentic homemade substitute, you can create your own blend: start with 1 tablespoon of ground cinnamon, and add 1/2 teaspoon each of ground ginger and nutmeg, 1/4 teaspoon of ground cloves, and a tiny pinch of ground white pepper or cardamom. This provides a much deeper, more complex flavor than just using cinnamon alone, which lacks the intricate warmth of the full blend.
Yes, essentially, Biscoff Spread and Cookie Butter refer to the same type of product! They are both delicious spreads made from finely crushed Speculoos (Biscoff) cookie crumbs, blended with vegetable oils and often sugar, to create a smooth, spreadable consistency. “Biscoff Spread” is the brand name for Lotus Bakeries’ version, while “cookie butter” is the generic term for this type of spread. Although exact recipes might vary slightly between brands, they are generally interchangeable in baking recipes like this one, offering the same distinctive spiced caramel flavor.
Absolutely! This Biscoff cake recipe is versatile enough to be adapted for a stunning layered or tiered cake. To do so, you would simply double or even triple the recipe, depending on the number of layers and the size of your desired cake. Bake the batter in separate cake pans (e.g., two or three 8-inch pans) for distinct layers. However, please note that the Biscoff whipped cream topping used in this recipe is quite soft and is best suited as a delicate topping for a single-layer cake or served immediately. For a more stable, structural filling and frosting for a layered cake, we recommend using a rich Biscoff buttercream or a creamy Biscoff cream cheese frosting, which will provide the necessary firmness to hold multiple layers together beautifully.
Expert Tips for a Perfect Biscoff Cake Every Time
Achieving a bakery-quality Biscoff cake at home is entirely possible with a few key considerations. Follow these tips to ensure your cake turns out moist, flavorful, and beautifully presented.
- Room Temperature is Key: For the best and most consistent results, always use ingredients like butter and eggs at room temperature. Cold ingredients don’t emulsify properly, leading to a lumpy batter and a denser, less tender cake crumb. Room temperature ingredients blend smoothly, trapping more air and creating a light, airy texture.
- Understanding Batter Splitting: Don’t panic if your batter appears to split or curdle slightly after adding the eggs. This common occurrence can happen if your butter was either too cold or too warm, or if the initial creaming of butter and sugar wasn’t thorough enough. In this particular recipe, the batter will almost always come back together and smooth out beautifully once you incorporate the dry ingredients, so it rarely causes any significant issues with the final cake.
- The Secret to an Even Rise: This Biscoff cake is baked at a slightly lower temperature (160°C / 325°F) than many other cakes. This isn’t an oversight; it’s a deliberate choice! Baking at a gentler heat allows the cake to rise more slowly and evenly, preventing the formation of a tall, domed center. This results in a flatter top, which is much easier to glaze and decorate without needing to trim. If your cake does develop a slight dome, a serrated knife can easily level it once cooled.
- Pre-Chill for Stable Whipped Cream: While the Biscoff whipped cream topping can be prepared up to 24 hours in advance, chilling it before piping is highly recommended. Not only does it help the cream become more stable and hold its shape better, but a cold bowl and whisk (pop them in the freezer for 10-15 minutes before whipping) will also aid in achieving perfectly stiff peaks. Keep any leftover whipped cream covered with plastic wrap in the fridge.
- Do Not Overmix the Flour: Once you’ve added the flour and other dry ingredients, mix only until just combined. Overmixing develops the gluten in the flour, which can lead to a tough, rubbery cake. Gently fold the dry ingredients into the wet until no streaks of flour are visible.
- Ensure Full Cooling Before Glazing: It’s tempting to glaze the cake as soon as it’s out of the oven, but patience is a virtue here. The cake must be completely cool, even slightly chilled, before applying the Biscoff glaze. If the cake is warm, the glaze will melt and soak into the cake rather than forming a distinct, shiny layer.
Storing & Freezing Your Biscoff Cake
Proper storage is essential to keep your Biscoff cake fresh and delicious.
- Unfrosted Cake: The plain cookie butter cake base, without any glaze or whipped cream, can be stored at room temperature for up to 2 days. Ensure it’s tightly covered with plastic wrap or kept in an airtight container to prevent it from drying out.
- Whipped Cream Topping: The Biscoff whipped cream topping can be made up to 24 hours in advance. Store it in an airtight container in the fridge until ready to use. For the best texture and appearance, we highly recommend adding the whipped cream topping as close to serving time as possible.
- Frosted Cake: Once the cake is topped with the Biscoff glaze and whipped cream, it must be kept refrigerated due to the fresh cream. Store it in an airtight cake dome or container for up to 3-4 days.
- Freezing: You can freeze the baked Biscoff cake itself, but it’s best to do so without the Biscoff glaze or whipped cream. Wrap the cooled, unfrosted cake tightly in several layers of plastic wrap, then an additional layer of aluminum foil. It can be frozen for up to 2-3 months. Thaw overnight in the refrigerator before glazing and frosting.
More Delightful Biscoff Recipes to Explore
If you’ve fallen in love with the unique taste of Biscoff, there’s a whole world of cookie butter desserts waiting for you! Here are some other irresistible Biscoff-inspired recipes to try:
- Biscoff Truffles
- Biscoff Brownies
- Baked Biscoff Cheesecake
- Speculoos Tiramisu
- Easy Biscoff Donuts
- Mini Biscoff Cheesecakes
- Biscoff Cupcakes
- Biscoff Muffins
- No Bake Biscoff Cheesecake
- 12 Delicious Recipes with Biscoff Spread
Did you make this recipe?
We’d love to hear from you! Please let us know if you enjoyed it by leaving a comment below, and don’t forget to tag us on Instagram @a.baking.journey with a photo of your delicious creation!
Full Easy Biscoff Cake Recipe Card

Easy Biscoff Cake
Servings:
12
Author:
Sylvie
40 minutes
35 minutes
1 hour
15 minutes
Print Recipe
Prevent your screen from going dark
Ingredients
Biscoff Butter Cake
- 120 gr (1/2 cup) Unsalted Butter, soft, at room temperature
- 120 gr (1/2 cup) Caster Sugar, or fine white sugar
- 3 Eggs, medium, at room temperature
- 120 gr (1/2 cup) Biscoff Spread, or cookie butter – melted and cooled down
- 1 teaspoon Vanilla Extract
- 200 gr (1 1/3 cup) Plain / All-Purpose Flour
- 1 1/2 teaspoon Baking Powder
- 1 pinch Fine Salt
- 1 teaspoon Speculoos Spices, optional – see notes below for substitute
- 80 gr (1/3 cup) Biscoff Spread, melted, for the glaze
Biscoff Whipped Cream
- 180 ml (3/4 cup) Heavy / Thickened Cream
- 45 gr (3 tablespoons) Biscoff Spread, melted and cooled down
- 1 Biscoff Cookie, crushed
Instructions
Biscoff Butter Cake
- Preheat your oven on 160’c / 325’f. Line the bottom of a 20cm / 8-inch Springform Pan with baking paper and lightly grease the sides.
- In a stand mixer or large bowl with a hand mixer, cream the soft Butter and Sugar on medium speed for about 5 minutes, or until light and fluffy.
- Slowly add the Eggs one at the time, mixing until fully incorporated before adding the next one (see note 1). Mix in the cooled down melted Biscoff Spread and Vanilla.
- Sift in the Flour, Baking Powder, Salt and Speculoos Spice (optional). Gently mix it in until just combine, making sure to not over-work the batter.
- Pour the batter into the prepared tin and spread around with the back of a spoon or small offset spatula.
- Bake for 35 to 40 minutes or until a skewer comes out clean. Transfer onto a cooling rack and leave to cool down for at least 30 minutes. Carefully transfer the cake on a serving plate (see note 2).
- For the biscoff glaze, melt the biscoff spread in the microwave for 30 seconds to 1 minutes or until very smooth and fluid. Pour it over the cake and spread it around with the back of a spoon, letting it drip over the side of the cake. Set aside to set.
Biscoff Whipped Cream
- Place the cold Cream and cooled down melted Biscoff Spread in a large mixing bowl or the bowl of your stand mixer. Whip on medium to high speed until you reach stiff peaks (see note 3).
- Tranfer the cream into a piping bag fitted with a star piping tip. Pipe small dollops of whipped cream over the biscoff glaze around the edge of the cake (See note 4).
- Optionally, crush a biscoff cookie and sprinkle the crumbs over the whipped cream.
Video
Would you like to save this recipe?
We’ll email this post to you, so you can come back to it later!
Notes
- Don’t worry if the mixture looks like it is splitting slightly; it can happen when the butter was too cold or too warm or the sugar and butter were not creamed properly. The batter will come back together when you add the flour.
- If the cake still feels warm to the touch, leave it to cool down for a little bit longer or the crumb might break.
- I personally like to whip it with the mixer until I reach medium peaks then finish it by hands. This helps to control how much you mix it and avoid over-whipping it, which would give a slightly grainy texture to the cream.
- The whipped cream can be prepared in advance and be stored in the fridge until ready to serve. I recommend adding this topping as close to serving as possible as you don’t want the cream to start melting. Once topped with cream, the cake will need to be kept in the fridge.
Nutrition (per serving)
Carbohydrates: 34g |
Protein: 5g |
Fat: 23g |
Saturated Fat: 11g |
Polyunsaturated Fat: 1g |
Monounsaturated Fat: 4g |
Trans Fat: 0.3g |
Cholesterol: 79mg |
Sodium: 78mg |
Potassium: 51mg |
Fiber: 1g |
Sugar: 17g |
Vitamin A: 532IU |
Vitamin C: 0.1mg |
Calcium: 52mg |
Iron: 1mg
