Easy Homemade Mini Salted Caramel Tartlets: The Ultimate Sweet & Salty Dessert
These exquisite Mini Salted Caramel Tartlets are more than just a dessert; they are a celebration of flavor and texture, perfect for any gathering, special occasion, or a delightful addition to your holiday baking spread. Each bite-sized tartlet masterfully combines a crisp, buttery Shortcrust Pastry shell with a rich, gooey homemade Salted Caramel sauce, all elegantly finished with a delicate sprinkle of flaky Sea Salt. Prepare to impress with these irresistible sweet and salty treats!

Why You’ll Love These Salted Caramel Tartlets
There’s something inherently delightful about mini desserts, and these mini salted caramel tarts are no exception! They are the epitome of “party-perfect” treats, yet so wonderfully simple that you don’t need a grand celebration to whip up a batch. If you’re a connoisseur of that exquisite sweet and salty caramel combination, then this recipe is tailor-made for you.
Each individual tartlet boasts a delicate, golden-brown crust, meticulously crafted from a traditional French Shortcrust Pastry, known as Pâte Sablée. This pastry is renowned for its rich, buttery flavor and satisfyingly crunchy texture, providing the perfect counterpoint to the luscious filling. Baked in mini tart pans, these shells are sturdy enough to hold the generous caramel but tender enough to melt in your mouth.
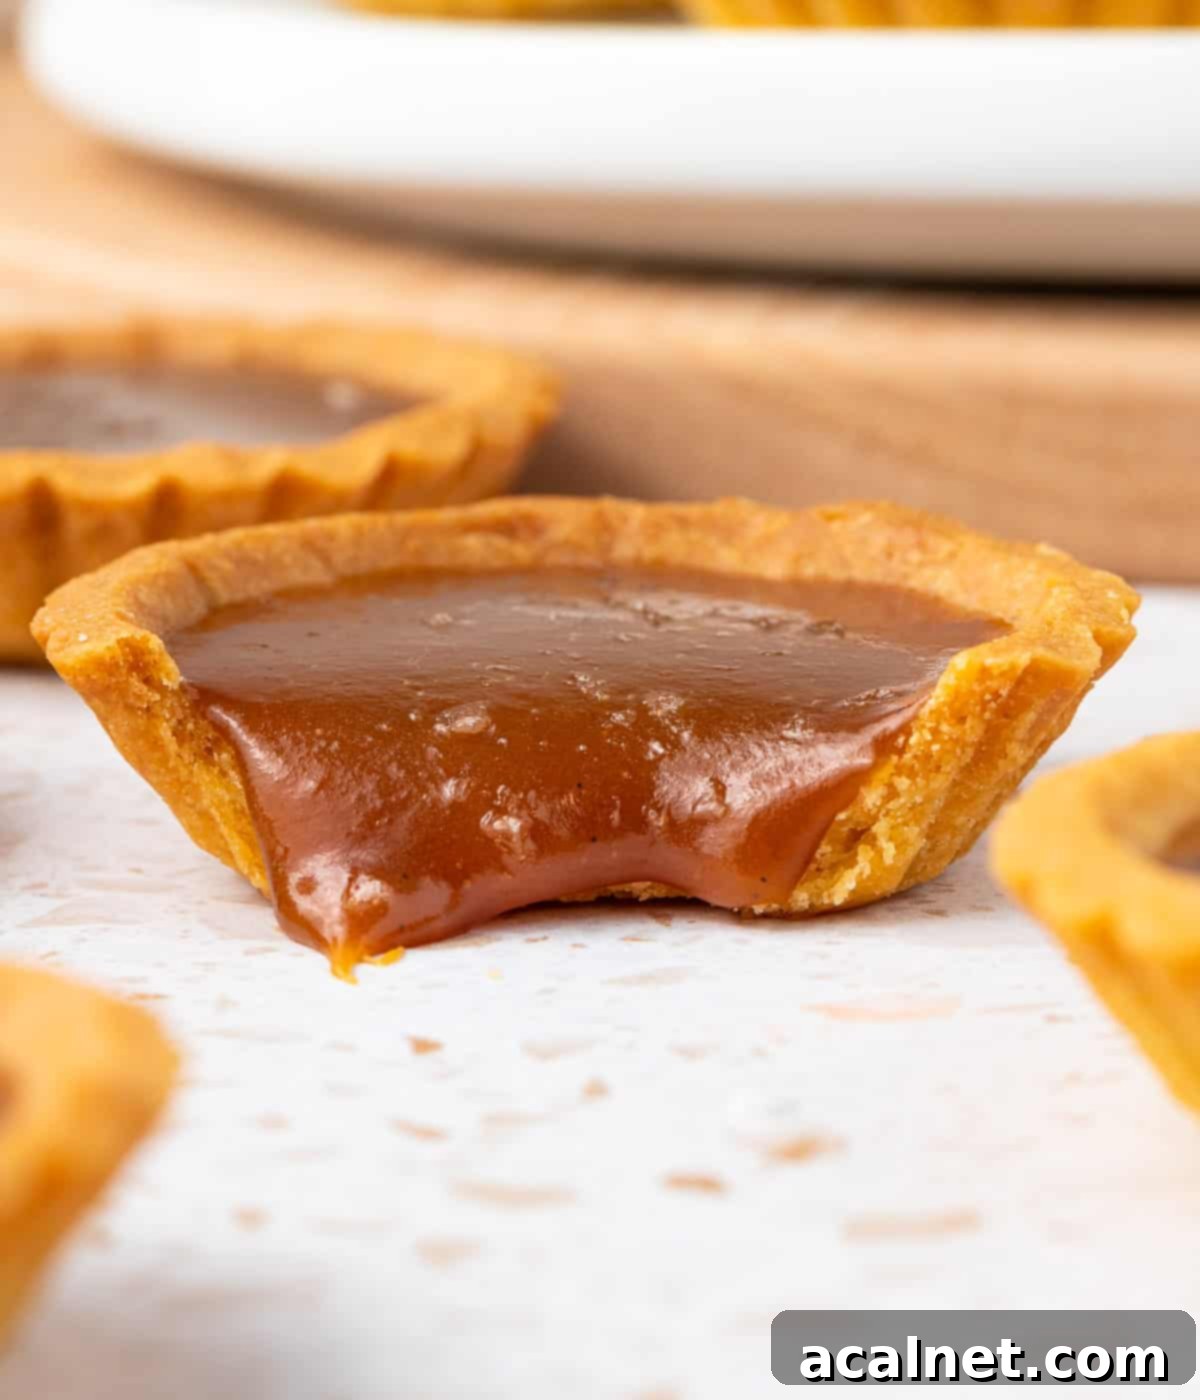
The star of the show, the salted caramel filling, is an experience in itself. It’s gloriously gooey, with a slight chewiness that keeps you coming back for more. Its deep, sweet notes are expertly balanced by a generous amount of sea salt, creating a complex flavor profile that tantalizes the taste buds. The interplay of sweet, salty, and buttery is simply irresistible, making these mini salted caramel tartlets a true crowd-pleaser.
Beyond their incredible taste, these salted caramel tartlets are a fantastic make-ahead dessert, allowing you to prepare them in advance and enjoy stress-free entertaining. They’re a treat the whole family, and any guest, will adore!
Craving an even more indulgent experience? Elevate these classic salted caramel tarts by adding a layer of rich chocolate. Our Mini Chocolate Caramel Tarts recipe takes this dessert to the next level. And if your love for salted caramel is boundless, you might also enjoy exploring the comforting flavors of our Mini Butterscotch Tartlets for another delightful bite-sized treat!
Essential Ingredients for Perfect Tartlets
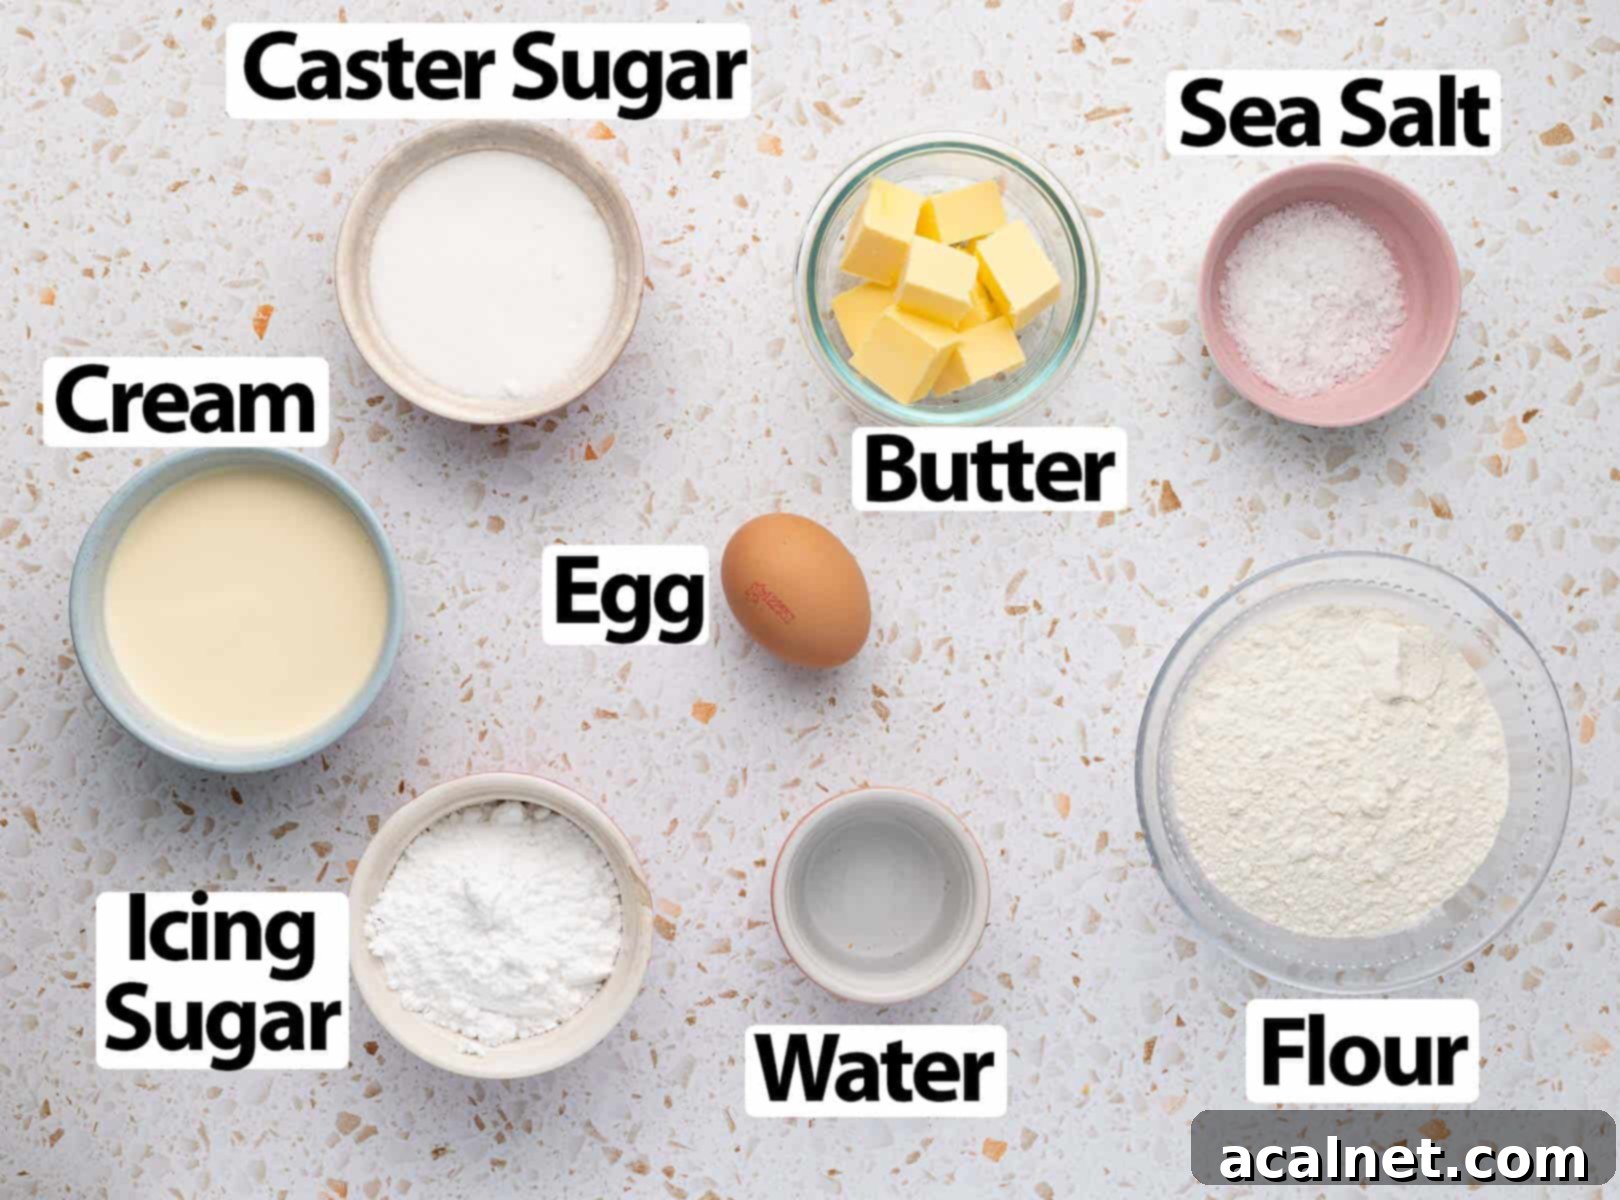
For precise measurements, please refer to the recipe card below.
For the Buttery Tartlet Crust:
- Dry Ingredients: This classic shortcrust pastry uses a simple yet effective blend of Plain / All-Purpose Flour, fine Icing Sugar (also known as powdered sugar), and a small pinch of Salt. Sifting these three dry ingredients together before combining them ensures a smooth, lump-free pastry dough, leading to a consistently tender and crisp crust.
- Butter: Opt for unsalted butter, and crucially, it must be very cold and cut into small cubes. Cold butter is essential for creating those delightful pockets in the pastry that result in a crisp, crumbly texture. Make sure it comes straight from the fridge and is not allowed to soften before mixing.
- Egg: A medium to large-sized egg helps bind the pastry dough together, adding richness and a lovely golden hue to the baked shells. For easier incorporation, you might whisk it lightly in a separate bowl before adding it to the dry ingredients.
For the Decadent Salted Caramel Filling:
- Sugar: Caster Sugar (or very fine white granulated sugar) is highly recommended for the caramel. Its fine granules melt more evenly and consistently, which is crucial for a smooth caramel. Brown sugar or other coarser sugars do not melt in the same way and can lead to a grainy texture, so we cannot recommend them for this recipe.
- Water: While optional, adding a small amount of water to the sugar at the start helps it melt more gradually and prevents it from burning too quickly, especially for those new to making caramel. This creates a “wet caramel” method, which is often more forgiving than a “dry caramel.”
- Cream: Use Heavy / Thickened Cream, and ensure it is at room temperature. If the cream is too cold when added to the hot sugar, it can cause the sugar to seize and crystallize. For an extra safeguard, you can gently warm the cream slightly before adding it, which helps it blend seamlessly with the melted sugar.
- Butter: Unsalted butter is preferred, allowing you to control the saltiness of the caramel. However, if you’re aiming for a more traditional French-style salted butter caramel, you could use salted butter. Like the cream, the butter should be at room temperature, but not overly soft or melted, to ensure it emulsifies properly into the caramel.
- Sea Salt: The amount of sea salt you add is entirely up to your personal preference, dictating the balance between sweet and salty. We suggest using flaky sea salt, both within the caramel sauce to enhance its depth of flavor and as a beautiful, textural topping for a final flourish.
Optional Enhancements: For an added layer of aroma and flavor, consider stirring in some Vanilla Paste (or vanilla extract) at the end. Other delightful additions like a hint of fresh orange zest can also bring a wonderful complexity to your homemade salted caramel.
Crafting Your Mini Salted Caramel Tarts: A Step-by-Step Guide
Perfecting the Tartlet Shells
The foundation of these delicious tartlets begins with a perfectly crisp pastry shell. While I prefer using a food processor for speed and consistency, you can certainly make this dough by hand. Refer to my detailed instructions for Pâte Sablée if you choose the manual method.
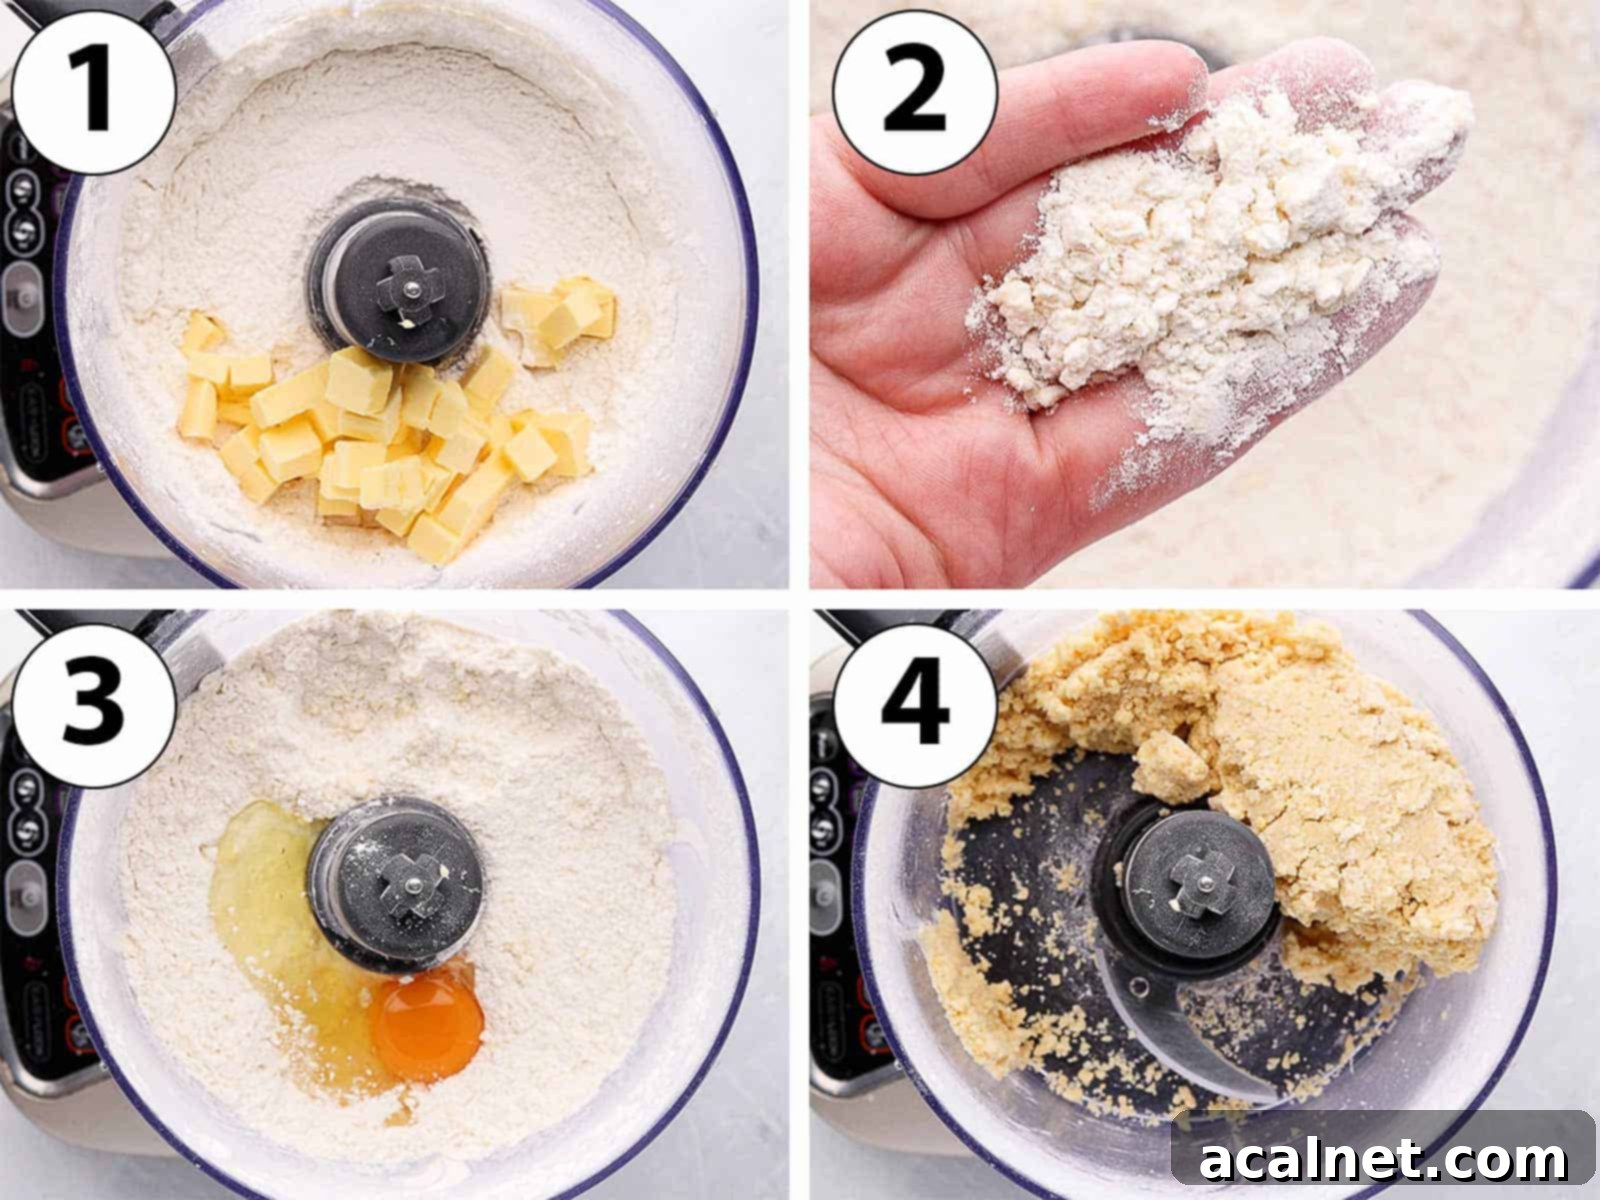
- Photo 1: Begin by placing the pre-sifted Plain Flour, Icing Sugar, and Salt into the bowl of your food processor. Give it a few quick pulses to ensure all the dry ingredients are thoroughly combined. Next, add the very cold, cubed Unsalted Butter. The colder the butter, the better the pastry will turn out.
- Photo 2: Process the mixture until the butter is broken down into very small crumbs. For this particular recipe, we’re aiming for a less flaky, more delicate and crunchy pastry, so continue mixing until the mixture resembles fine sand, with minimal larger butter pieces.
- Photo 3: Incorporate the Egg into the flour and butter mixture. This is the liquid component that will bring the dough together.
- Photo 4: Continue mixing just until a rough dough starts to form. It might appear slightly crumbly at first, which is perfectly normal. To check if the pastry is sufficiently mixed, take a small amount of crumbs in your hand and press them together. If they stick to form a cohesive piece, your pastry is ready. If it feels too dry or doesn’t come together, add a few drops of very cold water and pulse again until the desired consistency is achieved. Avoid overmixing, as this can lead to a tough pastry.
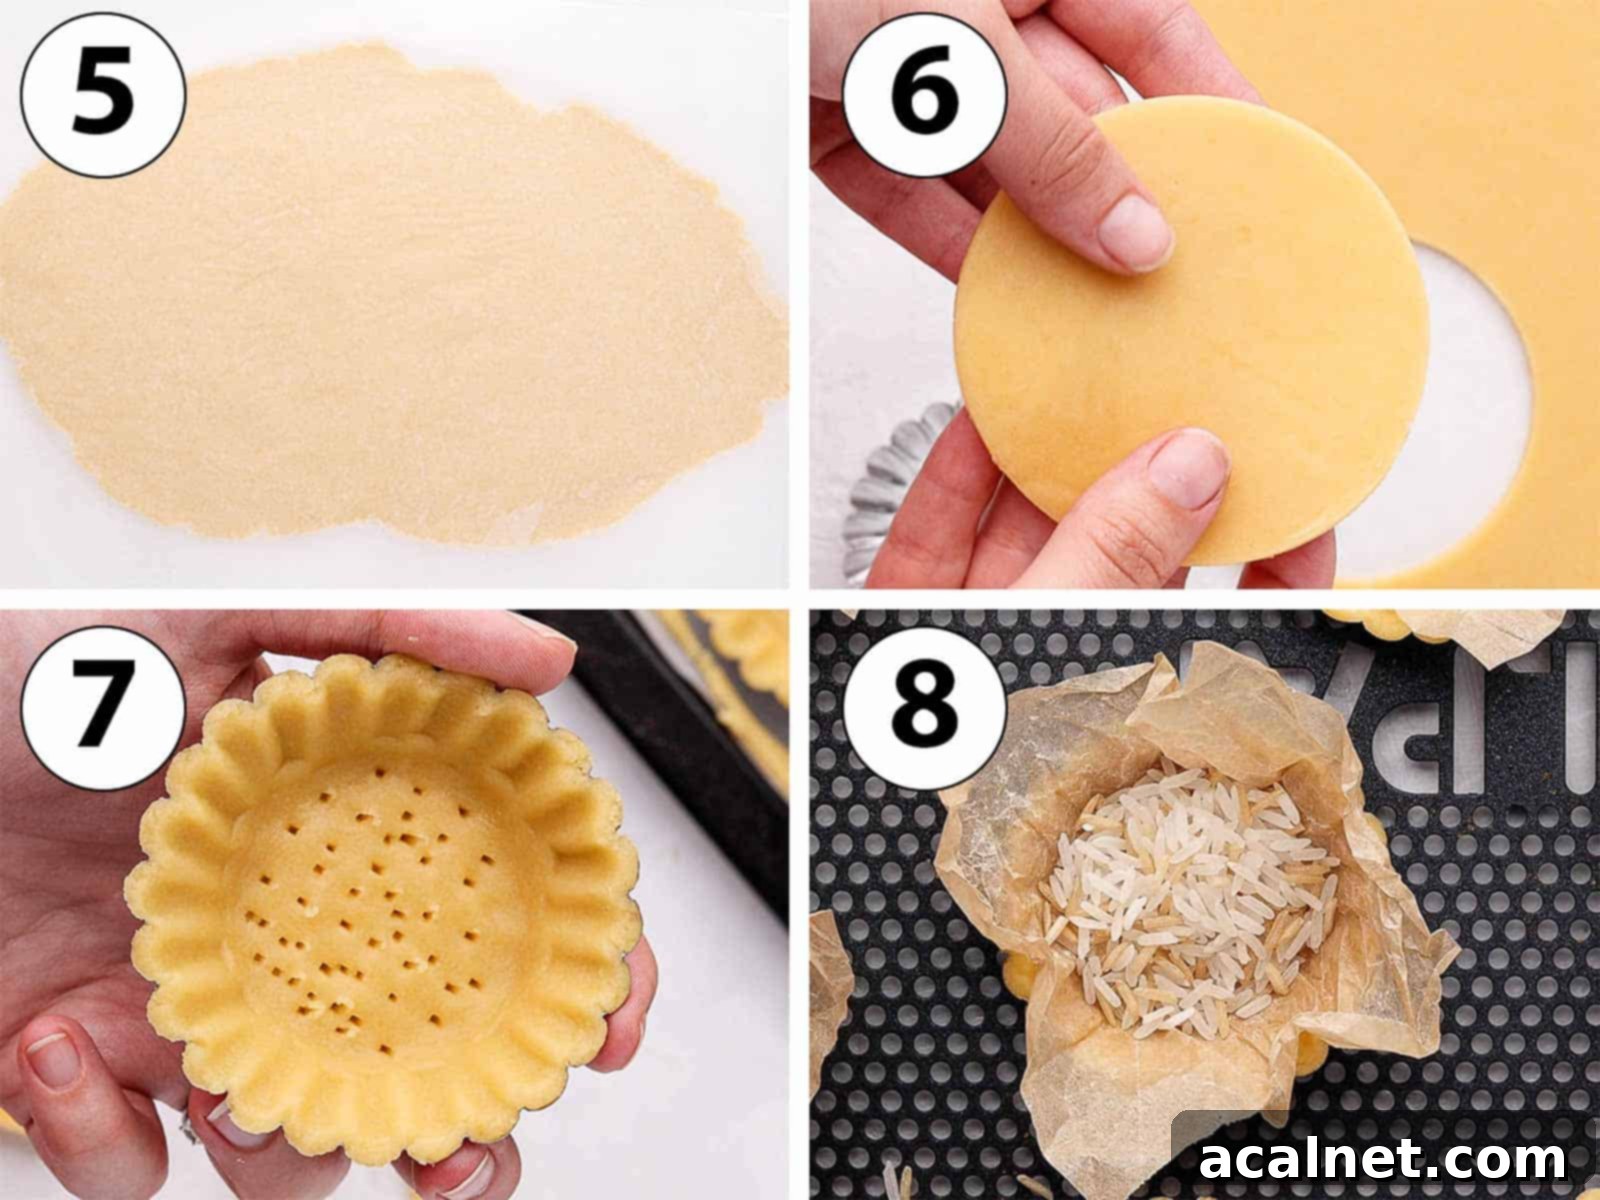
- Photo 5: Gently gather the crumbly dough into a ball and place it between two large sheets of baking paper or parchment paper. Using your hands, lightly flatten the ball, then take a rolling pin and roll the dough evenly to a thickness of approximately 4mm (or about 1/8 inch). This precise thickness ensures a delicate yet sturdy crust. Once rolled, transfer the dough (still between the baking paper) onto a flat tray and refrigerate for at least one hour, or ideally, overnight. This crucial chilling period allows the gluten to relax and the butter to firm up, preventing shrinkage during baking.
- Photo 6: Retrieve the chilled dough from the fridge and carefully remove the baking paper. Using a round cookie cutter that is slightly larger than your mini tartlet pans, cut out individual pastry disks. For example, if your Mini Tart Pans are 7 cm (about 2.75 inches) wide, aim to cut pastry disks that are approximately 10 to 12 cm (about 4 to 4.75 inches) in diameter. This extra size allows the pastry to comfortably line the sides of the pans.
- Photo 7: Carefully place each pastry disk into a tartlet pan, gently pressing it down the sides and into the bottom corners. Ensure the pastry is flush with the pan, especially at the edge where the side meets the base, to create a neat crust. If the dough feels too stiff to work with, let it warm up slightly at room temperature for a few minutes. If it becomes too soft and starts to tear, return it to the fridge for 5-10 minutes to firm up. Any excess dough can be re-gathered, re-rolled, and chilled for at least 2 hours to make additional tartlet shells.
- After lining all the pans, place them back in the fridge to chill again for at least 1 hour, or preferably overnight. This second chilling step is vital for maintaining the shape of the tartlet shells during baking.
- Preheat your oven to 160 degrees Celsius (325 degrees Fahrenheit). Before baking, gently prick the bottom of each pastry crust several times with a small fork (this is called “docking” and helps prevent air bubbles). For optimal results, you can place the lined tartlet shells in the freezer for 10 to 15 minutes while the oven preheats; this helps set the butter and further prevents shrinkage.
- Photo 8: Line each pastry crust with a small piece of crumpled baking paper, then fill with baking weights, dried beans, or rice. These weights prevent the bottom of the crust from puffing up during blind baking.
- Bake the tartlet shells for 15 minutes with the weights. Then, carefully remove the weights and baking paper and continue baking for an additional 12 to 15 minutes, or until the bottom of the crust feels dry to the touch and the edges are lightly golden. Once baked, remove them from the oven and allow them to cool completely in their pans before filling.
Crafting the Irresistible Salted Caramel Filling
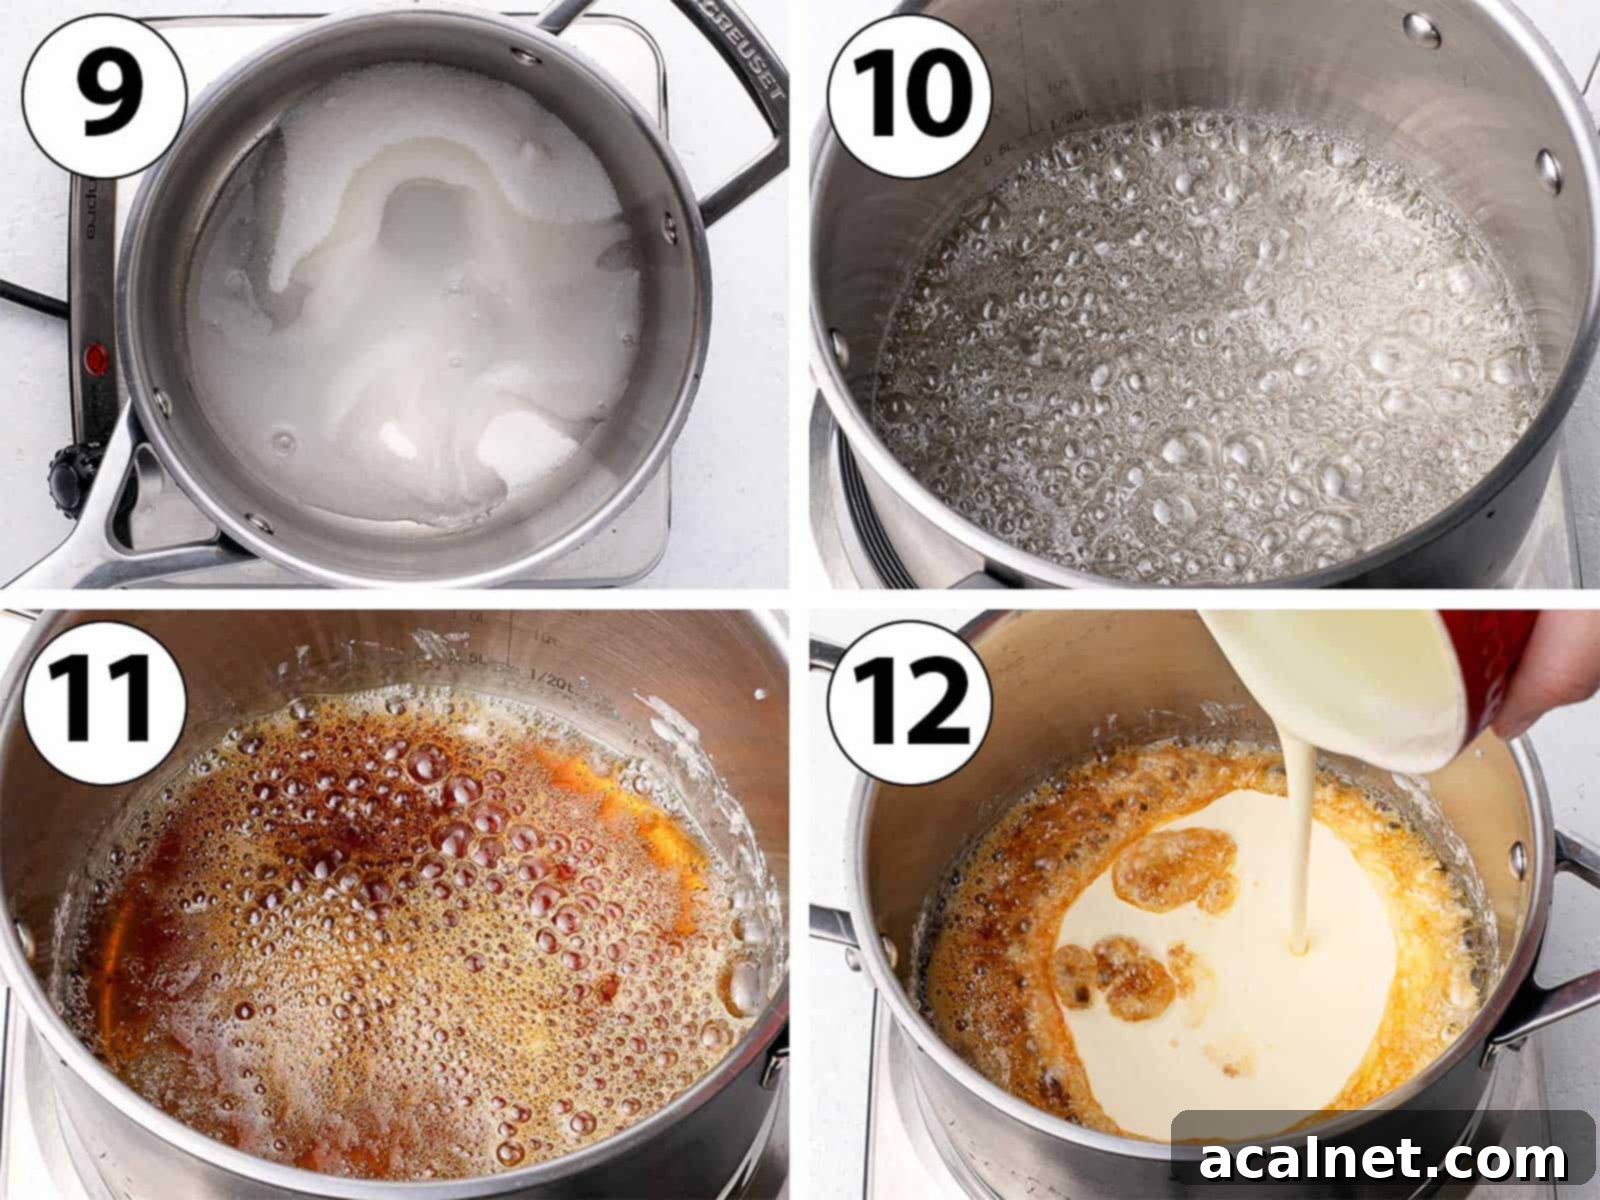
- Photo 9: In a medium to large-sized, heavy-bottomed saucepan, combine the Caster Sugar and Water. Give it a quick stir to evenly moisten all the sugar granules, then place it over very low heat. It’s crucial not to rush this stage by using medium or high heat, as the sugar can melt too quickly and burn, resulting in a bitter caramel.
- Photo 10: Allow the sugar to melt slowly and without disturbance. Resist the urge to stir it! It will begin to boil, forming large, clear bubbles. Don’t be alarmed if the sugar initially appears to clump or crystallize; this is a common occurrence with wet caramel and it should eventually melt into a clear syrup. The key is patience.
- Photo 11: Continue to cook the sugar, still without stirring, until its color transforms from clear to a beautiful orange, then to a light brown, and finally to a rich amber hue. This process typically takes between 5 to 10 minutes, depending on your stove’s temperature. Exercise caution during this stage; caramel gets very hot. If you have one, a candy thermometer can be helpful to ensure accuracy, aiming for a temperature around 170-175 degrees Celsius (338-347 degrees Fahrenheit). The caramel can start to burn quickly above 180 degrees Celsius (350 degrees Fahrenheit), which will result in a harsh, bitter flavor.
Pro Tip: The color of your caramel directly impacts its flavor. A lighter, pale amber caramel will be sweeter and milder. Pushing it further to a deeper, rich amber will yield a more complex, slightly bitter, and nutty flavor. Be careful not to go too dark, or it will taste burnt. Experiment to find your preferred balance of sweetness and bitterness!
- Photo 12: Once your caramel has reached the desired amber color, carefully pour the room temperature (or lukewarm) Heavy Cream into the melted sugar. This step will cause the mixture to bubble up vigorously and rise quickly in the saucepan, so be extremely careful and stand back to avoid any burns. Ensure your stove is on the very lowest heat setting before adding the cream.
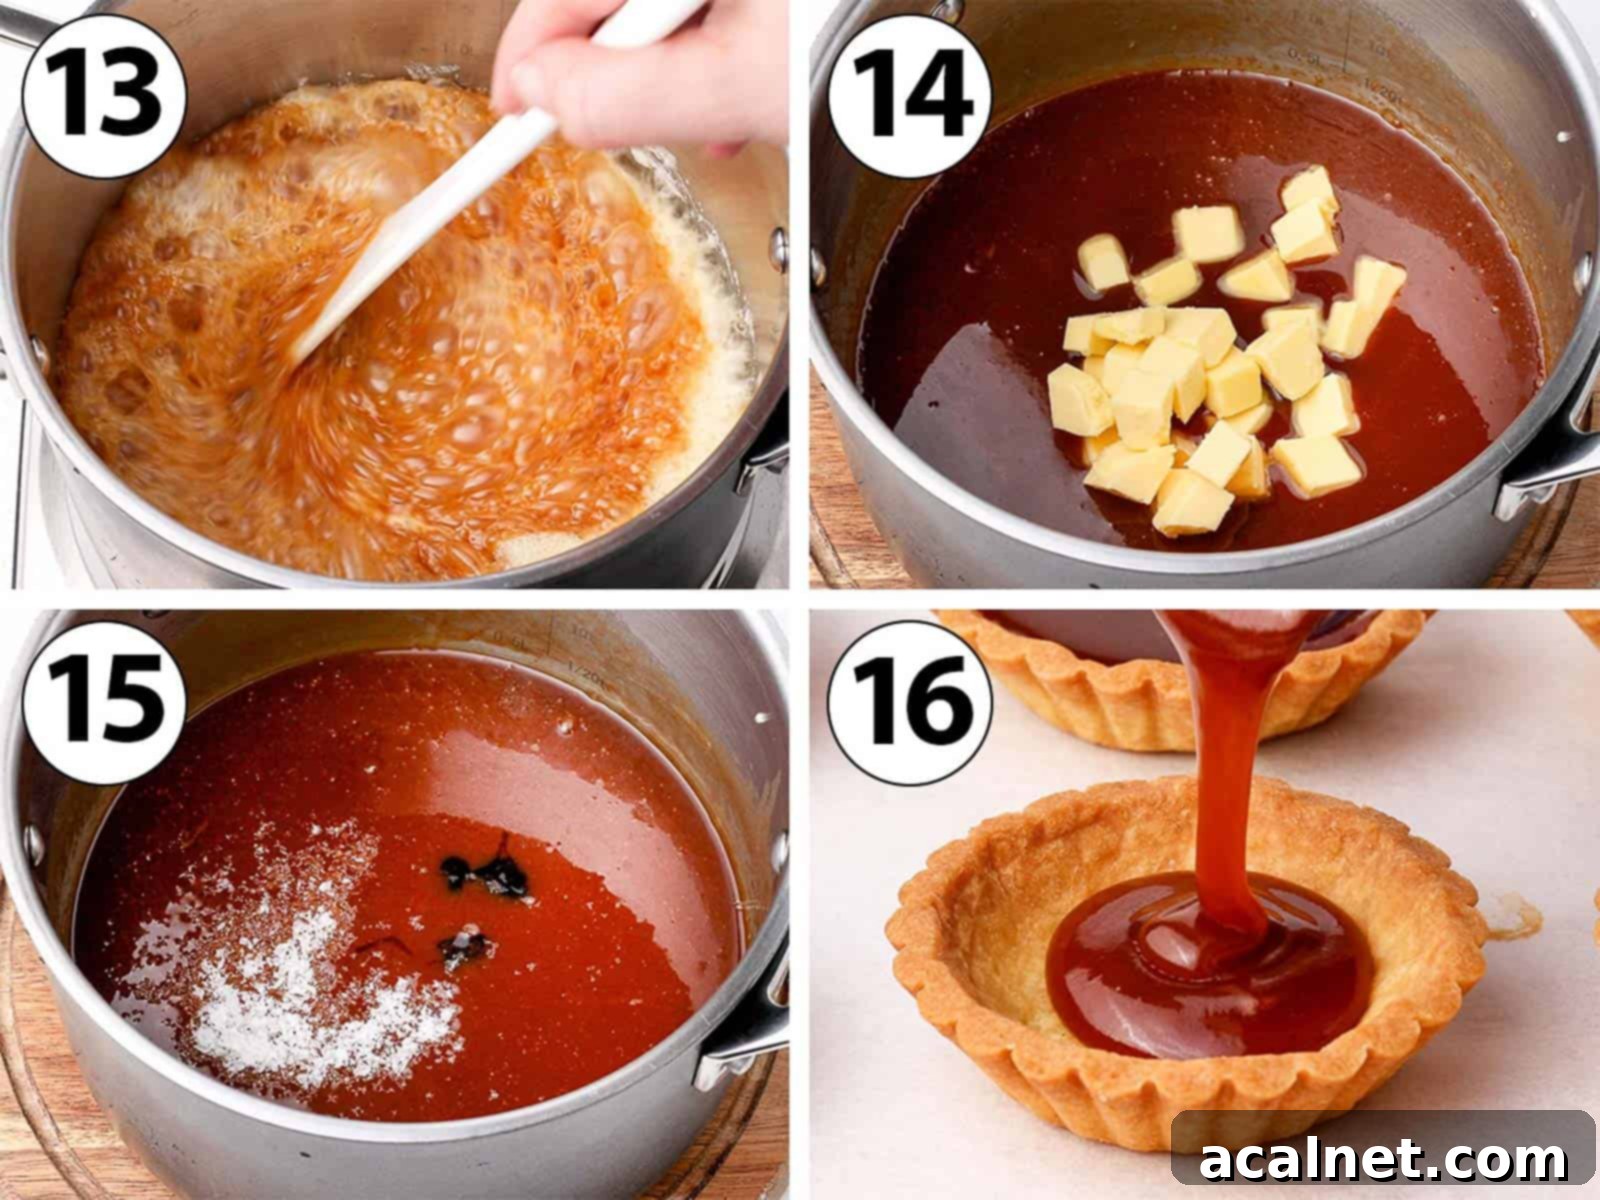
- Photo 13: Using a heat-proof spatula, stir the mixture vigorously until all the cream is thoroughly incorporated and you achieve a beautifully smooth and shiny caramel sauce. Again, be very cautious of any potential splashing. If the cream was too cold, the sugar might seize or crystallize. Should this occur, don’t despair! Return the saucepan to very low heat and continue stirring gently until the sugar melts again and the sauce becomes smooth. To prevent this, always ensure your cream is at room temperature or slightly warmed beforehand.
- Photo 14: Remove the saucepan from the heat and allow the hot caramel sauce to cool slightly for about 5 minutes. This brief cooling period helps prevent the butter from separating. Then, add the room temperature butter in small pieces, stirring continuously until each piece is fully melted and incorporated into the smooth caramel.
- Photo 15: Finally, stir in the Sea Salt to taste and, if using, the Vanilla Paste. Mix until well combined. The flaky sea salt will dissolve partially, enhancing the caramel’s flavor from within.
- Photo 16: Carefully transfer the warm, fluid salted caramel filling into a clean jug (or a pastry bag for more precise pouring). Immediately pour the caramel into your completely cooled, prepared tartlet crusts. It’s important to work quickly here, as the caramel will begin to thicken and become sticky as it cools.
- Gently tap the filled tartlets on a hard surface a few times. This action helps to release any trapped air bubbles and ensures the salted caramel spreads evenly within the shells, creating a perfectly smooth surface.
- Place the mini salted caramel tartlets in the fridge to chill for at least 1 to 2 hours, or preferably overnight. The longer they chill, the firmer and more set the caramel filling will become.
- Just before serving, for that extra touch of gourmet elegance and an intensified sweet-salty crunch, optionally sprinkle some additional Flaky Sea Salt over the top of your set salted caramel tartlets.
Frequently Asked Questions About Salted Caramel Tartlets
Absolutely! If you’re short on time or prefer a simpler approach, using high-quality pre-made tartlet shells is a perfectly acceptable shortcut. Just ensure they are fully baked and cooled before adding your homemade salted caramel filling. This will save you a significant amount of preparation time while still allowing you to enjoy the delicious, scratch-made caramel.
No mini tart pans? No problem! You can easily adapt this recipe by using a standard muffin pan. Simply follow our recipe for Tartlet Shells in a Muffin Pan. The shells made in a muffin pan will be slightly smaller than those made in dedicated mini tart pans, so you might get a larger yield from the same amount of dough, creating even more adorable bite-sized treats.
Yes, these mini salted caramel tartlets are excellent for making ahead! The tartlet pastry can be prepared and kept un-baked in the fridge for up to 24 hours. Once baked, the empty shells can be stored at room temperature in an airtight container for another 24 hours. For the assembled tarts, the salted caramel filling needs to be poured into the tart crusts while it’s still warm and fluid. The finished tarts can then be stored in the fridge until you are ready to serve them. For the absolute best texture and freshness, we recommend enjoying them within 24 hours of pouring the filling.
Absolutely! The versatile pastry recipe used for these mini tart crusts is the very same one I use for larger tarts (my Pâte Sablée recipe). To make a show-stopping large salted caramel tart, simply line the pastry into a 22 to 24 cm (9 to 10-inch) tart pan and proceed with the recipe. You’ll need to adjust the blind baking time slightly for a larger crust, typically extending it by 5-10 minutes for both stages of baking.

Pro Tips & Troubleshooting for Success
- The Pastry is Dry or Cracking: The consistency of pastry dough can sometimes vary due to environmental factors like humidity, or even the specific brand of flour or size of your egg. If your dough feels too dry, crumbly, or starts cracking when you try to roll it, simply add a few drops (start with half a teaspoon) of very cold water and mix briefly until the dough comes together and achieves a pliable consistency. Avoid adding too much water at once.
- The Pastry is Too Hard or Too Soft to Handle: If your pastry dough feels too stiff and difficult to work with after chilling, let it sit at room temperature for 5 to 10 minutes to allow the butter to soften slightly. Conversely, if the dough becomes too soft and sticky, making it hard to line the tartlet pans without tearing, pop it back into the fridge for 5 to 10 minutes to firm up. Temperature management is key for easy handling.
- The Crust Shrank or Collapsed When Baked: This common issue almost always stems from insufficient chilling time. When pastry dough isn’t adequately chilled, the butter melts too quickly in the oven, causing the gluten to contract and the crust to shrink. The best tip for perfectly shaped tartlet shells is to chill the dough twice: once after rolling, and again after lining the tartlet pans. I personally find chilling the lined tartlet pans overnight in the fridge yields the most consistent and stable results.
- The Sugar Isn’t Melting or Crystallizes: When making a wet caramel (with water), it will naturally take a bit longer for the sugar to melt and caramelize compared to a dry caramel (sugar only). The water needs to evaporate completely before the sugar truly begins to caramelize. Be patient and keep the heat low. If your salted caramel becomes grainy, lumpy, or crystallizes, this is often due to stirring the sugar while it’s melting or sugar crystals adhering to the sides of the pan. To prevent this, ensure your saucepan is meticulously clean before starting, avoid stirring the sugar once it’s on the heat, and if sugar crystals form on the sides, gently brush them down with a wet pastry brush. Adding a small amount of inverted sugar (like corn syrup, glucose syrup, or even honey) can also help prevent crystallization.
- Caramel Splashes or Seizes When Adding Cream: Hot caramel is extremely dangerous. When adding cream to hot caramel, it will bubble up vigorously and release steam. Always ensure the cream is at room temperature or lukewarm, as cold cream is more likely to cause the caramel to seize and splatter. Pour it in slowly and carefully, standing back. If the caramel seizes, do not panic. Return the pan to very low heat and stir continuously until the sugar re-dissolves and the caramel becomes smooth again.
Storing & Freezing Your Tartlets
Storing Unbaked Pastry: The prepared tartlet shells can be made in advance and stored unbaked in the fridge for up to 24 hours. Ensure they are well-covered to prevent drying out.
Storing Baked Shells: Once the tartlet shells are baked and completely cooled, they can be stored at room temperature in an airtight container for up to 24 hours before filling.
Storing Finished Tartlets: The caramel filling should be poured into the shells while still warm for the best fluidity. Once assembled, these delicious salted caramel tartlets will last for up to 3 days when stored in an airtight container in the fridge. However, for optimal texture and flavor, they are truly at their best when served within 24 hours of being filled.
Freezing: While we don’t recommend freezing the finished, filled tartlets (as the caramel’s texture can change upon thawing), the tartlet shells themselves are quite freezer-friendly. You can freeze them either baked or unbaked. To freeze unbaked shells, simply line your tart pans, then freeze until solid before transferring the frozen shells to an airtight container or freezer bag. To freeze baked shells, let them cool completely, then freeze in a similar fashion. Thaw in the fridge before filling or baking.

Explore More Delightful Tartlet Recipes
If you’ve fallen in love with making mini treats, don’t stop here! Discover more fantastic tartlet creations to expand your baking repertoire:
- Vibrant Mini Fruit Tarts
- Tangy Lemon Curd Tartlets
- Bright Orange Tartlets
- Rich Chocolate Orange Tartlets
- Effortless Easy Cherry Tartlets
- Classic Mini Chocolate Tarts
- Elegant Pear Frangipane Tartlets
Made this recipe?
Let us know if you liked it by leaving a comment below, and tag us on Instagram @a.baking.journey with a photo of your creation!
Recipe Card

Salted Caramel Tartlets
Servings:
15 tartlets
Author:
Sylvie
1 hour
45 minutes
4 hours
5 hours 45 minutes
Print Recipe
Ingredients
Tartlet Shells
- 250 gr Plain / All-Purpose Flour
- 50 gr Icing Sugar
- 1 pinch Fine Table Salt
- 120 gr Unsalted Butter, very cold, cubed
- 1 Egg, medium to large size
Salted Caramel Filling
- 250 gr Caster Sugar, or fine white granulated sugar
- 30 ml Water
- 150 ml Heavy / Thickened Cream, at room temperature or lukewarm
- 60 gr Unsalted Butter, at room temperature
- 1 teaspoon Flaky Sea Salt, plus extra for topping, optional
- 1/2 teaspoon Vanilla Paste, optional
Instructions
Tartlet Shells
- Place the sifted Plain Flour, Icing Sugar and Salt in the bowl of your food processor. Pulse for a few seconds to mix thoroughly.
- Add the very cold cubed Butter. Mix until you get very small crumbs of butter, resembling fine sand. (See note 1 for texture details.)
- Add the Egg and mix until a rough dough just starts to come together. (Refer to note 2 for consistency check.)
- Form the dough into a ball and place it between two large sheets of baking paper. Gently flatten with your hands, then use a rolling pin to roll to a consistent thickness of about 3 to 4mm (1/6 to 1/8 inch). Place on a flat tray and chill in the fridge for at least one hour, or preferably overnight, to rest.
- Take the dough out of the fridge and remove the baking paper. Using a round cookie cutter, cut out disks of pastry slightly larger than your tartlet pans. (See note 3 for sizing guidance.)
- Carefully line the tartlet pans with the pastry, gently easing it down the sides. Press firmly at the junction between the side and bottom to ensure the pastry is flush. Place the lined pans back in the fridge to chill for at least 1 hour, ideally overnight.
Any excess dough can be re-rolled and chilled for at least 2 hours to create additional tartlet crusts.
- Preheat your oven to 160 degrees Celsius (325 degrees Fahrenheit). Dock the bottom of each pastry crust with a small fork. Cover each crust with a crumpled piece of baking paper, then fill with baking weights, dried beans, or rice for blind baking.
- Bake for 15 minutes. Then, remove the weights and baking paper and continue to bake for an additional 12 to 15 minutes, or until the tartlet bottoms are dry to the touch and the edges are lightly golden. Remove from the oven and allow to cool completely before filling.
Salted Caramel
- Combine the Caster Sugar and Water in a medium to large heavy-bottomed saucepan. Stir briefly to distribute the water evenly, then turn the heat to low. (See note 4 regarding heat levels.)
- Allow the sugar to melt slowly without stirring. It will boil and form clear bubbles, eventually turning orange to light brown, then amber. This usually takes 5 to 10 minutes. (Exercise caution; refer to note 5 for critical caramel-making tips.)
- Carefully pour in the room temperature or lukewarm Cream. The mixture will vigorously bubble and rise; be extremely careful to avoid burns. Using a heat-proof spatula, stir vigorously until all the cream is incorporated and you have a smooth, shiny sauce. (See note 6 for safety and troubleshooting.)
- Remove the saucepan from the heat and let the sauce cool for 5 minutes. Stir in the Butter, one small piece at a time, until it is fully melted and smoothly incorporated.
- Mix in the Sea Salt and, if desired, the Vanilla Paste until well combined.
- Transfer the warm salted caramel filling into a clean jug (or a pastry bag) and immediately pour it into the prepared tartlet crusts. Gently tap the tarts on a hard surface to remove any air bubbles and help the caramel spread evenly.
- Place the filled tartlets in the fridge to chill for at least 1 to 2 hours, or preferably overnight, until the caramel is set.
- Just before serving, sprinkle some additional Flaky Sea Salt on top of the chilled salted caramel tartlets for an extra touch of flavor and visual appeal.
Video
Would you like to save this recipe?
We’ll email this post to you, so you can come back to it later!
Notes
- The flakiness of your pastry depends on the size of the butter crumbs. For this particular recipe, we aim for a more tender, less flaky shortcrust, so ensure the butter is processed until the crumbs are very small, resembling fine sand.
- To test if the pastry dough is adequately mixed, gather a small portion of the crumbs in your hand and squeeze. If they cohere into a solid piece, the dough is ready. If it remains crumbly and dry, add a few drops of very cold water and mix just until the desired consistency is achieved.
- This recipe uses Mini Tart Pans that are typically 7 cm (about 2.75 inches) wide. For these, cut your pastry disks to be about 10 to 12 cm (approximately 4 to 4.75 inches) in diameter, allowing enough dough to properly line the sides of the pans.
- When making caramel, maintaining a low heat is essential. High heat can cause the sugar to melt too quickly and burn, resulting in a bitter caramel. Patience at this stage is key.
- Caramelizing sugar is a delicate process. Watch the color carefully; a lighter amber yields a sweeter caramel, while a deeper amber offers more complex, slightly bitter notes. Never stir the sugar while it’s melting, as this can cause it to crystallize. Using a candy thermometer can help you monitor the temperature, aiming for around 170-175°C (338-347°F). Avoid exceeding 180°C (350°F) to prevent burning.
- Exercise extreme caution when adding cream to hot caramel. The mixture will bubble up vigorously and release intense steam, posing a burn risk. Ensure the cream is at room temperature or even slightly warmed beforehand to minimize the temperature shock and prevent the caramel from seizing or splashing.
Nutrition (per serving)
Carbohydrates: 33g |
Protein: 3g |
Fat: 14g |
Saturated Fat: 9g |
Polyunsaturated Fat: 1g |
Monounsaturated Fat: 4g |
Trans Fat: 0.4g |
Cholesterol: 48mg |
Sodium: 166mg |
Potassium: 79mg |
Fiber: 2g |
Sugar: 20g |
Vitamin A: 464IU |
Vitamin C: 0.1mg |
Calcium: 16mg |
Iron: 0.5mg
