Indulge in the Ultimate Classic French Dark Chocolate Ganache Tart: A Decadent Homemade Delight
Welcome to a chocolate lover’s dream dessert! This Classic French Chocolate Ganache Tart seamlessly blends a delightfully crunchy Chocolate Tart Crust with an unbelievably decadent Dark Chocolate Ganache Filling. What’s more, the rich ganache is made from just two simple ingredients, proving that extraordinary flavor doesn’t always require a complicated process. Whether you’re planning a sophisticated dinner party, a cozy afternoon tea, or simply craving an intense chocolate fix, this elegant tart is sure to impress with its rich flavor and contrasting textures.

[feast_advanced_jump_to]
Why This Classic French Chocolate Tart Is a Must-Try
For true connoisseurs of chocolate, is there any dessert more satisfying than one that is entirely dedicated to the rich, complex flavors of cacao? We think not! This Dark Chocolate Ganache Tart delivers an unparalleled chocolate experience that goes beyond mere sweetness, offering depth and intensity in every single bite. It’s the kind of dessert that feels incredibly luxurious and impressive, yet is surprisingly straightforward to prepare.
Much like its charming Mini Chocolate Tarts counterpart, this full-sized French tart boasts the perfect harmony of textures. You’ll find a wonderfully crunchy and crispy chocolate pastry crust providing a delightful counterpoint to an intensely flavorful chocolate ganache filling. What makes this ganache particularly special is its simplicity – made with no added sugar, allowing the pure essence of the dark chocolate to shine through.
This classic French dessert offers an easier, yet equally delicious, alternative to more complex recipes like our Baked Triple Chocolate Tart. Instead of a truffle-like consistency, this tart features an incredibly smooth, melt-in-your-mouth fudgey texture that is utterly irresistible. The combination of the crisp cocoa crust and the rich, silken ganache creates a symphony of sensations that will captivate your taste buds. It’s a truly decadent dark chocolate pastry that’s perfect for any occasion.
Essential Ingredients for Your Decadent Chocolate Tart
Crafting this exquisite French Chocolate Ganache Tart begins with selecting the right, high-quality ingredients. While the recipe is simple, the quality of each component makes a significant difference in the final taste and texture of your dessert. We’ll divide the ingredients into two main parts: the rich Cocoa Tart Crust and the luscious Dark Chocolate Ganache Filling.
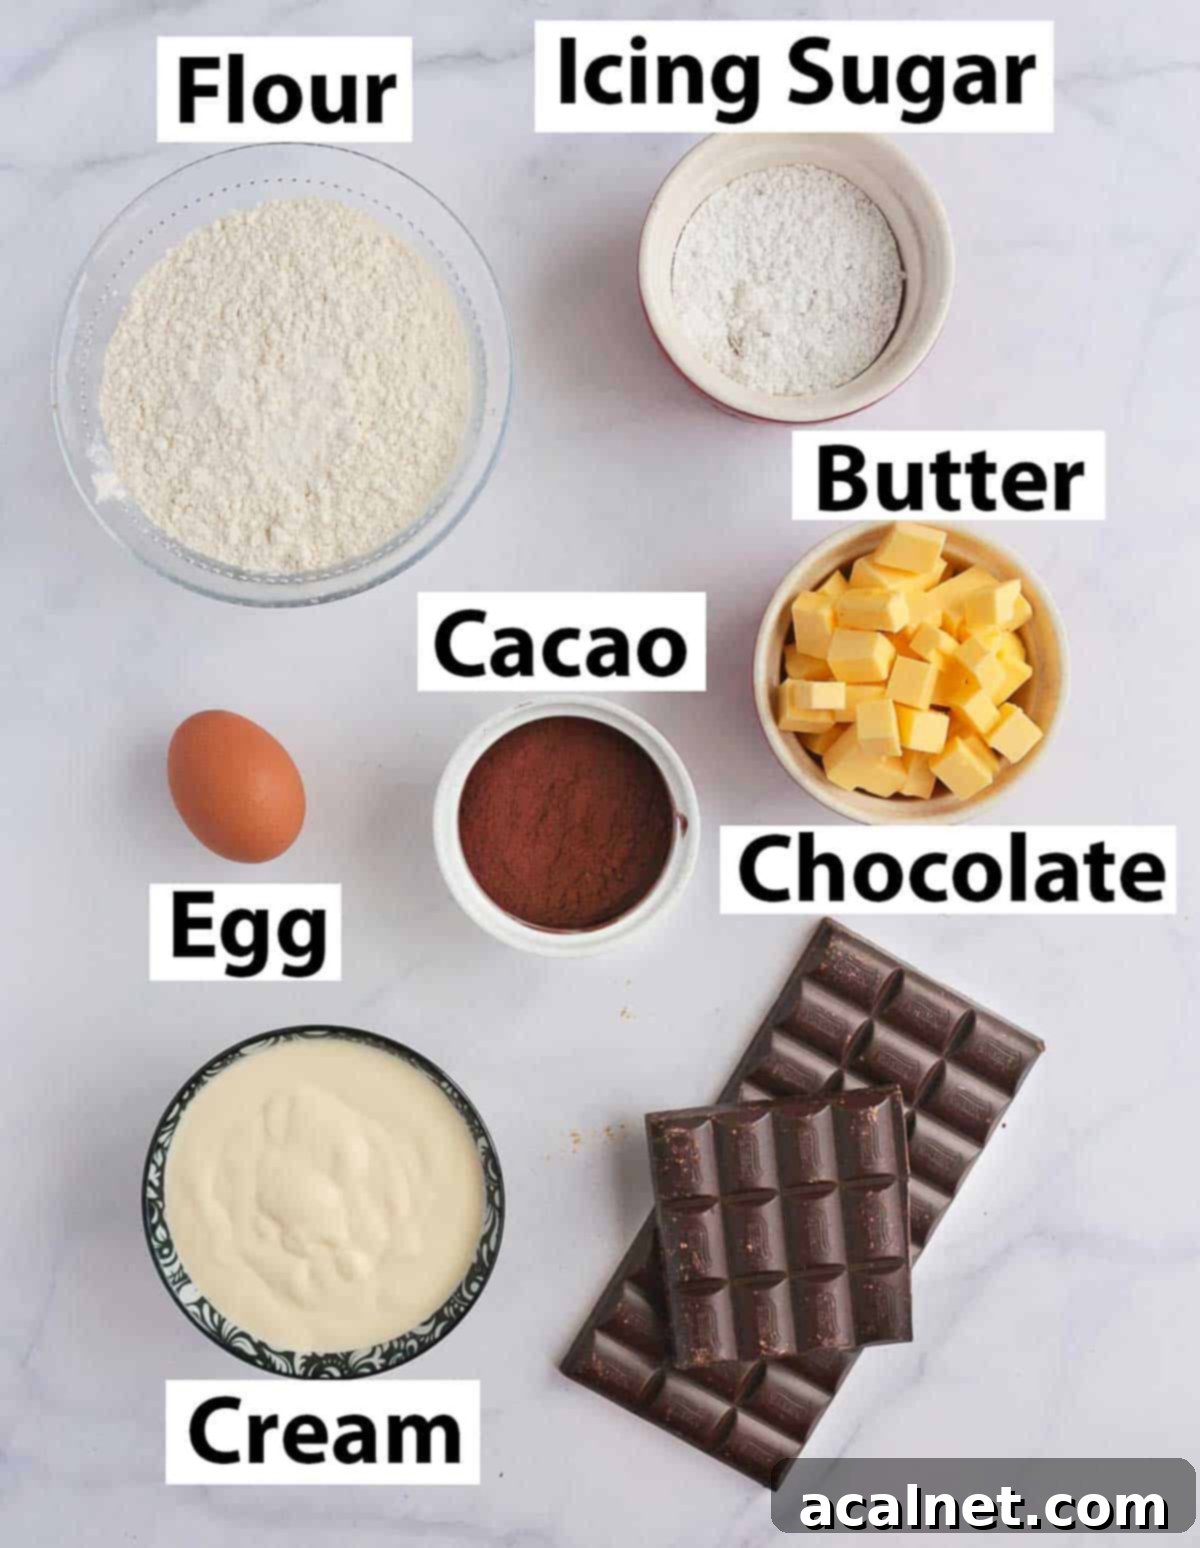
For the Cocoa Tart Crust (Pâte Sablée)
The foundation of this tart is a classic French Shortcrust Pastry, known as Pâte Sablée, enriched with the addition of high-quality unsweetened cacao powder. This specific type of pastry is renowned for its delicate, crumbly texture that truly ‘melts in the mouth’, and the cocoa powder infuses it with a deep, complementary chocolate flavor. It’s meticulously crafted by combining precise amounts of dry and wet ingredients:
- Dry Ingredients: You’ll need Plain / All-Purpose Flour to provide structure, finely sifted Icing Sugar (also known as Powdered Sugar) for sweetness and a tender crumb, a small pinch of Salt to balance the flavors, and Unsweetened Cacao Powder for that intense chocolate hue and taste.
- Wet Ingredients: Key to achieving the perfect texture are Cold Unsalted Butter, which creates pockets of steam during baking for flakiness, and a medium-sized Egg, ideally at room temperature, to bind the dough and add richness.
For optimal results, especially in pastry making, we strongly recommend measuring your ingredients using a kitchen scale in grams or milliliters rather than volumetric cups and spoons. This precision is crucial for the delicate balance required to achieve the ideal Pâte Sablée texture. Substitutions for these core ingredients are not recommended as they can significantly alter the outcome.
For the Dark Chocolate Ganache Filling
The star of the show, this ganache filling, is remarkably simple to prepare, requiring just two primary ingredients. A classic ganache relies on a specific ratio of chocolate to cream to achieve its luxurious, stable consistency:
- Chocolate: We recommend using a high-quality 70% Dark Chocolate (bittersweet chocolate) for a truly intense and balanced flavor profile. However, you can adjust the cacao percentage to suit your personal preference for sweetness and bitterness. The critical point is to always use proper Cooking Chocolate, also known as couverture chocolate, not standard eating chocolate or chocolate chips. Eating chocolate contains stabilizers and less cocoa butter, which prevents it from melting smoothly and emulsifying correctly with the cream, potentially leading to a grainy or unset ganache.
- Cream: Opt for Thickened or Heavy Cream with a high fat content (typically 35% fat or higher). The fat in the cream is essential for emulsifying with the chocolate and creating that rich, velvety texture. Avoid using fat-free or low-fat cream, as this will compromise both the luscious taste and the desired smooth, stable texture of your ganache.
It’s important to note that no additional sugar is added to the ganache filling itself. Therefore, the tart’s overall sweetness will be entirely dependent on the type and percentage of chocolate you choose. If you prefer a sweeter chocolate dessert, consider using a dark chocolate with a lower cacao percentage (e.g., 50-60%) or even a good quality milk chocolate for a milder flavor. For an extra touch of richness and a beautiful, shinier finish, you can stir in a small knob of unsalted butter (about 1 tablespoon) after the ganache has fully emulsified. Additionally, a dash of vanilla extract or a spoonful of strong brewed coffee can enhance the chocolate’s natural flavors, adding another layer of complexity to your ganache.
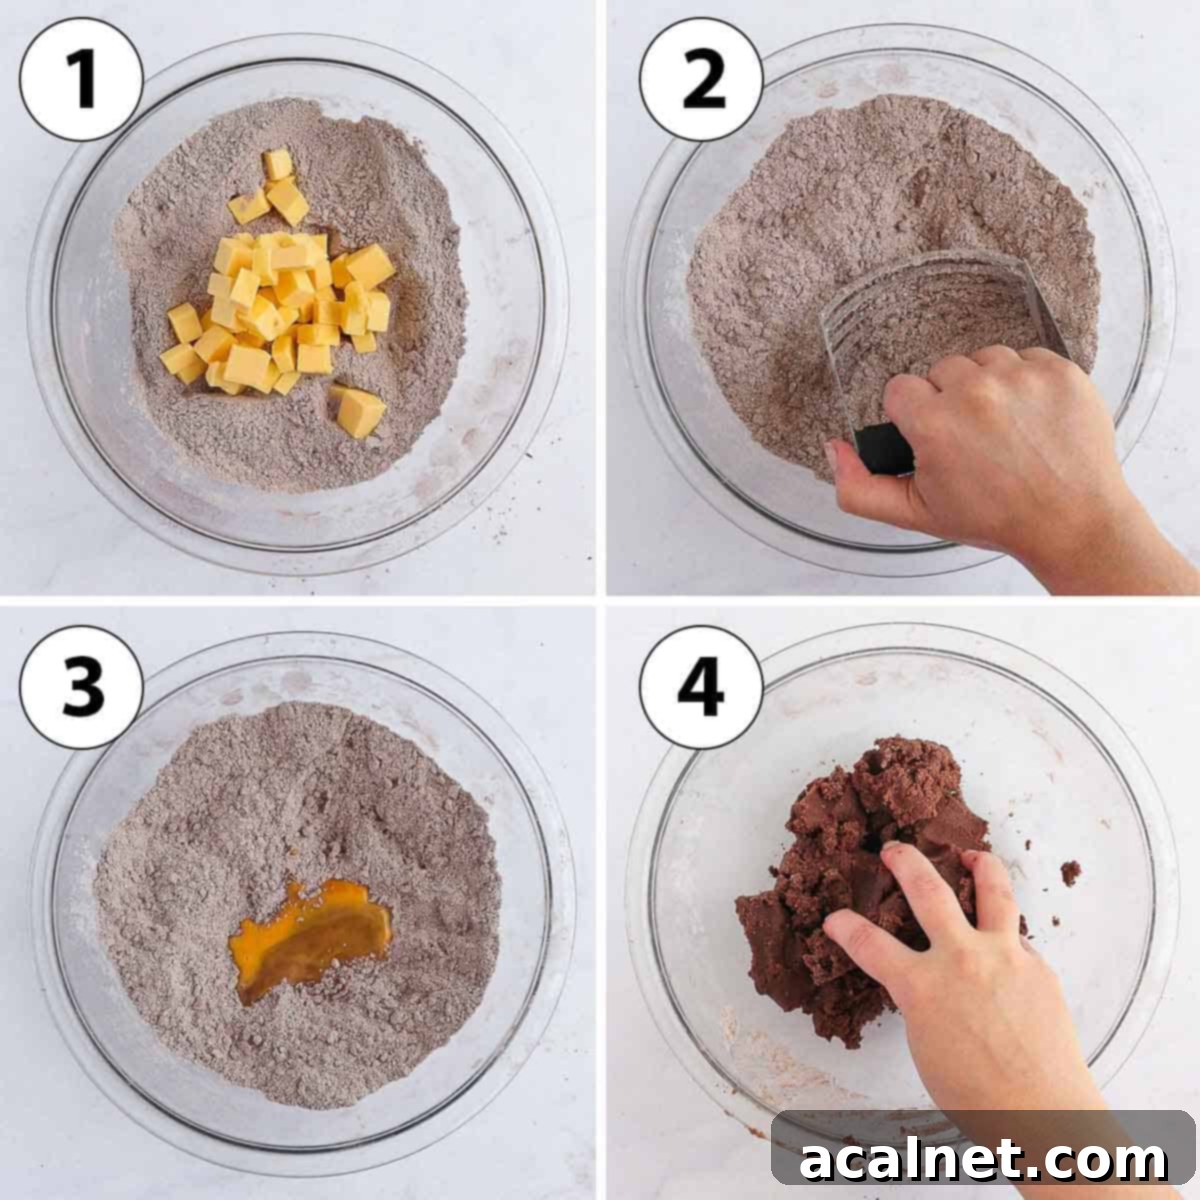
Crafting the Perfect Chocolate Tart Crust (Pâte Sablée)
The journey to a perfect Chocolate Ganache Tart begins with creating and flawlessly baking the tart crust. Since our delectable ganache filling requires no baking, it’s crucial to fully bake the pastry shell on its own beforehand. This process, known as blind baking, ensures a crisp, golden-brown crust that stands up beautifully to the rich filling.
- Photo 1: Preparation of Dry Ingredients. Begin by sifting together the Plain Flour, a pinch of Salt, Icing Sugar, and Unsweetened Cacao Powder into a large mixing bowl. Sifting is important to remove any lumps and ensure all ingredients are evenly distributed. Next, add the very Cold Unsalted Butter, which should be cut into small, even cubes. Keeping the butter cold is vital for a flaky, tender crust, as it prevents the butter from melting too quickly into the flour.
- Photo 2: Incorporating the Butter. Using your fingertips or a pastry blender, gently work the cold butter into the dry ingredients. The goal here is to “cut” the butter into the flour mixture by rubbing and pressing them together until the mixture resembles fine breadcrumbs or very small peas. You should no longer see any visible chunks of butter or loose powder. If using a food processor, pulse the ingredients a few times until small crumbs form. Be careful not to overmix, as this can develop the gluten too much, resulting in a tough crust.
- Photo 3 & 4: Forming the Dough. Add the room-temperature egg to the mixture. Using your fingers, gently mix until a soft, cohesive dough begins to form. You might find it easier to transfer the mixture onto a clean kitchen bench for a brief, gentle knead to fully bring the dough together. However, it’s essential not to overwork the pastry; minimal handling keeps it tender. Once formed, flatten the dough slightly into a disc.
- Place the dough between two sheets of baking paper or parchment paper. This method makes rolling much easier and prevents sticking. Using a rolling pin, roll the dough into a large, even circle, aiming for a thickness of about 3 mm or 1/8 inch. The size should be sufficient to generously line your tart pan. Transfer the rolled dough (still between the parchment paper) onto a flat tray and refrigerate for at least 1 hour. This chilling period is critical as it allows the gluten to relax, preventing the crust from shrinking excessively during baking, and firms up the butter, resulting in a flakier texture.
- Carefully line your tart pan – or a Perforated Tart Ring, like the one I used, which promotes even baking and crispness – with the chilled pastry. Gently press the dough into the corners and up the sides. Trim any excess pastry from the edges. Then, “dock” the bottom of the pastry by pricking it all over with a fork. This prevents air bubbles from forming and ensures the crust bakes flat. Place the lined tart pan back in the fridge to rest for at least another hour. This second chill is crucial for stability during blind baking.
- Preheat your oven to 160°C (325°F). While the oven is preheating, transfer the tart pan with the chilled pastry into the freezer for about 10-15 minutes. This quick freeze helps the butter remain very cold and further minimizes shrinkage. Bake the pastry for 30 to 40 minutes, or until it is fully baked, golden-brown (for a chocolate crust, this means it will appear slightly darker and feel firm), and crisp. Once baked, remove from the oven and allow it to cool down completely on a wire rack before you even think about adding the filling. A warm crust can melt the ganache.
Please note that I used a tart ring measuring 2 cm high and 24 cm wide (approximately 0.75″ high by 9.75″ wide). This specific pastry recipe yields a generous amount, often more than needed for this particular size of tart ring. This means you have flexibility and could easily use a slightly larger or higher tart pan with a removable bottom, if preferred, without needing to adjust the crust recipe.
For even more detailed instructions on creating this exquisite Cacao Pastry, including methods for using a food processor, along with invaluable tips and comprehensive troubleshooting advice, be sure to explore my dedicated Chocolate Pie Crust recipe.
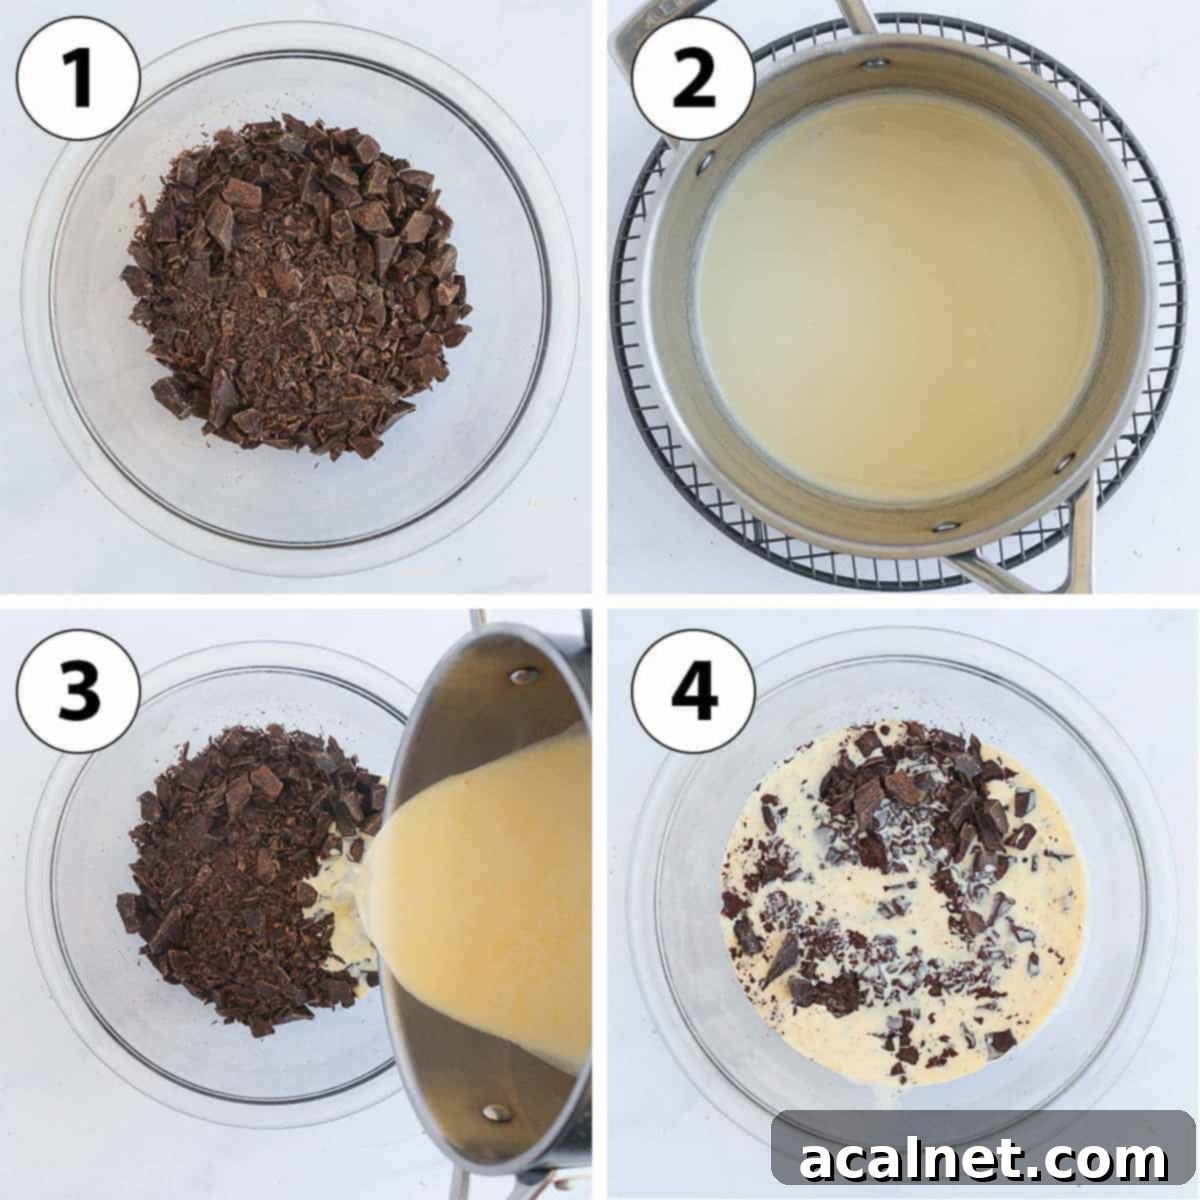
Creating the Silken Dark Chocolate Ganache Filling
Once your exquisite Chocolate Tart Pastry has been perfectly baked and allowed ample time to cool completely on a wire rack, it’s time to turn your attention to the luscious, no-bake filling. This is where the magic of a two-ingredient ganache truly comes to life, promising an incredibly rich and smooth result.
- Photo 1: Preparing the Chocolate. If you are using a cooking chocolate bar, it is absolutely essential to finely chop it before proceeding. Fine chopping increases the surface area, allowing the chocolate to melt more efficiently and evenly when the hot cream is added. This is a crucial step to achieve a smooth ganache without any unmelted lumps. If you’re using cooking chocolate in the form of callets or chips, you can use them as is. Place the finely chopped chocolate (or callets/chips) into a large, heat-proof mixing bowl.
- Photo 2: Heating the Cream. Pour the Thickened or Heavy Cream into a small saucepan. Place it on the stove over low to medium heat. Gently heat the cream until it just begins to simmer, and you see small bubbles forming around the edges of the pan, with steam rising. The cream does not need to come to a rolling boil; simply reaching a simmering point is sufficient to heat it thoroughly without scorching.
- Photo 3 & 4: First Pour and Resting. Carefully pour approximately half of the hot cream directly over the chopped chocolate in the mixing bowl. Resist the urge to stir immediately! Let the cream and chocolate sit undisturbed for about 2 to 3 minutes. This allows the heat from the cream to begin melting the chocolate, creating a foundation for a smooth emulsion. During this time, you’ll observe the chocolate starting to soften and melt from the heat.
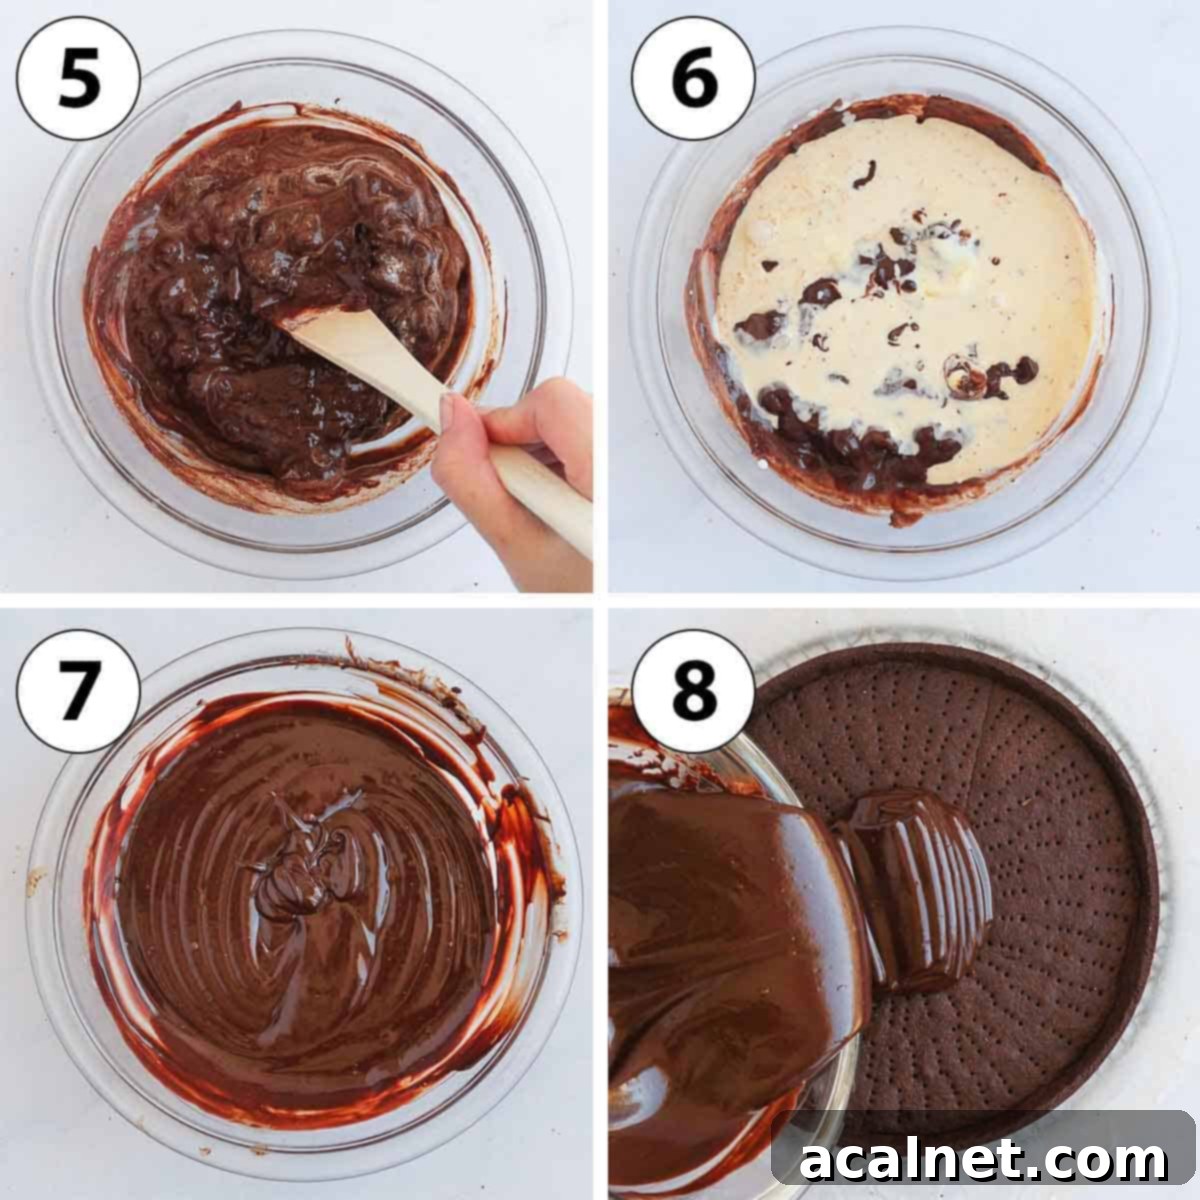
- Photo 5: Gentle Emulsification. Now, using a stiff rubber or silicone spatula (avoid a whisk, which can incorporate too much air), begin stirring the chocolate and cream together. Start stirring gently from the very center of the bowl in small, circular movements, slowly expanding your circles towards the edges. This technique encourages the chocolate and cream to emulsify properly, creating a smooth, stable ganache. At this stage, you might still observe some small chunks of unmelted chocolate, which is perfectly normal.
- Photo 6 & 7: Finishing the Ganache. Reheat the remaining half of the cream if it has cooled down, bringing it back to a gentle simmer. Pour this second half of hot cream over the chocolate mixture. Repeat the gentle stirring process with your spatula, starting from the center and slowly moving outwards, until all the chocolate has completely melted and is fully incorporated into the cream. You should be left with a perfectly smooth, glossy, and uniform ganache.
- Photo 8: Filling the Tart. Immediately pour the warm, liquid chocolate ganache mixture into your completely cooled and fully baked tart crust. The warmth of the ganache at this stage ensures a smooth, even spread. If necessary, use a small offset spatula or the back of a spoon to gently spread the ganache evenly to the edges of the crust, creating a beautiful, flat surface.
- Place the filled tart in the refrigerator to set for approximately one hour, or until the ganache has firmed up to your desired consistency. To prevent the ganache from drying out or absorbing any fridge odors, remember to cover the tart with plastic wrap once it has cooled slightly but before it’s fully set.
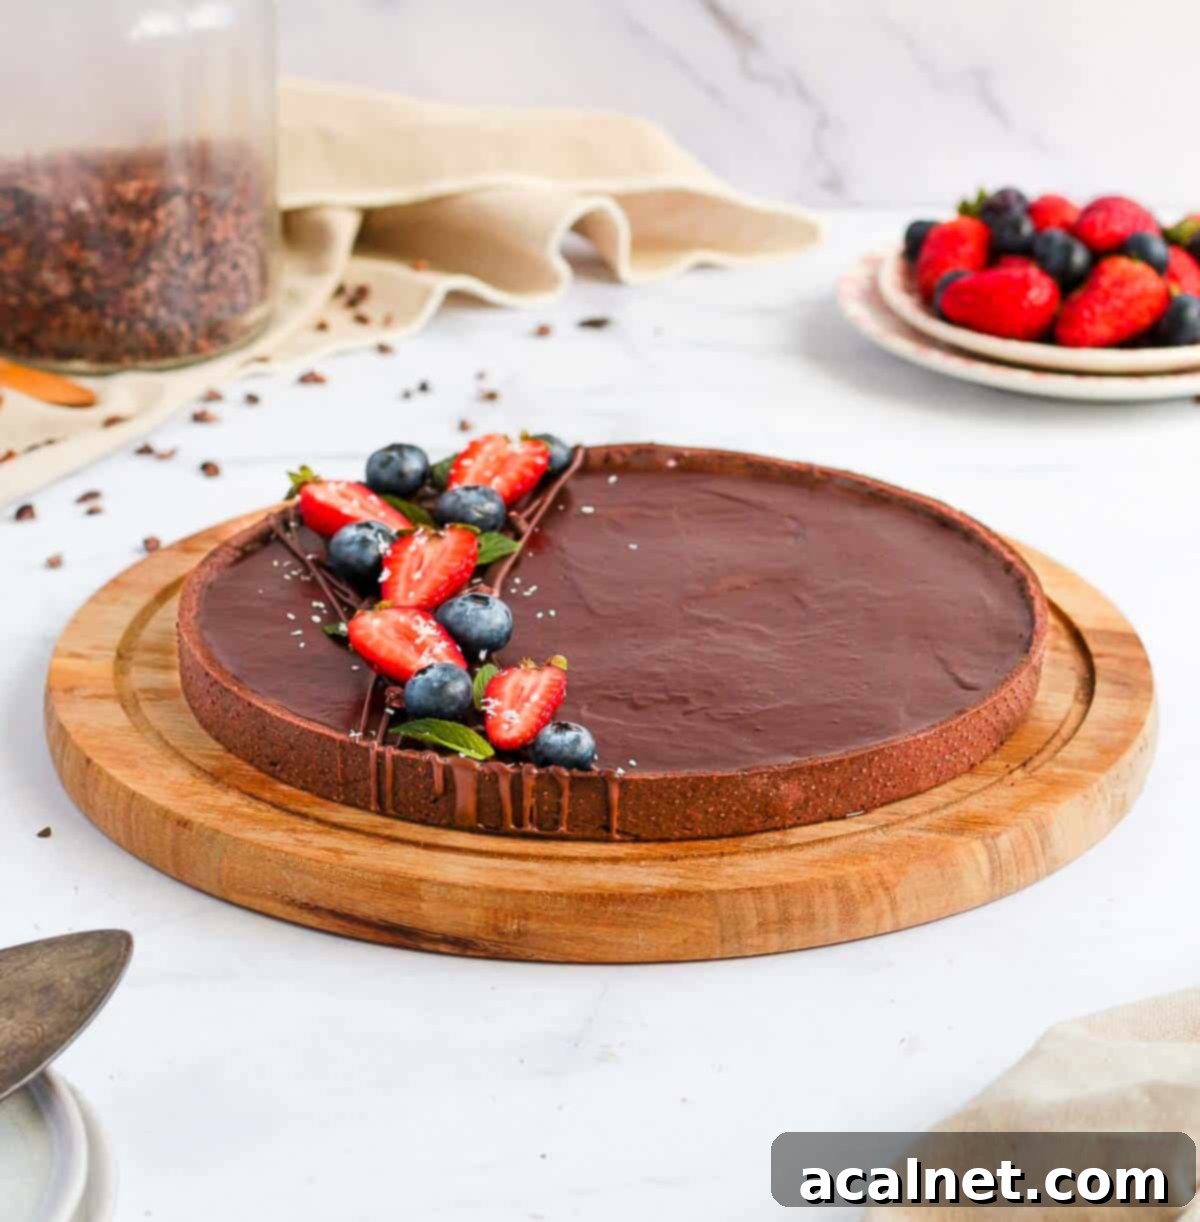
To finalize your magnificent chocolate ganache tart, consider decorating it with an array of delightful toppings. A delicate drizzle of melted chocolate, vibrant fresh berries (like raspberries or strawberries), crunchy cacao nibs, finely Desiccated Coconut, a sprinkle of flaky Sea Salt to enhance the chocolate’s flavor, or a dollop of freshly Whipped Cream are all excellent choices. Use a large, sharp knife, warmed slightly under hot water and wiped dry, to cut clean, elegant slices for serving.
Common Questions About This Chocolate Ganache Tart
Absolutely! While we love the unmatched flavor and texture of a homemade Pâte Sablée, we understand that sometimes convenience is key. If you’re looking to create a super easy, no-fuss chocolate ganache tart, you can certainly opt for a good quality store-bought basic shortcrust pastry shell. Just make sure it’s fully baked and cooled according to package directions before filling it with our simple, homemade ganache. This shortcut still allows you to enjoy the rich chocolate filling without the extra effort of making the pastry from scratch.
The strength or percentage of cacao in the chocolate is entirely a matter of personal preference, so feel free to choose what you enjoy most. However, the most critical factor is to ensure you are using proper high-quality Cooking Chocolate (couverture chocolate), not everyday eating chocolate or standard chocolate chips. Eating chocolate often contains less cocoa butter and added stabilizers that prevent it from melting smoothly and emulsifying correctly with the cream, which can result in a grainy or unset ganache.
Since there’s no sugar added directly to the ganache filling, the tart’s overall sweetness will depend entirely on your chosen chocolate. I personally prefer a 70% dark chocolate for an intensely rich and balanced flavor. If you prefer a slightly sweeter tart, opt for a dark chocolate with a lower cacao percentage (e.g., 50-60%) or even a good quality milk chocolate for a milder, sweeter profile!
The final texture of your chocolate ganache largely depends on its temperature. When kept in the refrigerator, the ganache will firm up, resulting in a dense, almost fudge-like consistency that holds its shape beautifully. For a wonderfully soft, velvety, and fudgy texture that melts in your mouth, we recommend taking the chocolate ganache tart out of the fridge at least 1 hour before serving. This allows the chocolate to soften slightly and reach its optimal texture. For a firmer, more sliceable ganache, keep it chilled until just before serving.
If your ganache filling remains soft or liquid even after several hours in the fridge, there are a few common culprits. Firstly, ganache needs proper chilling time to fully set; simply leave it in the refrigerator for longer. A more significant issue might be incorrect ratios of cream to chocolate. Too much cream in relation to the chocolate (especially if using a lower cacao percentage chocolate) will result in a ganache that is too runny and may not set properly. Always ensure you measure your ingredients accurately, preferably by weight, to maintain the correct balance. Additionally, using eating chocolate instead of cooking chocolate can prevent proper setting due to different fat and stabilizer contents.
Yes, you can! The tart crust can be baked 1-2 days in advance and stored at room temperature, wrapped tightly in foil or plastic, to maintain its crispness. The ganache filling can also be made a day ahead and gently rewarmed if it becomes too stiff to pour. However, for the best textural contrast, we recommend assembling and filling the tart no more than 24-48 hours before serving. This ensures the chocolate pastry crust retains its delightful crunch against the smooth ganache.
Achieving a beautifully glossy ganache is a sign of a well-emulsified mixture. Key steps include using high-quality cooking chocolate, ensuring the cream is hot enough to melt the chocolate but not boiling, and stirring gently with a spatula from the center outwards to create a stable emulsion. Adding a small knob of unsalted butter (about 1 tablespoon) at the very end, once the ganache is fully mixed and still warm, can also contribute significantly to that coveted luxurious sheen.
Perfect Pairings: What to Serve with This Chocolate Tart
While this Chocolate Ganache Tart is a showstopper on its own, it also provides a wonderful canvas for complementary flavors and textures. The intense richness of the dark chocolate makes it incredibly versatile for pairing, allowing you to customize the experience to your liking.
For a beautiful presentation and an added layer of flavor, I love to finish my Chocolate Ganache Tart with a delicate drizzle of Melted Chocolate, a scattering of vibrant Fresh Berries (the tartness of raspberries or strawberries cuts through the richness beautifully), a few fresh Mint Leaves for aroma and freshness, crunchy Cacao Nibs for an extra chocolatey crunch, and a sprinkle of finely Desiccated Coconut. Alternatively, you could opt for a contrasting texture like a light and airy Whipped Ganache or simply leave it plain to let the pure chocolate flavor dominate.
When serving, consider elevating each slice of this decadent chocolate tart with one of these delightful accompaniments:
- Berry Sauces: The bright, tangy notes of a berry sauce provide an exquisite contrast to the deep chocolate. A smooth Strawberry Coulis or a vibrant Raspberry Coulis are fantastic choices, adding a touch of freshness and acidity.
- Ice Cream: A scoop of creamy Vanilla Ice Cream melting gently alongside a slice of tart creates a classic and comforting combination. The coolness and creamy texture of the ice cream beautifully complement the firm, rich ganache.
- Warm Sauces: For an extra layer of indulgence, a warm Hot Chocolate Sauce can amplify the chocolate experience, or a silky Crème Anglaise (Vanilla Custard) adds a sophisticated, creamy warmth.
- Coffee or Liqueurs: Pair with a strong espresso or a small glass of a complementary liqueur like Grand Marnier or a coffee liqueur for an adult-only treat.
Expert Tips for a Flawless Chocolate Ganache Tart
Achieving a bakery-quality chocolate ganache tart at home is entirely possible with a few key techniques and considerations. Follow these expert tips to ensure your dessert is nothing short of perfect:
- Finely Chop Your Chocolate: This step is more important than you might think! Finely chopping your cooking chocolate before adding the hot cream significantly increases its surface area. This allows the chocolate to melt much more quickly and evenly, requiring less stirring and reducing the risk of overheating. Overheating chocolate can cause it to seize, become grainy, or split your ganache.
- Maintain Cream Temperature: When you’re adding the hot cream to the chocolate in two stages, the first half might cool down slightly as it begins to melt the chocolate. If the second half of your cream seems to have cooled during this process, don’t hesitate to gently re-heat it in the saucepan until it’s simmering again. Ensuring both additions of cream are hot helps maintain the optimal temperature for a smooth and stable emulsion.
- Troubleshooting Unmelted Chocolate: Despite your best efforts, if you still find some stubborn solid chocolate pieces after adding all the hot cream and stirring, don’t panic! You can gently warm the mixture to encourage melting. Place the bowl in the microwave for very short bursts (no more than 10-15 seconds at a time) and stir thoroughly after each burst until smooth. Alternatively, and often preferred by professional bakers, set the bowl over a double boiler (a saucepan of simmering water, ensuring the bowl does not touch the water) and stir gently until fully melted and smooth.
- Use a Spatula, Not a Whisk, for Ganache: This is a crucial tip for achieving a silky, glossy ganache. When mixing the chocolate and hot cream, always use a stiff rubber or silicone spatula, not a whisk. Whisking incorporates air bubbles into the ganache, which can lead to a dull, less smooth finish and a less stable emulsion. A spatula allows you to gently fold and press the ingredients together, promoting a rich, dense texture and a beautiful sheen.
- Pour Ganache While Warm: For the smoothest, most professional-looking finish, pour the ganache into your blind-baked tart crust immediately after it’s made and while it’s still warm and fluid. If you let the ganache sit aside for too long, it will begin to cool and thicken, making it harder to pour evenly and resulting in a less pristine surface. Work quickly once your ganache is ready!
Storing Your Chocolate Ganache Tart: Freshness is Key
Proper storage ensures that your beautiful and delicious chocolate ganache tart retains its optimal texture and flavor. Here’s how to best store your masterpiece:
The assembled chocolate ganache tart is best enjoyed within 24 to 48 hours. While it will still be edible after this period, we do not recommend making it too far in advance, as the delicate crunch of the pastry crust may begin to soften due to the moisture from the ganache. The textural contrast between the crisp crust and the creamy filling is a hallmark of this dessert, and prolonged storage can diminish this delightful quality.
For convenience, the chocolate pastry crust can be prepared and fully baked 1 or 2 days ahead of time. Once baked, allow it to cool completely, then wrap it securely in aluminum foil or plastic wrap and store it at room temperature. This allows you to tackle the crust in advance and then simply focus on making and adding the ganache up to an hour before serving (or allowing sufficient time for the ganache to set in the fridge).
Once the tart has been filled with the rich chocolate ganache, it must be stored in the refrigerator. Ensure it is covered with plastic wrap, especially after it has cooled, to prevent the ganache from drying out on the surface or absorbing any unwanted odors from the fridge. When ready to serve, refer to our FAQ section for tips on achieving your preferred ganache texture (firm or fudgy) by adjusting its time out of the fridge.
Due to the delicate nature of the ganache and the pastry, we generally do not recommend freezing this dessert. Freezing and thawing can significantly impact the texture of both the ganache (which may become grainy) and the crust (which can become soggy), compromising the overall quality of the tart.

Explore More Delicious Tart Recipes
If you’ve fallen in love with the art of tart making, or simply enjoy a beautifully crafted pastry, then you’ll want to explore these other fantastic tart recipes from our collection. Each offers a unique flavor profile and a delightful baking experience:
- French Orange Tart – Bright, zesty, and refreshing.
- Rhubarb Custard Tart – A perfect balance of tart fruit and creamy sweetness.
- Easy French Apple Tart – A classic, comforting dessert.
- Strawberry Custard Tart – Fresh berries atop a silky custard.
- Parisian Flan (Flan Patissier) – A creamy, deeply satisfying French classic.
- Lemon Curd Tart – Tangy, sweet, and utterly delightful.
- Peach Tarte Tatin – Caramelized peaches in a rustic, inverted tart.
- Chocolate Raspberry Tart – The perfect marriage of rich chocolate and tart raspberries.
- Pear Frangipane Tart (Tarte Bourdaloue) – Elegant and almond-infused.
Made this recipe?
Let us know if you liked it by leaving a comment below, and tag us on Instagram @a.baking.journey with a photo of your creation!
Recipe

French Chocolate Ganache Tart
Print Recipe
Ingredients
Chocolate Tart Crust
- 225 gr (1 1/2 cup) Plain / AP Flour
- 20 gr (2 tablesp.) Unsweetened Cacao Powder
- 50 gr (1/2 cup) Icing Sugar, or Powdered Sugar
- 1 pinch Salt
- 120 gr (1/2 cup) Unsalted Butter, Cold
- 1 Egg, at room temperature
Chocolate Ganache Filling
- 250 gr (9 oz) Dark Cooking Chocolate, (*)
- 250 ml (1 cup) Thickened / Heavy Cream
Instructions
Chocolate Tart Crust
- Sift together the Flour, Cacao Powder, Icing Sugar and Salt, place in a large mixing bowl and mix well to combine.
- Add the cold Butter, cut into small cubes. Mix it with the dry ingredients by rubbing it between your fingertips (or using a Pastry Blender) until the mixture resembles very fine crumbs and no loose powder is visible (see note 1).
- Add the Egg and gently mix it in by hands until a smooth, soft dough comes together. Be careful not to overwork the pastry (see note 2).
- Place the dough between two sheets of baking paper and roll it into a large circle with a rolling pin, aiming for approximately 3 mm or 1/8 inch thick. Dust lightly with flour if needed to prevent sticking. Transfer the dough (still between the paper) onto a flat tray and refrigerate for at least 1 hour, or up to 24 hours.
- Carefully line your Tart Ring or Tart Pan (see note 3) with the chilled pastry, gently pressing it into the edges. Prick the bottom of the pastry all over with a fork (this is called ‘docking’). Return the lined tart pan to the fridge for at least 1 hour, or up to 24 hours.
- Preheat your oven to 160°C (325°F). While the oven heats, place the tart ring/pan with the pastry in the freezer. Bake for 30 to 40 minutes, or until the crust is fully baked and crisp. Allow it to cool down completely on a wire rack before filling.
Chocolate Ganache Filling
- Finely chop the Cooking Chocolate (unless using callets/chips) and place it in a large, heat-proof mixing bowl.
- Pour the Thickened / Heavy Cream into a small saucepan and heat on low until it just begins to simmer. Pour half of the hot cream over the chopped chocolate and leave undisturbed for 2 to 3 minutes. Then, using a stiff spatula, gently stir from the center of the bowl, gradually moving towards the edges, until the cream is mostly incorporated into the chocolate (see note 4).
- Reheat the remaining cream to a simmer if it has cooled (see note 5). Pour the rest of the hot cream over the chocolate mixture and repeat the gentle stirring motion until all the chocolate has melted and you achieve a smooth, shiny ganache.
- Immediately pour the warm ganache into the fully baked and cooled tart crust. If necessary, use a small offset spatula or the back of a spoon to spread it evenly. Place the tart in the fridge to set for at least one hour, or until the ganache is firm.
- Optionally: Once fully set, decorate your tart with desired toppings such as a melted chocolate drizzle, fresh berries, cacao nibs, or desiccated coconut.
Would you like to save this recipe?
We’ll email this post to you, so you can come back to it later!
Notes
For all detailed instructions, tips, troubleshooting and food processor method on the pastry, read my Chocolate Tart Crust recipe.
Ingredients Notes:
(*) Chocolate: I used a 70% Dark Chocolate, but you can use any of your preferred cooking chocolate. Simply make sure you are using proper Cooking Chocolate – not eating chocolate or chocolate chips. Eating chocolate will not melt properly and might result in a grainy, unset ganache.
There is no added sugar to the ganache itself, so you can adjust the level of sweetness by choosing a sweeter type of chocolate (e.g., lower cacao percentage dark chocolate, or milk chocolate).
Instructions Notes:
- When rubbing the butter into the flour, you should no longer see any visible loose powders. You can also use a Food Processor for this step if preferred; pulse until fine crumbs form.
- You might find it easier to transfer the dough to your clean kitchen bench to gently mix in the egg and briefly ‘knead’ it until it forms a cohesive dough. Remember, avoid overworking the pastry to keep it tender.
- If the pastry becomes too cold and hard to handle after chilling, let it sit at room temperature for a few minutes to soften slightly. Conversely, if it becomes too soft and sticky while you are working with it, place it back in the fridge for 5-10 minutes to firm up.
- The chocolate won’t be fully melted at this point – this is normal and part of the slow emulsification process. Continue stirring gently until the cream is mostly incorporated into the chocolate.
- If the remaining cream has cooled significantly, gently reheat it in the saucepan until it just simmers again before adding. If, after adding all the cream and stirring, you still have some unmelted chocolate, you can gently heat the ganache bowl in the microwave for very short intervals (10-15 seconds at a time, stirring well after each) or over a double boiler until perfectly smooth.
Nutrition (per serving)
