Effortless Elegance: Bake Fluffy, 5-Ingredient Scones in Your Remoska (No Oven Needed!)
Imagine the aroma of freshly baked scones filling your home, light, fluffy, and perfectly flaky – all achieved without even turning on your oven. Sound like a dream? With a Remoska, it’s an incredibly simple reality! These delightful scones, made with just 5 basic ingredients, are the ultimate treat for morning coffee, afternoon tea, or any moment you crave a comforting homemade bake. Whether you’re a seasoned baker or just starting, this no-oven method ensures perfect results every time, making delicious scones accessible to everyone, everywhere.

This recipe is proudly sponsored by Remoska.
Why You’ll Adore Baking Scones in Your Remoska
For many passionate bakers, the oven is the heart of the kitchen. So, discovering a method to achieve perfectly baked goods without one feels nothing short of revolutionary! This basic scone recipe leverages the incredible capabilities of the Remoska Tria, a truly versatile three-in-one cooker that redefines convenience in the kitchen. Its ingenious design features three distinct lids, each offering a unique cooking experience: a glass lid for stovetop cooking, a soft-pressure lid for slow cooking or pressure cooking, and – most excitingly for us bakers – a baking lid that transforms the unit into a portable mini-oven.
The Remoska baking lid is a game-changer. Simply plug it in, and you have a compact, efficient oven ready to go. This means you can enjoy freshly baked scones not just in your kitchen, but virtually anywhere with a power outlet. Imagine waking up to the smell of warm scones during a camping trip in your caravan, enjoying them al fresco in your backyard during a barbecue, or simply baking them on your kitchen bench when your main oven is occupied (or non-existent!). This accessibility makes baking a joy, removing the limitations of traditional ovens and expanding your culinary horizons.
And the results speak for themselves. Just like the delicious Cinnamon Rolls, hearty No-Knead Bread, comforting Baked Apples, and moist Banana Cake we’ve made, the Remoska consistently delivers beautifully light, wonderfully fluffy, exquisitely flaky, and delightfully buttery scones. The even heat distribution within the Remoska ensures a perfect rise and a golden-brown finish, without the fuss or excessive heat of a large oven. It’s a testament to how modern culinary tools can simplify our lives without compromising on quality or taste, offering perfect scones every time.
You can now pre-order the Remoska Tria and get 25% off plus free shipping when using the code “BakingJourney” at checkout! (valid only in Australia and New Zealand).
Essential Ingredients for Perfect Remoska Scones
One of the many charms of this Remoska scone recipe is its simplicity, requiring just a handful of readily available ingredients. The magic truly lies in the quality and temperature of these few components. (For exact quantities, please refer to the detailed recipe card below.)
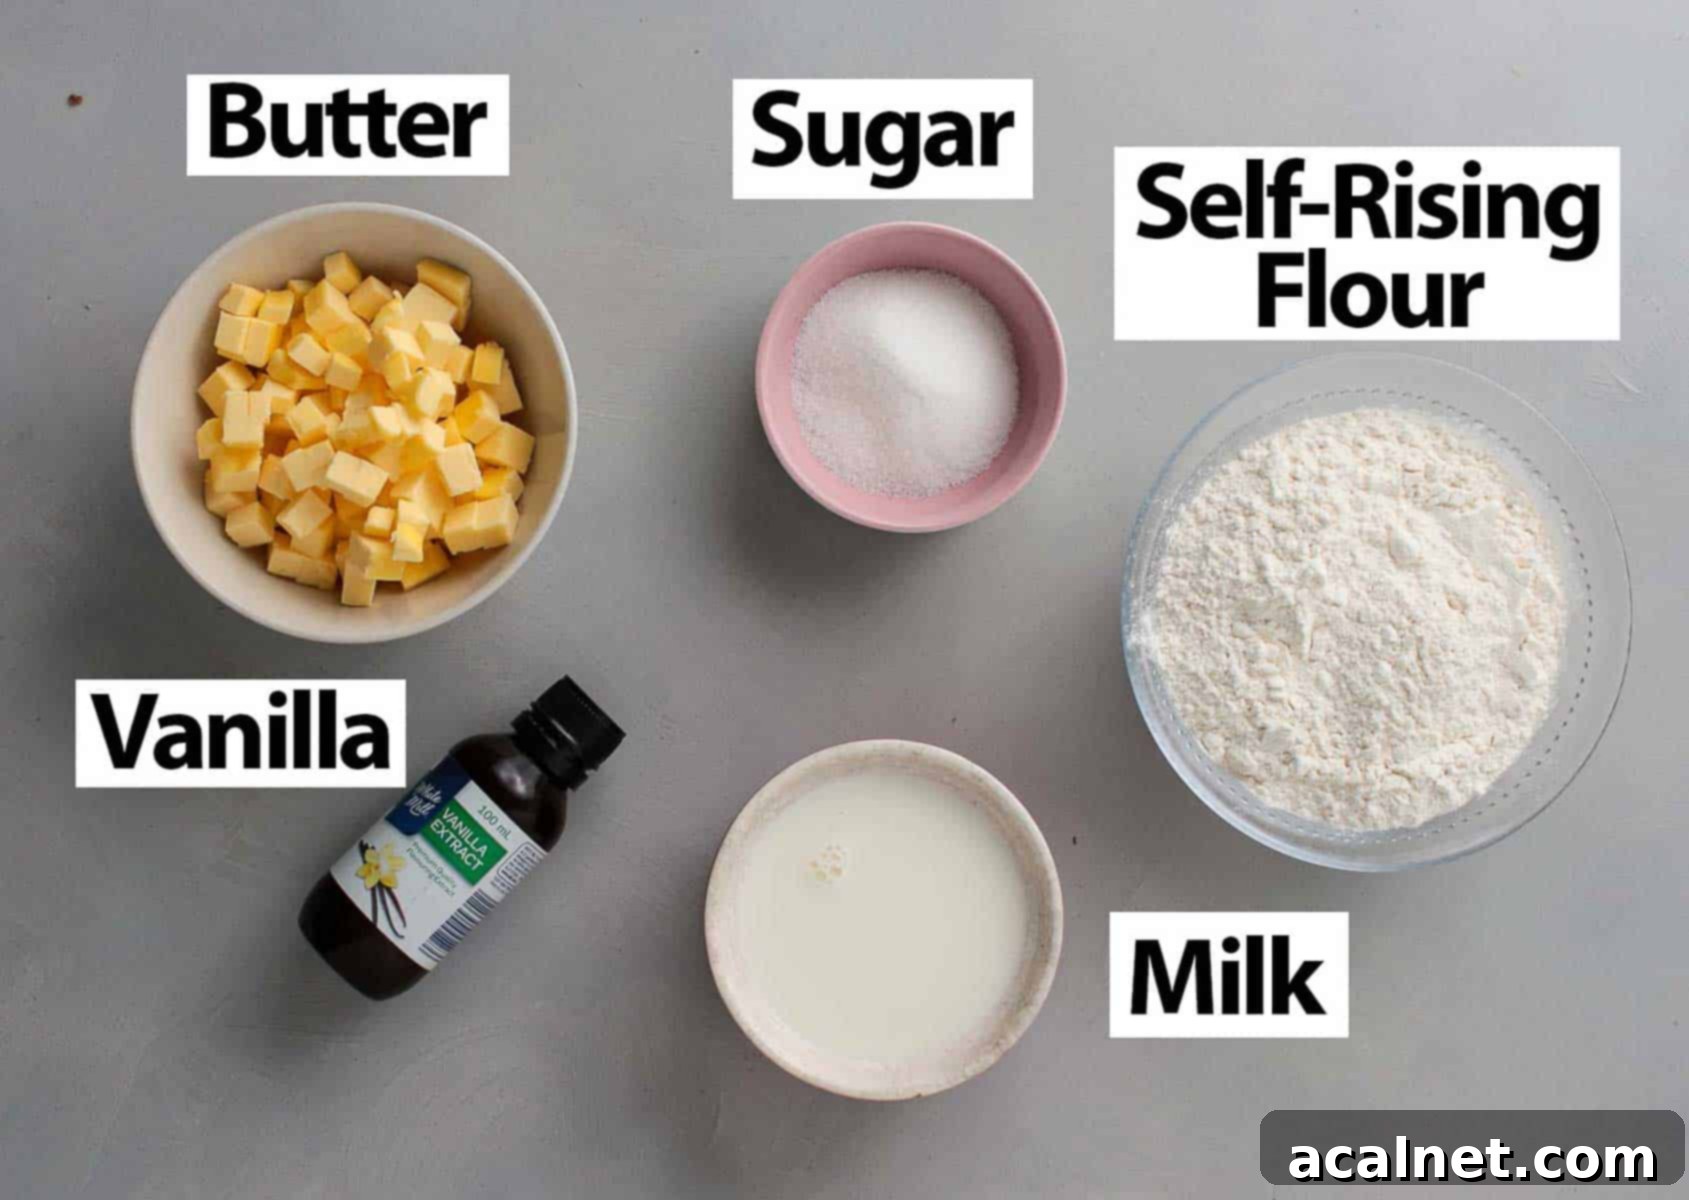
Dry Ingredients:
- Self-Rising Flour: This is your secret weapon for speed and ease! Using self-rising flour means you don’t have to worry about adding separate baking powder or baking soda, as the leavening agent is already perfectly mixed in. It’s designed to give your scones that desirable lift and airy texture, making the process much simpler and more foolproof.
- Sugar: I typically use Caster Sugar (also known as superfine or fine white granulated sugar) for its ability to dissolve quickly and evenly, ensuring a subtle sweetness throughout. While a little sugar is essential for flavor balance and a touch of golden crust, these aren’t overly sweet scones, allowing the rich buttery notes to shine through beautifully.
Wet Ingredients:
- Unsalted Butter: The colder, the better! Chilled, unsalted butter is crucial for creating those coveted flaky layers in your scones. As the butter melts during baking, it releases steam, which pushes apart the layers of dough, resulting in a wonderfully light and tender crumb. Using unsalted butter also gives you precise control over the overall saltiness of the recipe.
- Milk: Full Cream or Whole Milk is highly recommended for its richness and fat content, which contribute to a tender scone and a slightly richer flavor. Like the butter, ensure your milk is very cold to maintain the chill of the dough, which is a key factor in achieving maximum flakiness and a good rise.
- Vanilla Extract (Optional): A touch of pure vanilla extract adds a lovely, subtle aromatic depth that complements the simple, buttery flavor of the scones beautifully. While not strictly necessary for the structure of the scone, it significantly enhances the overall taste experience, adding a layer of warmth and sweetness.
Ingredient Substitutions:
- Self-Rising Flour Alternative: If you only have Plain / All-Purpose Flour on hand, don’t worry! You can easily create your own self-rising flour. Simply combine 400g (or the equivalent cup measurement) of plain flour with 1 teaspoon of baking powder and a pinch of salt. Sift them together thoroughly to ensure an even distribution of the leavening agent, which is essential for a consistent rise.
Creative Optional Additions:
While delicious on their own, these basic scones serve as an excellent canvas for your culinary creativity. You can easily customize them with a variety of flavors to suit any preference or occasion:
- Sweet Fruit Enhancements: Fold in fresh berries like blueberries or raspberries, or try chopped strawberries (check out my Strawberry Coconut Scones for inspiration!). Bright citrus zest from lemons or oranges can also add a delightful, fragrant twist. Diced apples or pears with a hint of cinnamon are wonderful for autumnal flavors.
- Indulgent Chocolate Variations: Chocolate chips or chunks, as seen in my Chocolate Chip Scones, are always a crowd-pleaser. You could also experiment with white chocolate chips, dark chocolate shavings, or even a tablespoon of cocoa powder for a richer, chocolatey dough.
- Warm Spices: A pinch of ground cinnamon, nutmeg, cardamom, or a mix of “mixed spice” can transform plain scones into something truly special and comforting, especially when served with a hot cup of tea.
- Savory Twists: For a savory treat, simply omit the sugar from the recipe entirely. Instead, add grated cheese (like cheddar, as I did in my Cheddar Cheese Scones), finely chopped chives, a hint of black pepper, or a pinch of dry mustard powder. These are fantastic served with soups or as a side to a main meal.
The possibilities are endless, allowing you to tailor your scones to any craving, season, or dining experience!

Step-by-Step Guide: Baking Perfect Scones in the Remoska
The beauty of baking scones in a Remoska is that the process mirrors traditional oven baking, making it incredibly intuitive. The key principles remain the same: gentle handling of the dough and maintaining cold ingredients. I often make these by hand, which is very satisfying and allows for precise control, but a food processor can also be used if you prefer a quicker approach (the method for incorporating ingredients remains fundamentally similar).
Preparing the Scone Dough for Optimal Flakiness
Achieving light and flaky scones starts with how you combine your ingredients. Follow these steps carefully to build the perfect foundation, always prioritizing cold temperatures and minimal handling:
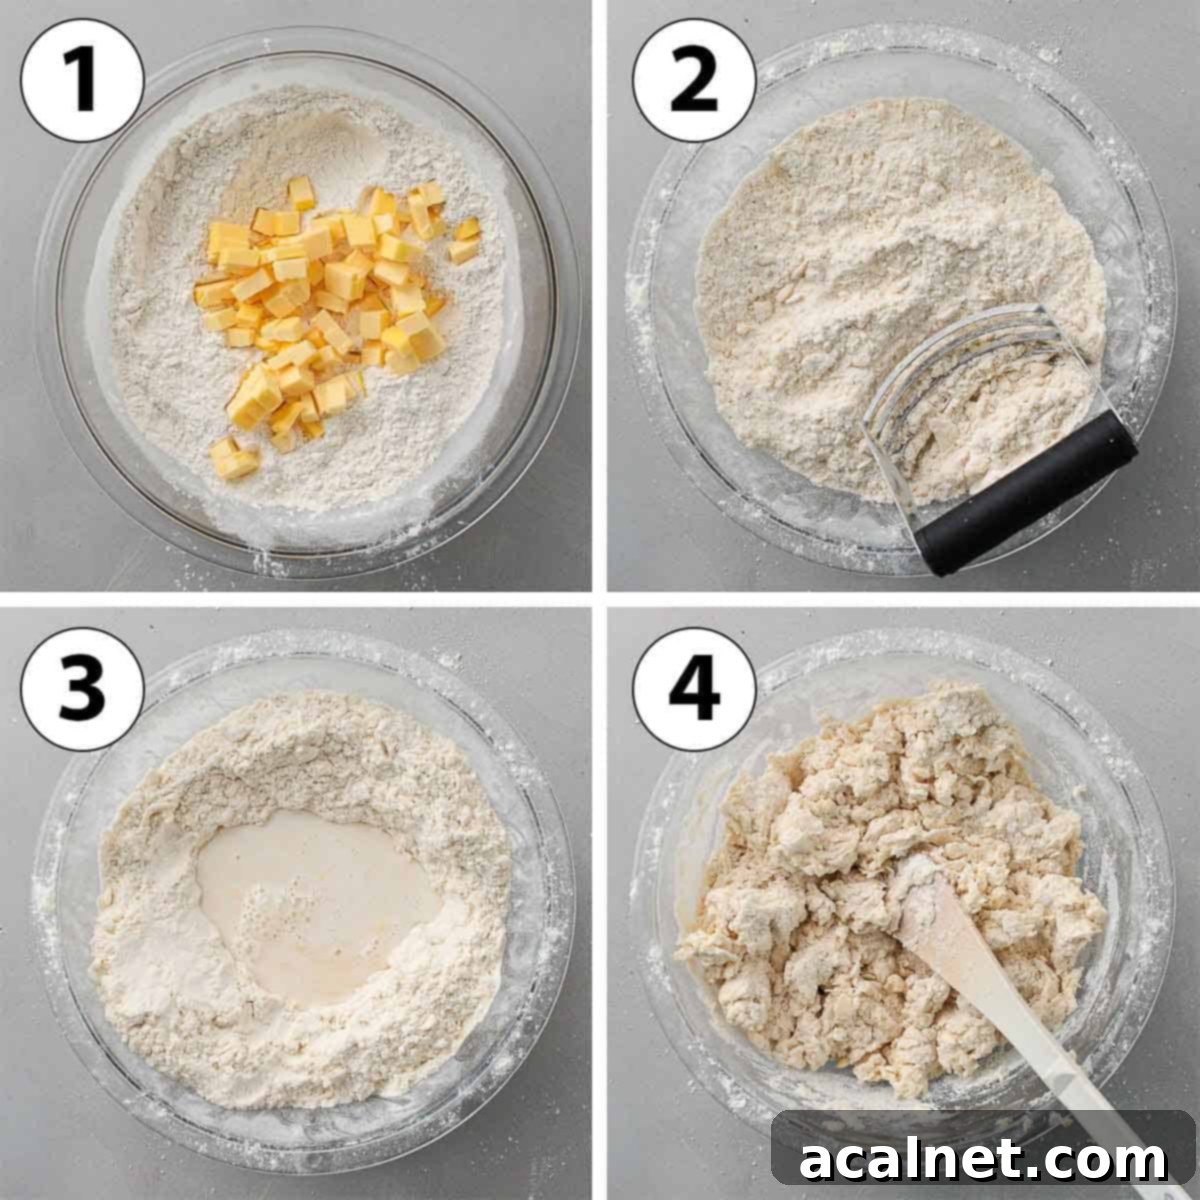
- Photo 1: Initial Dry Mix & Cold Butter Addition. Begin by combining the self-rising flour and caster sugar in a large mixing bowl. This ensures an even distribution of sweetness and leavening throughout the dough. Next, add your very cold butter, which should be cut into small, even cubes. Keeping the butter cold is paramount for flaky scones, as it prevents it from fully incorporating into the flour, instead creating distinct pockets that will release steam and expand during baking, resulting in those desirable layers.
- Photo 2: Incorporating the Butter – The “Rubbing In” Method. Using your fingertips, or a specialized Pastry Blender, gently rub the butter into the flour mixture. The goal here isn’t to fully melt or combine the butter, but rather to break it down into very small, pea-sized crumbs that are coated in flour. You should still be able to see small visible chunks of butter. This technique creates those essential internal layers in your scones. Work quickly and with light hands to prevent the butter from warming up too much from the heat of your hands.
- Photo 3: Creating the Well and Adding Wet Ingredients. Once the butter is properly incorporated and the mixture resembles coarse crumbs, make a small well in the center of the flour mixture. Pour in the cold milk and, if using, the vanilla extract. Again, the cold temperature of the milk helps to keep the butter firm and prevents premature gluten development, both contributing to the ultimate tender and flaky texture of your scones.
- Photo 4: Gentle Mixing to Form the Dough. Using a stiff spatula or your hands, gently mix the wet and dry ingredients together until they just begin to combine. The dough will look shaggy and slightly crumbly at first – this is exactly what you want! Avoid over-mixing at this stage, as excessive handling develops gluten, which can lead to tough, dense scones rather than light and tender ones. Stop mixing as soon as the ingredients come together and form a loose, cohesive mass.
Shaping and Cutting Your Scones for an Even Rise
The way you handle and cut your dough plays a significant role in how beautifully your scones will rise and develop their texture. Precision and gentleness are key here:
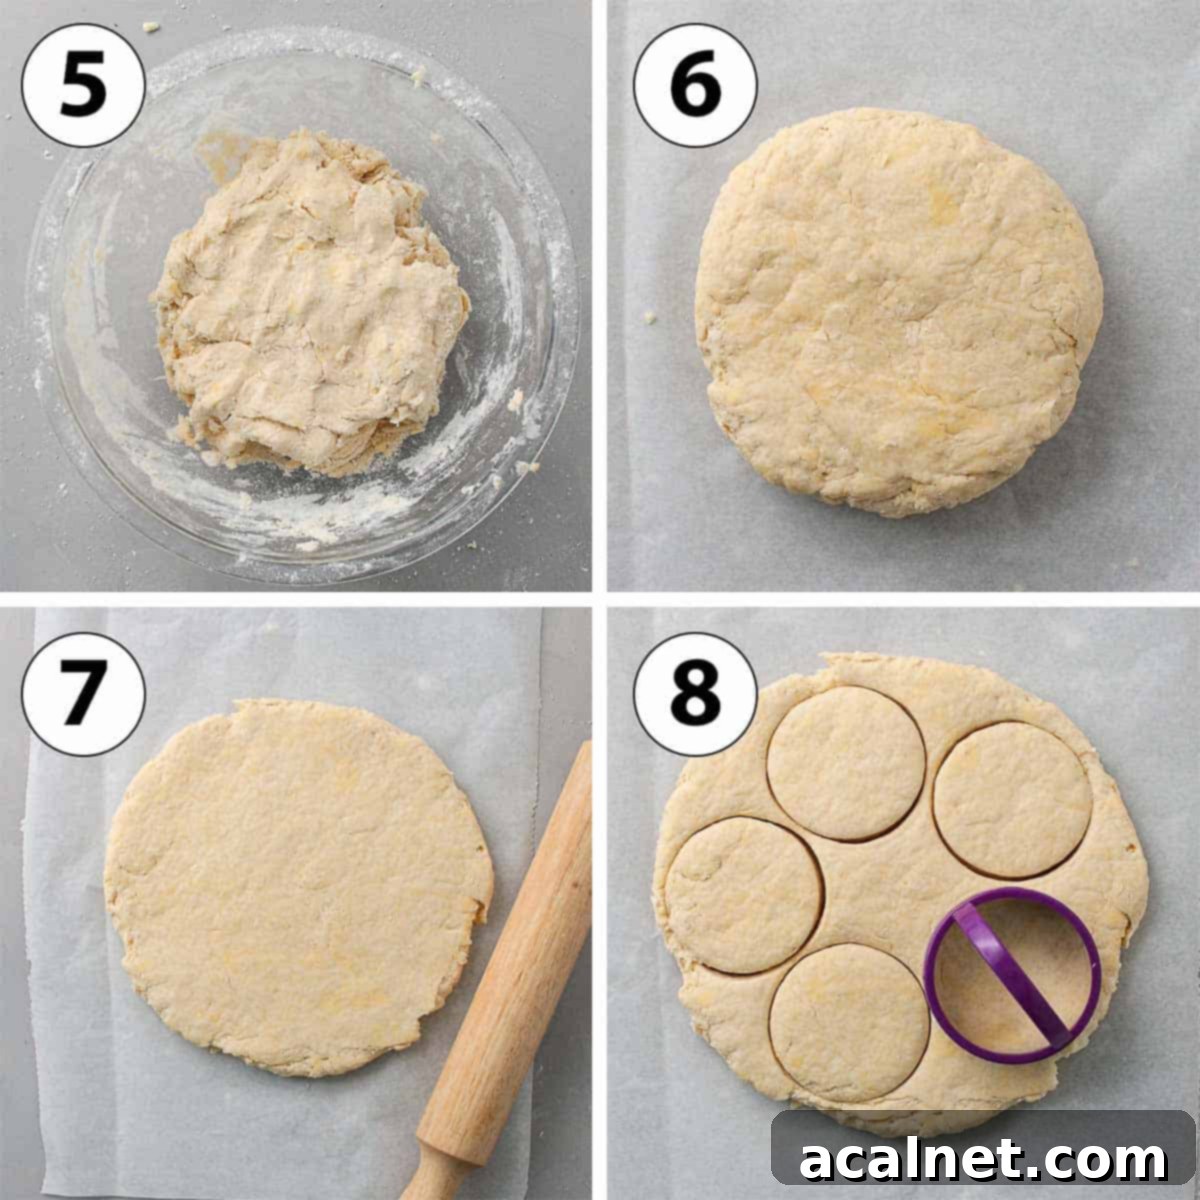
- Photo 5: Gently Kneading the Dough. Turn the shaggy dough out onto a lightly floured surface or, even better, a sheet of baking paper to prevent sticking and minimize the need for extra flour. Gently bring the dough together, kneading just enough until all the ingredients are combined into a cohesive mass. Remember, less is more when it comes to scone dough; overworking will lead to tough scones. You’re aiming for a soft, slightly sticky dough that just holds together.
- Photo 6 & 7: Rolling the Dough to the Right Thickness. Form the dough into a large ball, then, using a rolling pin, roll it out into an even disk. Aim for a thickness of about 1 to 1.5 cm (0.4 to 0.6 inches). This consistent thickness is important for even baking and a good rise. If your rolling pin starts to stick, lightly dust it with a little extra flour, but avoid adding too much as it can dry out the dough.
- Photo 8: Cutting Out Individual Scones. Use a round cookie cutter (I find a 7.5 cm / 3-inch cutter works perfectly for a good-sized scone) to cut out individual rounds. Press straight down firmly without twisting the cutter; twisting can seal the edges and inhibit the scones from rising properly, leading to a lopsided or less impressive “oven spring.” Any dough scraps can be gently pressed together, formed into a disc, and then chilled in the fridge for 10-15 minutes before re-rolling. This helps keep the butter cold and the dough relaxed for the best results.
- Final Chill – A Crucial Step: Once cut, place your scones on a flat tray, ideally lined with parchment paper, and return them to the fridge to chill for at least 30 minutes. This final chill is a crucial step! It ensures the butter is very cold and firm, ready to create maximum steam and lift during baking, resulting in those wonderfully flaky layers and a tall, proud rise. Do not skip this step!
Troubleshooting Tip: If your scone dough feels resistant or pulls back significantly when you try to roll it, this usually indicates that the gluten has become too developed from handling. Don’t force it! Simply place the dough back in the fridge for about 10-15 minutes to allow the gluten to relax. This makes it much easier to roll out smoothly without tearing.
Baking the Scones to Golden Perfection in Your Remoska
Now for the exciting part – watching your scones puff up and turn golden in the Remoska! The Remoska’s even heat ensures a beautifully consistent bake and a perfect crust without the need for a traditional oven:
- Preheating the Remoska: Once your scones have had their essential chill time, position your Remoska pot on its trivet. Line the bottom of the pot with a sheet of baking paper if you wish (this is optional but makes lifting the scones out much easier – see our FAQ for more details). Cover the pot with the Remoska Baking Lid, plug it in, and turn it on. Allow it to preheat for a brief 2-3 minutes. While preheating isn’t strictly necessary, it does tend to yield slightly better results in terms of rise and even browning, creating a more consistent baking environment from the start.
- Optional Golden Finish: For that classic, appealing golden-brown top, brush the tops of each scone with a light coating of Heavy Cream or Thickened Cream just before placing them in the Remoska. This step is purely for aesthetics and a touch of extra richness and color to the crust.
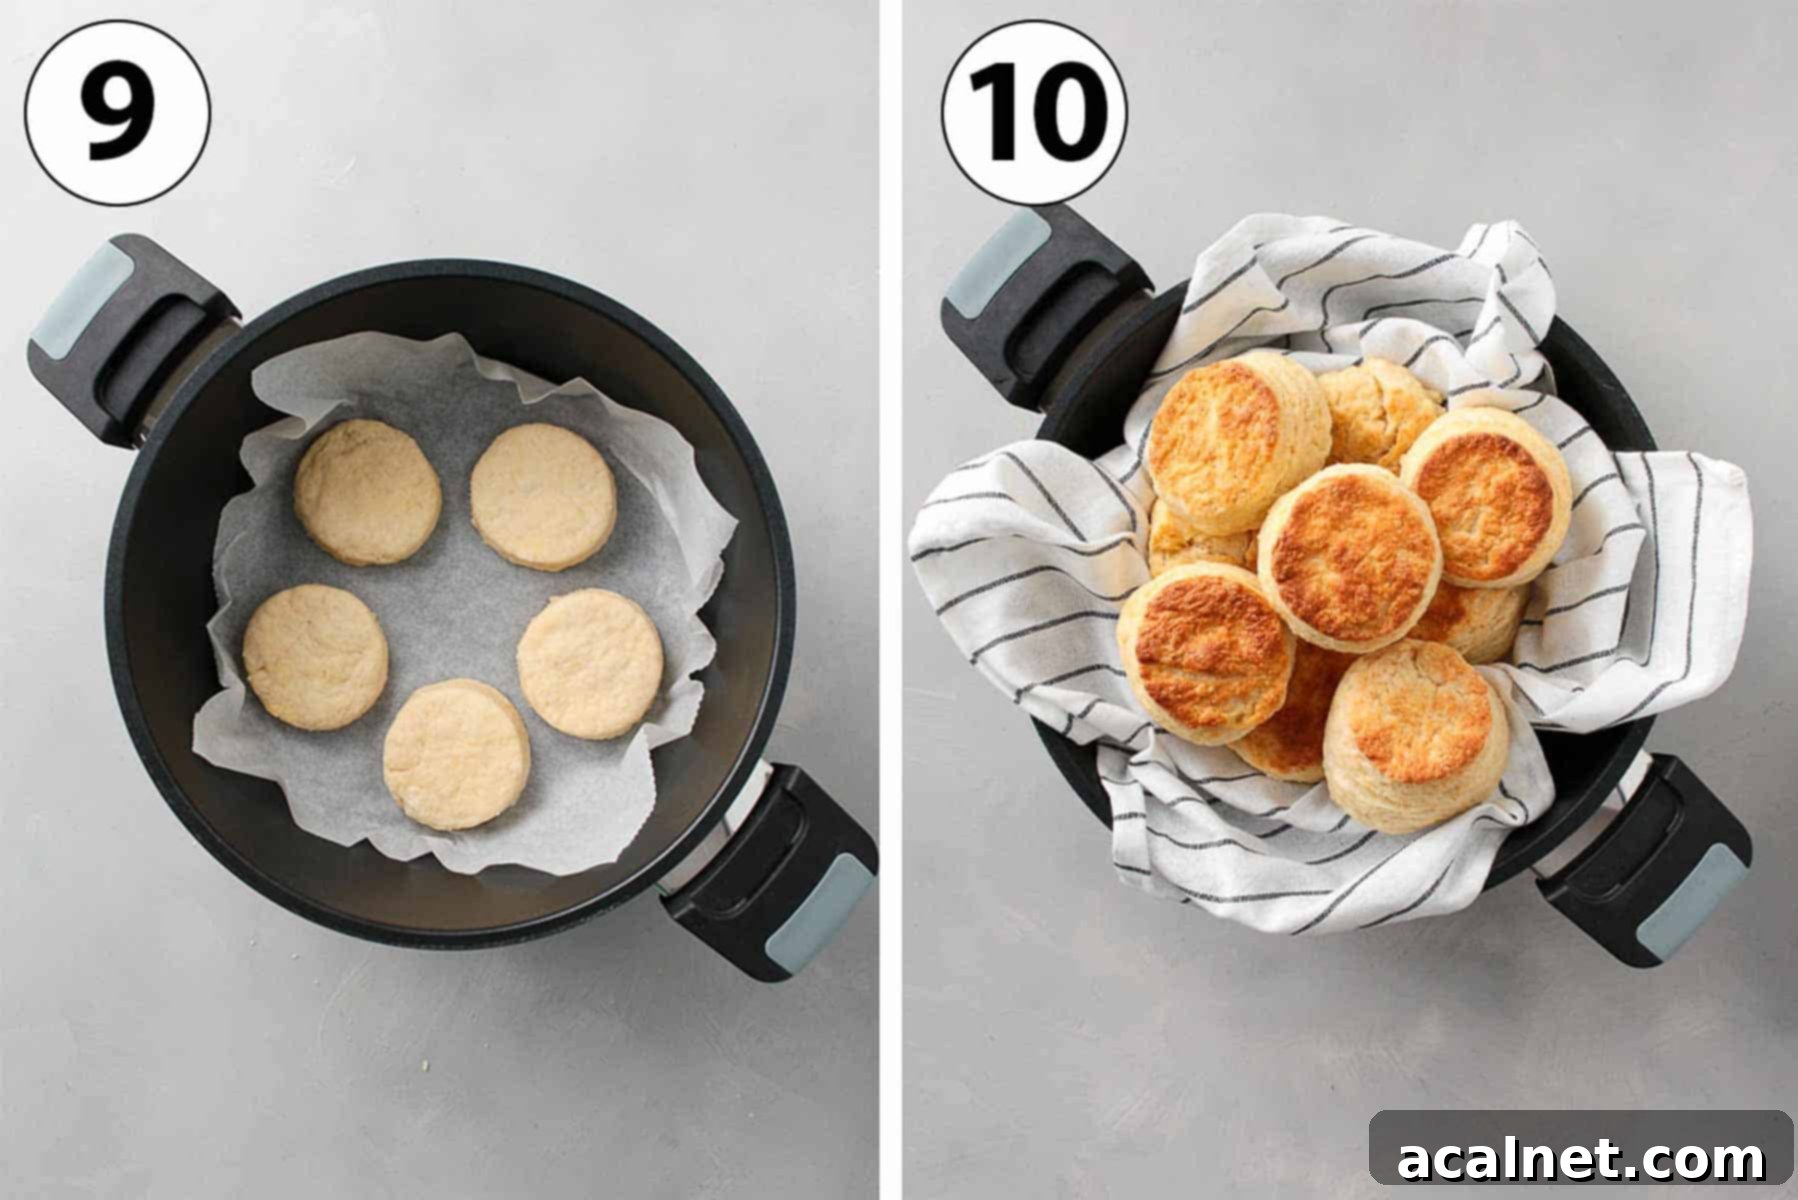
- Photo 9: First Batch Baking. After the Remoska has preheated (or if starting cold), carefully remove the baking lid – remember, it will be very hot! Arrange half of your chilled scones inside the Remoska pot. It’s vital to leave ample space between each scone, as they will expand significantly as they bake. Overcrowding can prevent them from rising properly and browning evenly. Replace the baking lid securely. Bake for approximately 20 to 22 minutes, or until the scones are beautifully risen, golden brown on top, and cooked through.
- Photo 10: Removing and Cooling. Once the first batch is ready, carefully remove the hot baking lid. If you used baking paper, gently lift the paper to remove the scones from the Remoska. If not, use non-metal tongs (silicone or wooden are ideal to protect the non-stick coating of your Remoska pot) to transfer the hot scones onto a wire cooling rack. Allow them to cool slightly – patience is key for the best texture and to allow the internal structure to set properly!
- Baking the Second Batch: Repeat the baking process with your remaining chilled scones. As mentioned, because the Remoska is now at full operating temperature, the second batch will require less baking time, generally 15 to 18 minutes. Keep a close eye on them to prevent over-browning and achieve that perfect golden hue.
- Enjoy Warm: Scones are truly at their best when served warm, split open and generously adorned with your favorite toppings. The warmth enhances their delicate texture and buttery flavor.
Since scones expand quite a lot, you will almost certainly need to bake them in two batches. Keep the second batch of unbaked scones in the fridge while the first batch is baking. This maintains their cold temperature, which is crucial for their rise and texture, ensuring both batches turn out perfectly. You’ll notice that the second batch will bake more quickly – typically around 15 to 18 minutes – because the Remoska is already thoroughly heated.
Frequently Asked Questions About Remoska Scones
Through various tests, I’ve found that pre-heating the Remoska with the baking lid on for about 2-3 minutes before adding the scones yields the most consistent and best results. This initial burst of heat helps the scones rise quickly and evenly, contributing to their signature light and fluffy texture. However, the difference in texture isn’t drastically huge. If time is of the essence or you simply prefer, you can certainly place the scones in a cold Remoska and then turn it on. You might just need to extend the baking time by an additional 2 to 3 minutes to achieve the desired golden-brown finish and doneness, so keep a close eye on them.
No, lining the Remoska pot with baking paper is not strictly necessary. The Remoska pot is designed with an excellent non-stick coating, which means your scones should release easily without sticking. I personally choose to use baking paper for one simple reason: convenience. It makes it incredibly easy to lift all the baked scones out of the hot pot in one go, preventing any potential damage to the non-stick surface from metal tongs or spatulas, and saving a little on cleanup. So, while optional, it’s a helpful trick!
Absolutely! This recipe is incredibly versatile and can easily be adapted. Since the Remoska essentially functions as a mini-oven, the method translates perfectly to a traditional oven setting. To bake these scones in a conventional oven, preheat your oven to 180°C (350°F). Once heated, place your scones on a baking sheet, ensuring they have enough space to expand, and bake for approximately 20 minutes, or until they are well-risen and golden brown on top. Always keep an eye on them as oven temperatures can vary slightly.
The secret to light and fluffy scones lies in two main factors: very cold ingredients and minimal handling of the dough. Using super-chilled butter and milk ensures that the butter remains in small, distinct pieces within the dough. As these butter pieces melt during baking, they release steam, which creates tiny pockets and pushes apart the layers of dough, resulting in their signature airy and tender texture. Overworking the dough, on the other hand, develops gluten excessively, which can make scones tough and dense, rather than light and ethereal.
Several factors contribute to a good scone rise, often referred to as “oven spring.” Firstly, using fresh self-rising flour (or correctly mixed plain flour with baking powder) is essential for chemical leavening. Secondly, ensure your butter and milk are very cold, as this creates more steam during baking. Thirdly, when cutting out the scone shapes, press straight down without twisting the cookie cutter. Twisting can seal the edges of the dough, inhibiting proper rise. Finally, giving the cut scones a good chill in the fridge for at least 30 minutes before baking helps firm up the butter and relax the gluten, resulting in a better, taller rise.

Top Tips for Baking Irresistible Remoska Scones
To ensure your scones are consistently perfect every time – light, fluffy, and beautifully risen – keep these expert tips in mind. They are crucial for maximizing the Remoska’s potential and achieving bakery-quality results at home:
- Keep Your Butter Super Cold: The colder the butter, the flakier your scones will be. Very cold butter creates steam pockets during baking, which separate the layers of dough. If you’re short on time or finding it hard to “rub in” cubed butter, consider grating your very cold butter directly into the flour mixture using a box grater. This creates smaller, more evenly distributed pieces, speeding up the process. While it might lead to slightly less distinct layers compared to the traditional rubbing-in method, it’s a fantastic alternative for convenience and still yields excellent results.
- Rest the Dough: After you’ve handled the dough, whether mixing or rolling, it’s highly beneficial to let it rest. This allows the gluten (which develops from handling) to relax, making the dough much easier to work with without it pulling back or becoming elastic. This is especially important when you’re gathering and re-rolling dough scraps. Always rest the dough in the fridge to keep the butter as cold as possible – a non-negotiable step for flaky scones.
- Adjust Baking Time for Batches: If you’re baking your scones in multiple batches (which is usually recommended to avoid overcrowding the Remoska and ensure even baking), remember that the Remoska will be significantly hotter for the second batch. Consequently, the second batch will bake more quickly. Start checking for doneness after 15 to 18 minutes, and adjust as needed to prevent them from over-baking and becoming dry.
- Achieve a Golden Top: For that classic, appetizing golden-brown finish that makes scones look as good as they taste, brush the tops of your scones with a small amount of Heavy Cream or Thickened Cream just before placing them in the Remoska to bake. This simple step adds a lovely visual appeal and a touch of extra richness to the crust, enhancing the overall presentation.
- Avoid Overworking the Dough: This tip cannot be stressed enough! Overworking scone dough develops the gluten, which will result in tough, dense, and chewy scones instead of the light, airy texture you’re aiming for. Mix and knead only until the ingredients are just combined and a cohesive dough forms. As soon as the flour streaks disappear, stop.
- Do Not Twist the Cutter: When cutting out your scone shapes with a cookie cutter, press the cutter straight down firmly and lift it straight up. Twisting the cutter can inadvertently seal the edges of the scone dough. This sealed edge can prevent the scones from rising properly, hindering that beautiful “oven spring” and resulting in a flatter, less impressive scone.
Delightful Ways to Serve Your Remoska Scones
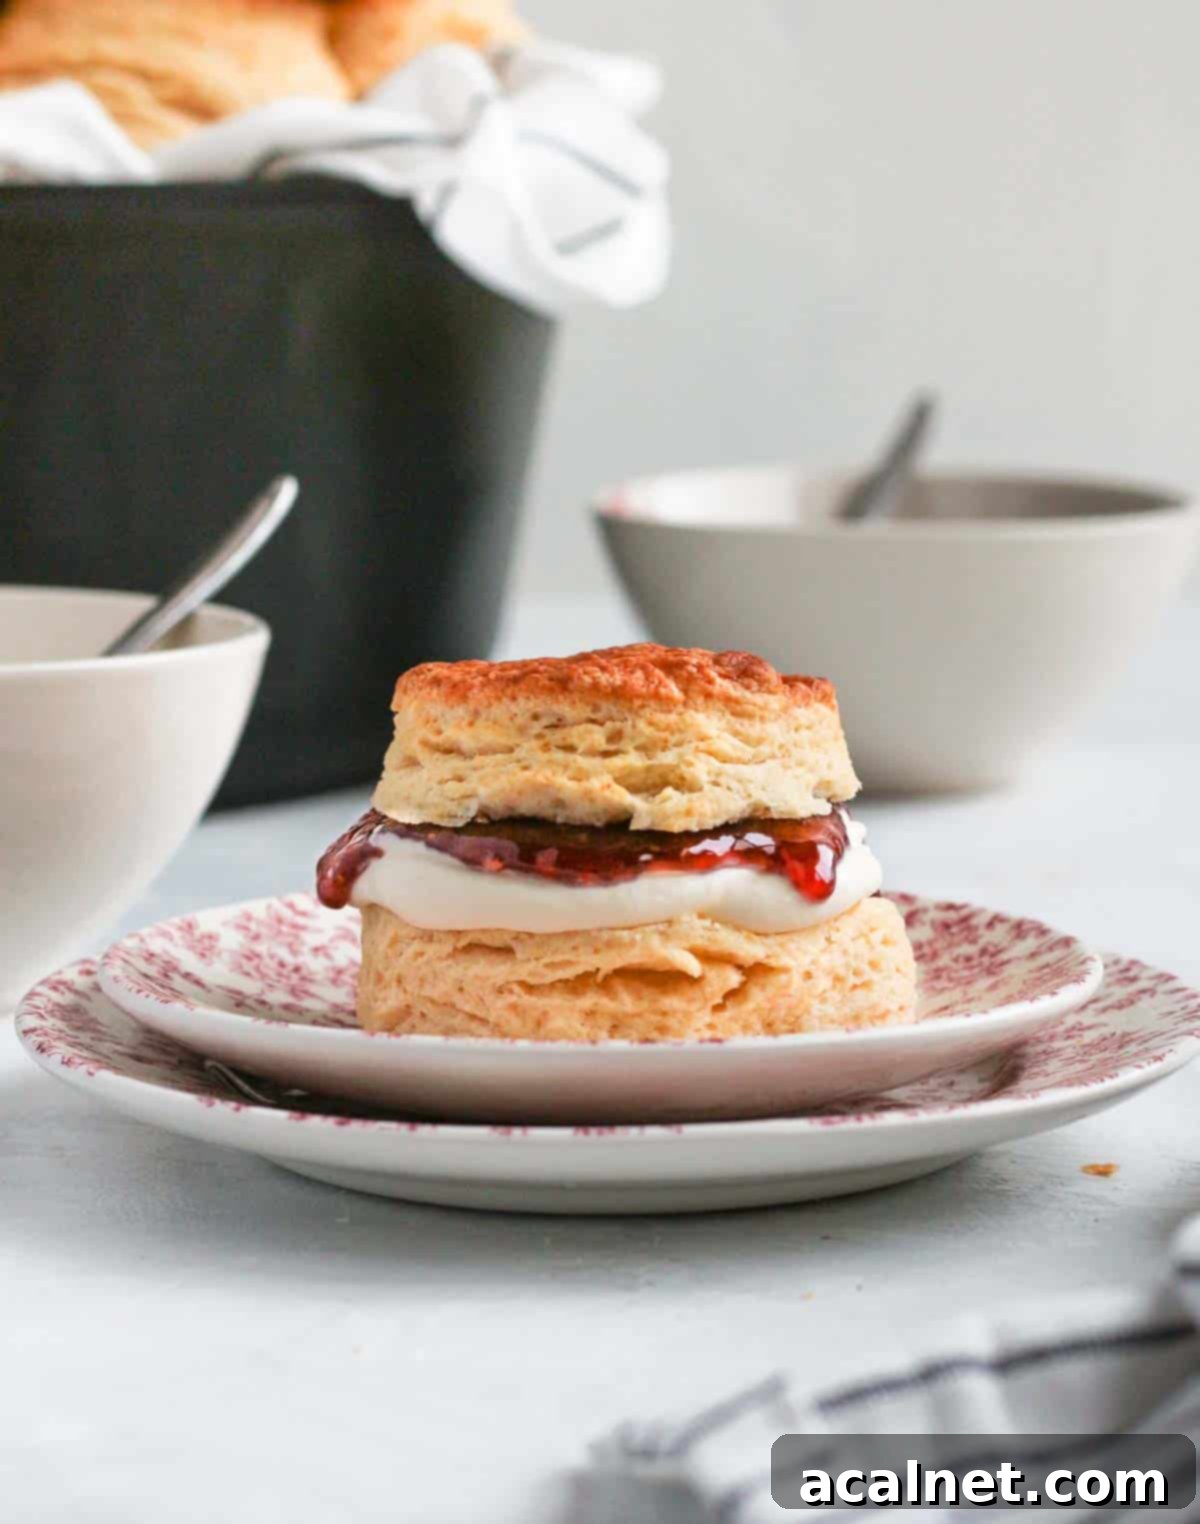
The beauty of a perfectly baked scone is its versatility. While the most beloved and classic accompaniment is undoubtedly a generous dollop of cream and a spoonful of your favorite jam, these buttery vanilla scones are a wonderful base for countless other pairings, making them suitable for any time of day:
- The Quintessential Cream Tea: This is the traditional and most beloved way to enjoy scones. Partner them with clotted cream (the traditional choice for English scones, known for its rich, thick texture) or freshly whipped double cream, alongside a vibrant strawberry, raspberry, or mixed berry jam. The contrast between the rich scone and the sweet-tart preserves is simply divine.
- Citrusy Brightness: For a zesty and refreshing twist, serve your warm scones with homemade Tangy Lemon Curd or a fragrant Sweet Orange Curd. The bright tanginess of the curd provides a delightful contrast to the scone’s richness, awakening the palate.
- Fresh Fruit Compotes: Elevate your scone experience with chunky, homemade fruit compotes. A quick and easy Mixed Berry Compote or a sweet and juicy Blueberry Compote adds a burst of natural fruitiness and a lovely textural element, especially when slightly warm.
- Beyond the Usual: Don’t be afraid to experiment! Try serving your scones with honey butter for added richness, a smooth chocolate spread for a decadent treat, or even a spiced apple butter for a comforting autumn flavor. For a truly indulgent experience, a scoop of good quality vanilla bean ice cream could also be surprisingly delicious on a warm scone, melting into its tender crumb.
No matter how you choose to enjoy them, remember that scones are best served slightly warm, allowing their tender crumb, buttery aroma, and delicate flavor to truly shine. They are an experience to be savored.
Storing & Freezing Your Homemade Scones
While freshly baked scones are always the absolute best, it’s incredibly practical to know how to properly store them to enjoy later or prepare ahead of time. This way, you can always have a delicious treat ready at a moment’s notice:
- At Room Temperature: These basic scones will remain fresh and delicious for up to 3 days when stored in an airtight container at room temperature. To revive their texture and warmth, and bring them back to their optimal state, I highly recommend gently re-heating them for a few minutes in your Remoska, a conventional oven, or even a microwave before serving. This process helps to soften the crumb and release their delightful, buttery aroma.
- Freezing for Later: Scones freeze exceptionally well, making them perfect for meal prep, unexpected guests, or simply ensuring you always have a homemade treat on hand. Once completely cooled (this is important to prevent ice crystals), place them in a single layer on a baking sheet and flash-freeze until solid (about 1-2 hours). This prevents them from sticking together. Then, transfer the frozen scones to a freezer-safe bag or an airtight container, ensuring as much air is removed as possible. They can be stored in the freezer for up to 2-3 months without losing much quality.
- Reheating Frozen Scones: To enjoy frozen scones, you have a couple of convenient options. You can simply leave them to thaw at room temperature for a few hours until soft. For the ultimate “freshly baked” experience, which is highly recommended, you can reheat them directly from frozen. Place them in a preheated Remoska (for about 5-8 minutes, depending on the Remoska’s current temperature) or a conventional oven (preheated to 160°C/325°F for 10-15 minutes). This method results in a warm, tender interior and a slightly crisp exterior, almost as good as straight from the oven!
More Irresistible Afternoon Tea Recipes
If you’ve enjoyed the simplicity and deliciousness of these Remoska scones, you’ll love exploring these other delightful treats. They are all perfect for any afternoon tea spread, a celebratory occasion, or simply satisfying a sweet craving:
- Crunchy Chocolate Cornflake Cakes: A nostalgic, no-bake favorite that’s quick to make and loved by all ages!
- Zesty Lemon Curd Tartlets: Bite-sized bursts of tangy citrus, perfect for a refreshing treat.
- Decadent Chocolate Caramel Slices: Layers of rich, gooey caramel and smooth chocolate – pure indulgence!
- Sweet Mini Orange Tarts: A refreshing and vibrant treat with a delightful citrus punch.
- Elegant Financiers Cakes: Small French almond cakes, subtly sweet with a crisp exterior and moist interior.
- Rich Mini Chocolate Tarts: A perfect individual chocolate fix for any chocolate lover.
- Delicate Lemon Meringue Bites: Tangy lemon filling crowned with a cloud of sweet, toasted meringue.
Loved this recipe?
We’d be thrilled to hear from you! Please consider leaving a comment below to share your experience and tips, and don’t forget to tag us on Instagram @a.baking.journey with a photo of your fantastic Remoska scone creation!
Full Recipe: Basic Scones in the Remoska

Basic Scones in the Remoska
★★★★★
Servings:
8
scones
Author:
Sylvie
20 minutes
40 minutes
30 minutes
1 hour 30 minutes
Print Recipe
Ingredients
- 400 gr (2 cups + 2/3 cup) Self-Rising Flour
- 40 gr (3 1/2 tablesp.) Caster Sugar, or fine white granulated sugar
- 120 gr (1/2 cup) Unsalted Butter, very cold
- 180 ml (3/4 cup) Full Cream Milk
- 1 teasp. Vanilla Extract, optional
Instructions
- Combine the Self-Rising Flour and Sugar in a large bowl. Add the very cold Unsalted Butter, cut into small cubes (or grated, see Note 1). Use your fingertips or a Pastry Blender to rub the butter into the flour until you have very small, pea-sized crumbs (see Note 2).
- Make a well in the center of the mixture and pour in the cold Full Cream Milk and optional Vanilla Extract. Mix gently with a stiff spatula or your hands until the ingredients just come together to form a rough dough. Knead briefly and lightly until cohesive, taking care not to overwork it (see Note 3).
- On a lightly floured surface or baking paper, roll the dough into a disk approximately 1.5 cm (0.6 inch) thick. Using a 7.5 cm (3 inch) round cookie cutter, cut out individual scones. Place the cut scones on a tray and chill in the fridge for at least 30 minutes.
- Gather any dough scraps, gently press them together into a disc, and rest them in the fridge for 10-15 minutes before re-rolling and cutting more scones.
- Place the Remoska pot on its trivet. Cover with the Baking Lid, plug it in, and pre-heat for 2-3 minutes (see Note 4 for optional preheating).
- Optional: For a golden-brown top, lightly brush the scones with a little Heavy/Thickened Cream before baking.
- Carefully remove the hot lid. Arrange half of the chilled scones in the bottom of the Remoska pot, leaving some space between each scone for rising (see Note 5). You may line the pot with baking paper for easy removal.
- Replace the Baking Lid and bake for 20 to 22 minutes, or until risen and golden. Remove the scones (using the baking paper or non-metal tongs) and place on a cooling rack.
- Bake the second batch of scones using the same method, but for a shorter duration of 15 to 18 minutes, as the Remoska will already be hot (see Note 6).
- Serve your delicious Remoska scones while still slightly warm, with your choice of fillings.
Notes
Ingredients Notes:
- Flour Substitution: If you don’t have self-rising flour, you can easily substitute it with plain (all-purpose) flour. Simply combine the same quantity of plain flour with 1 teaspoon of baking powder and a pinch of salt. Ensure it’s well mixed by sifting or whisking thoroughly to distribute the leavening agent evenly.
Instruction Notes:
- Grating Butter: To expedite the butter incorporation process, you can grate very cold butter directly into your flour mixture using a box grater. This method can make the initial steps quicker and easier, especially if your hands warm up easily, but might result in slightly less distinct layers compared to the traditional rubbing-in method.
- Butter Consistency: After rubbing in the butter, the mixture should resemble coarse crumbs with some small, pea-sized chunks of butter still visible. The goal is to coat most of the flour in butter, but not to fully incorporate it, as these small butter pieces are key to creating flaky layers.
- Avoiding Overworking: It is crucial to handle the dough as little as possible. Overworking the dough develops gluten, which will lead to tough, chewy scones rather than light and airy ones. If the dough feels quite tough or springs back when you try to handle or roll it, it’s a sign that the gluten has become too active. In this case, wrap the dough loosely and let it rest in the fridge for 10-15 minutes to allow the gluten to relax.
- Preheating Importance: While optional, slightly preheating the Remoska for a few minutes with the lid on typically provides the best rise and an even golden color, ensuring a consistent baking environment from the start. However, you can absolutely place scones in a cold Remoska and start baking; just be prepared to add 2-3 minutes to the total baking time to achieve the desired doneness.
- Batch Baking: Scones expand considerably during baking. To ensure even cooking and optimal rise, it’s best to bake them in two batches, leaving sufficient space between each scone. This prevents them from steaming rather than baking. Keep the unbaked second batch in the fridge until ready to use to maintain its cold temperature.
- Second Batch Baking Time: Because the Remoska will be hot and at its optimal temperature after the first batch, the second batch will bake more quickly. Start checking for doneness after 15 minutes and continue baking until golden, typically no more than 18 minutes, to prevent over-browning.
Nutrition (per serving)
