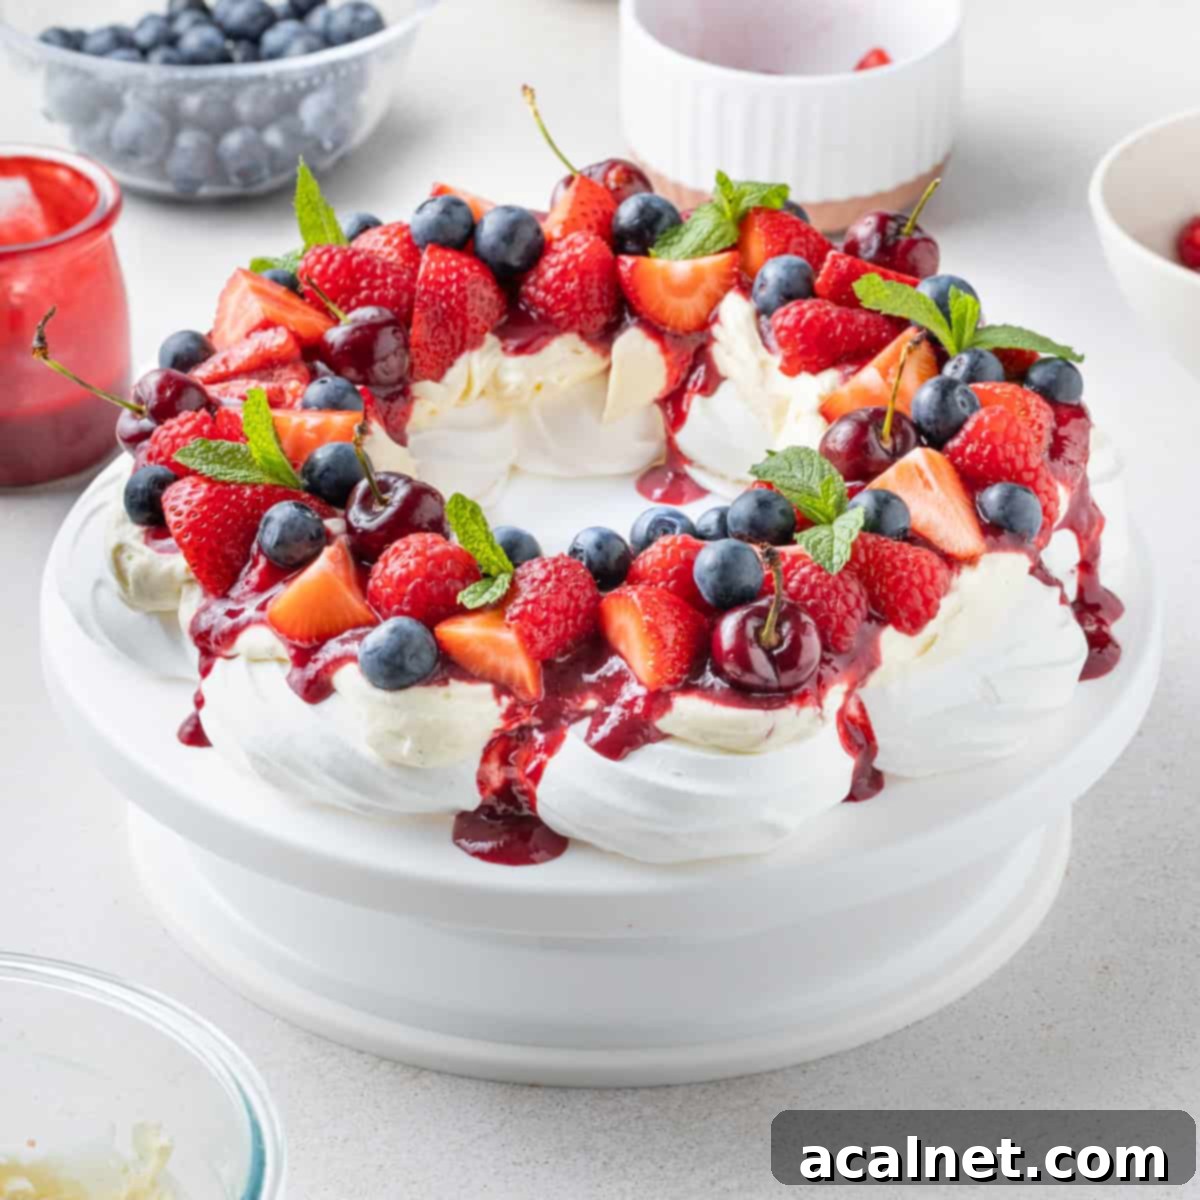
Easy & Festive Christmas Pavlova Wreath: Your Ultimate Holiday Dessert
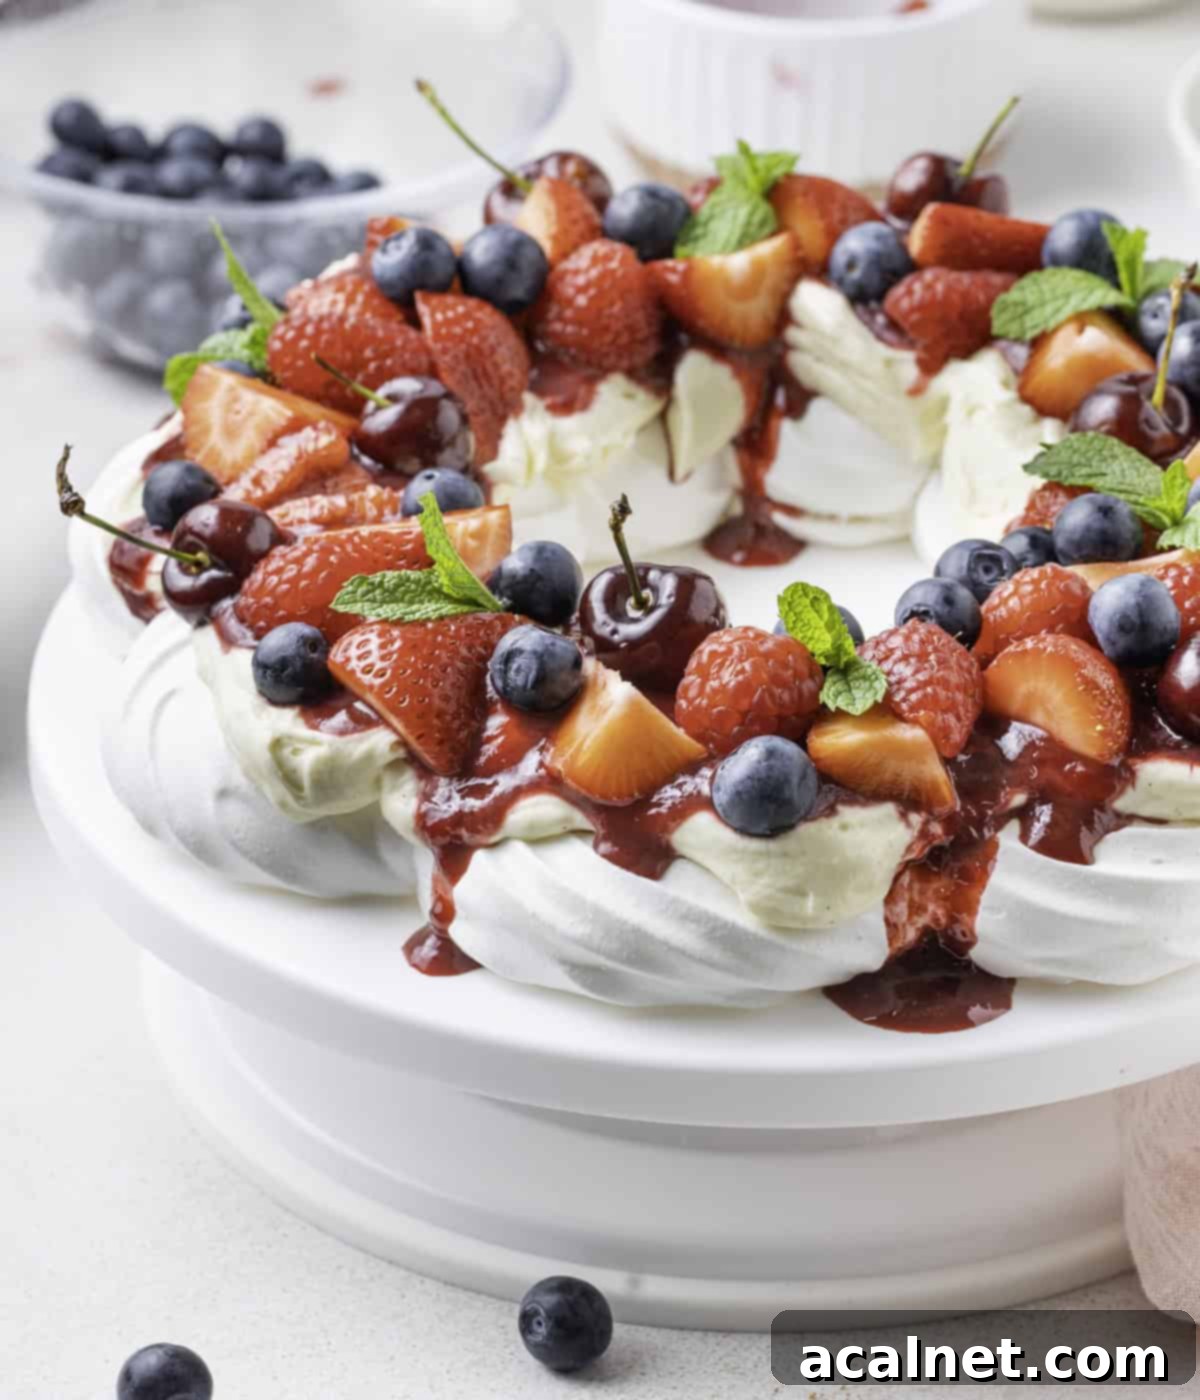
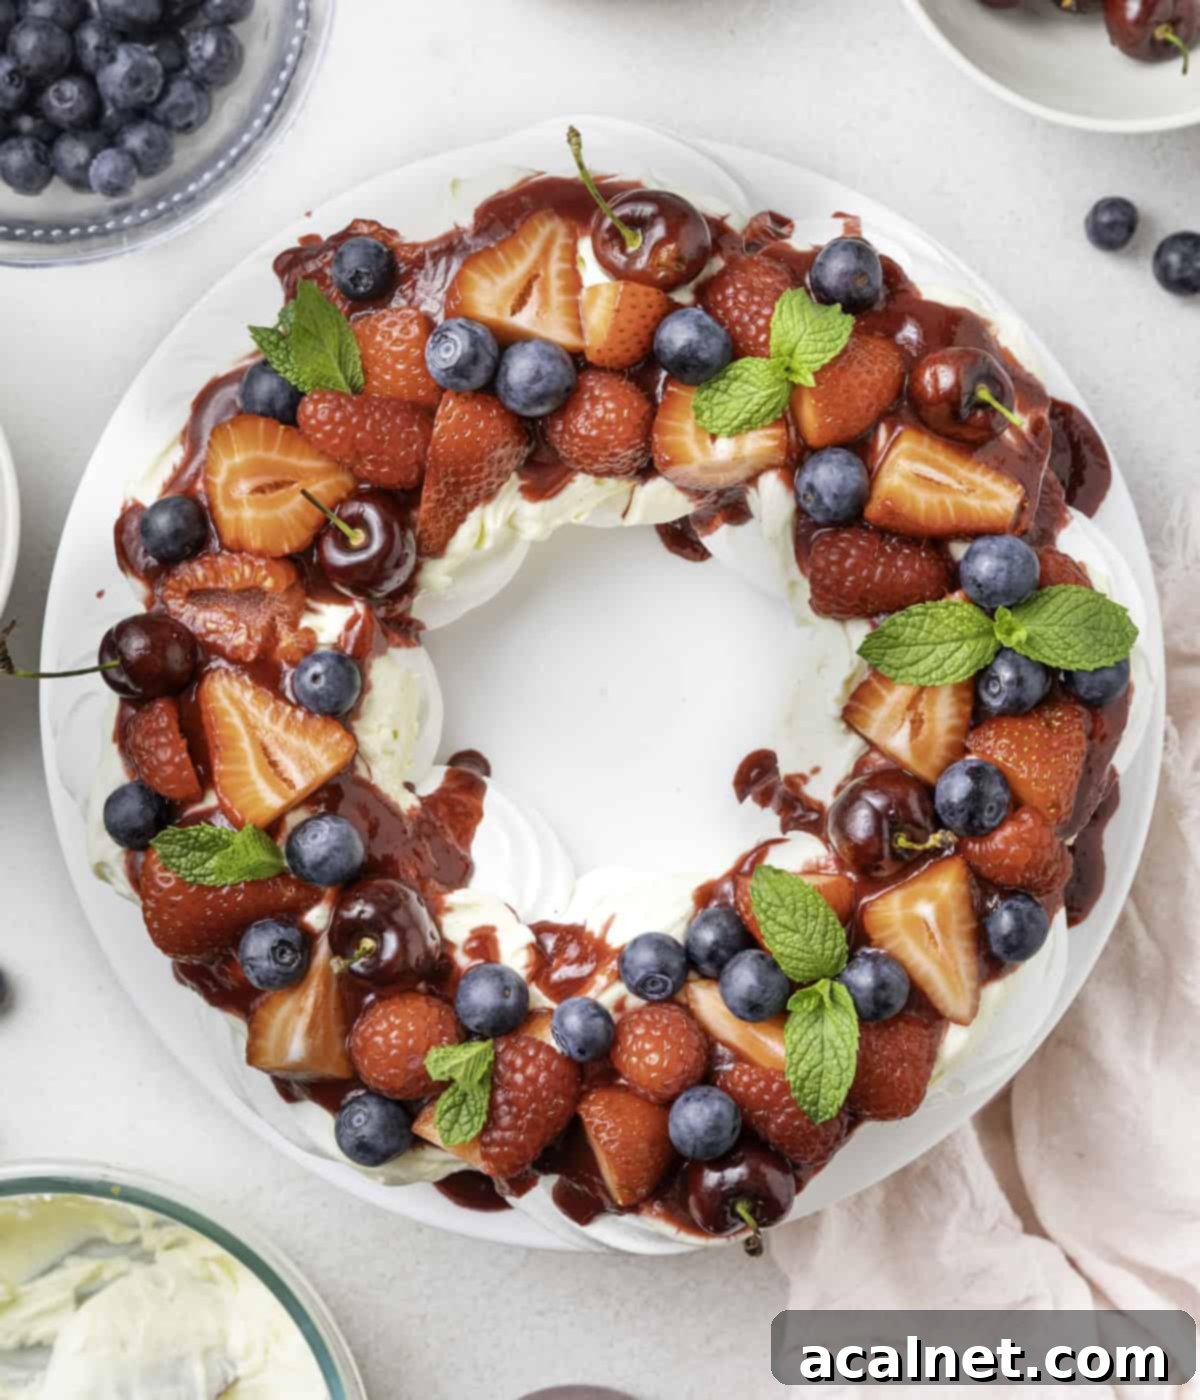
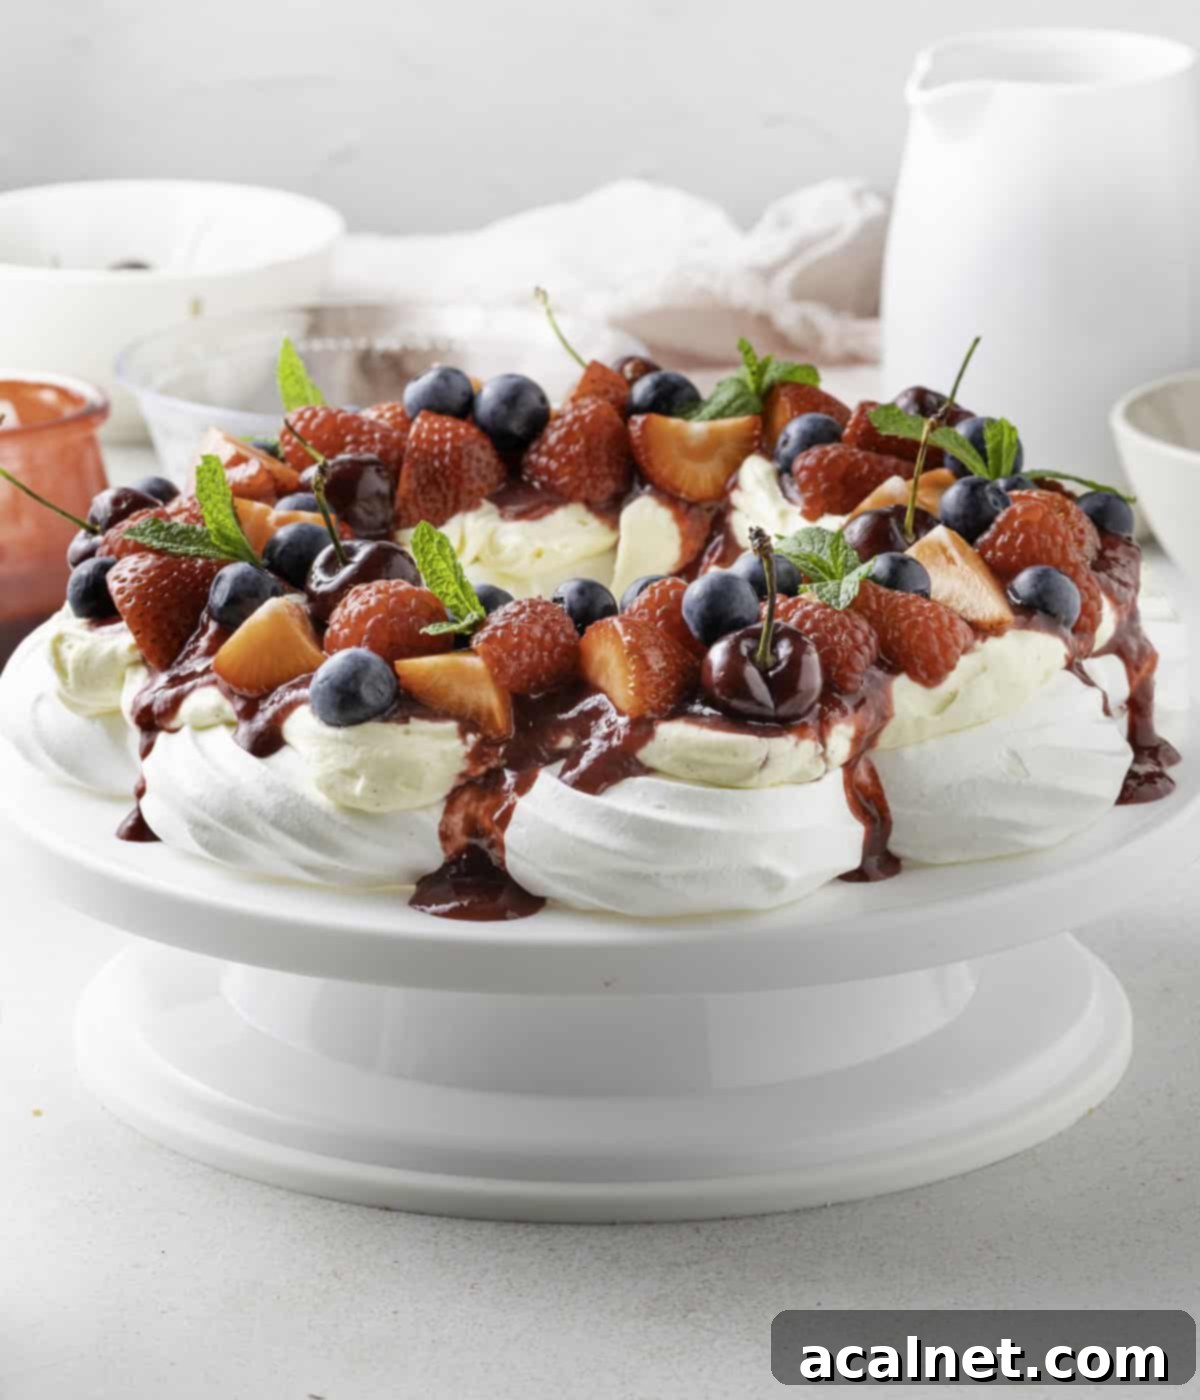
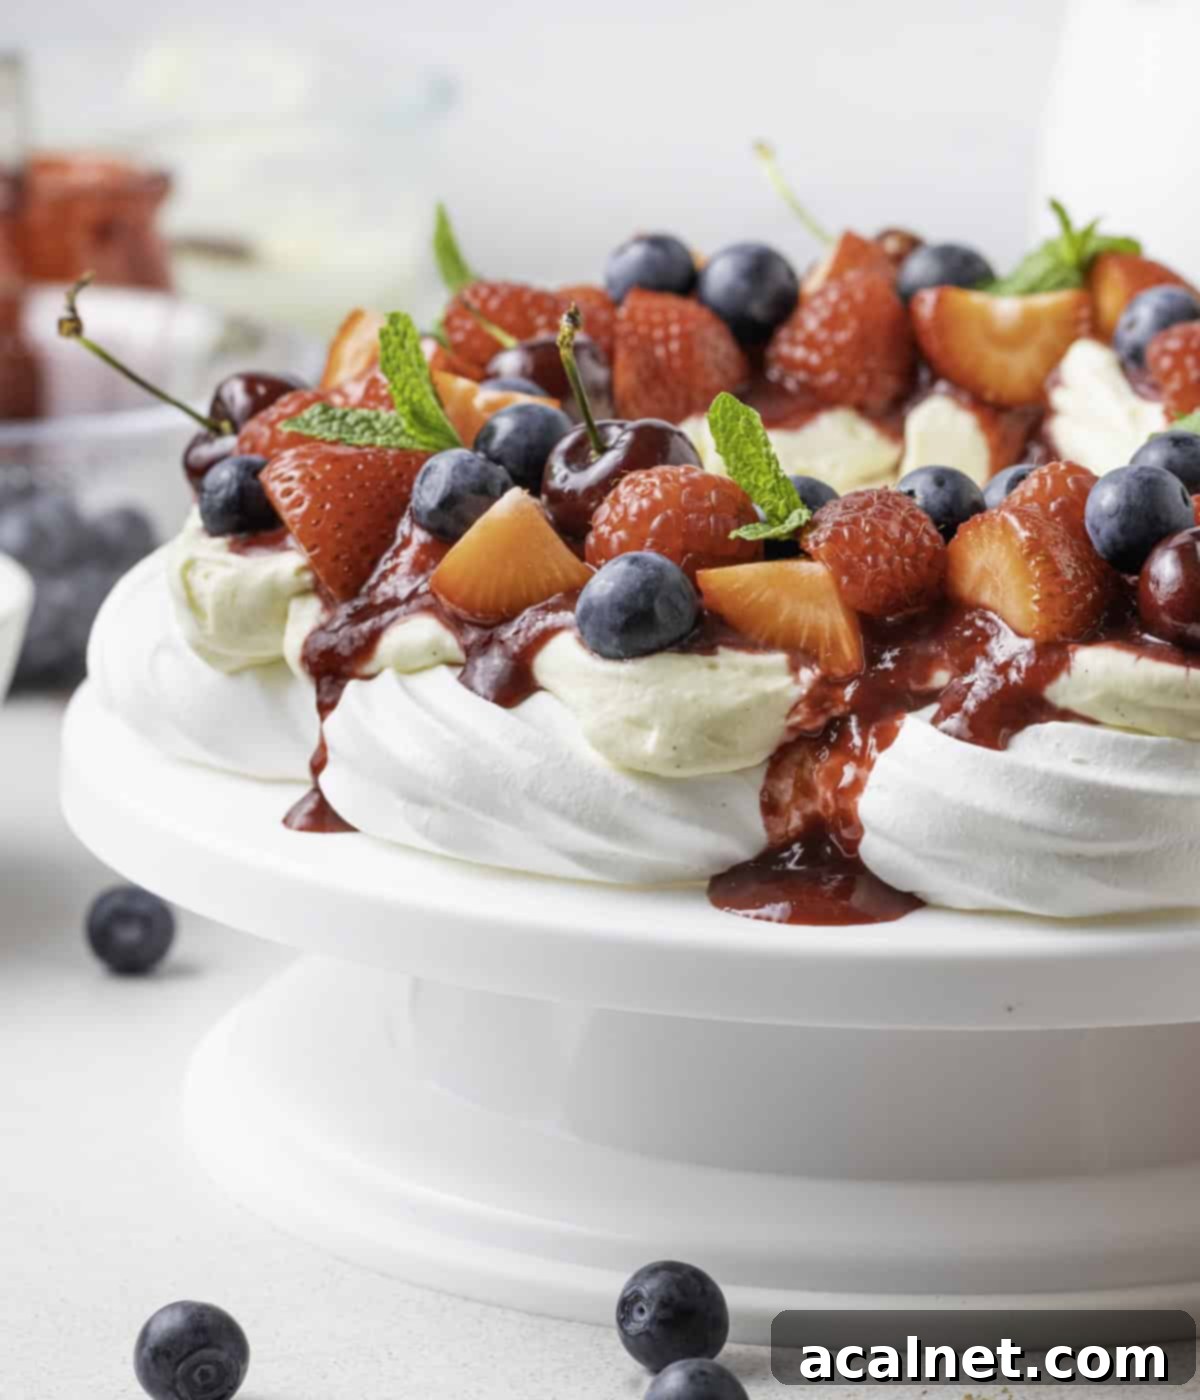
Prepare to enchant your guests this holiday season with the most spectacular and surprisingly simple dessert: our Christmas Pavlova Wreath. This show-stopping creation beautifully combines a delicate, cloudy pavlova base with a rich mascarpone whipped cream, a vibrant, tangy raspberry coulis, and a generous assortment of fresh, colorful berries. It’s more than just a dessert; it’s a festive centerpiece that promises to impress your friends and family with its ethereal texture and incredible flavor. Perfect for Christmas gatherings or any special holiday celebration, this pavlova wreath offers a delightful balance of crisp meringue, creamy indulgence, and fresh fruity brightness.
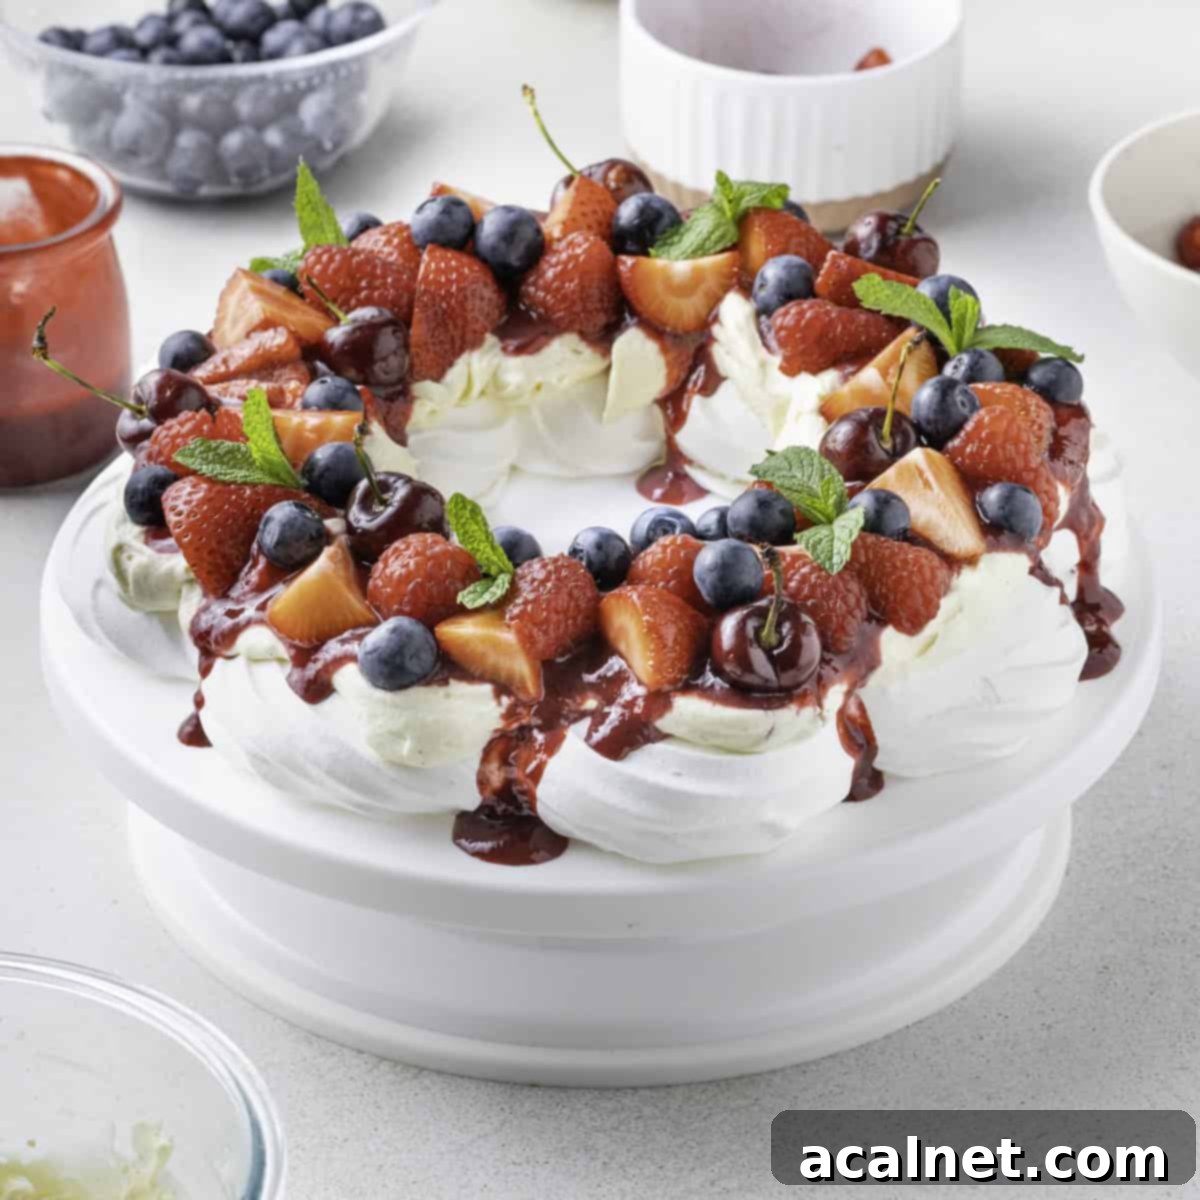
Why You’ll Adore This Christmas Pavlova Wreath
This Christmas Pavlova Wreath isn’t just a dessert; it’s a celebration on a plate. It takes the beloved classic pavlova and elevates it with a festive twist, making it the perfect showstopper for your holiday table. Here’s why this recipe will become your new go-to for seasonal entertaining:
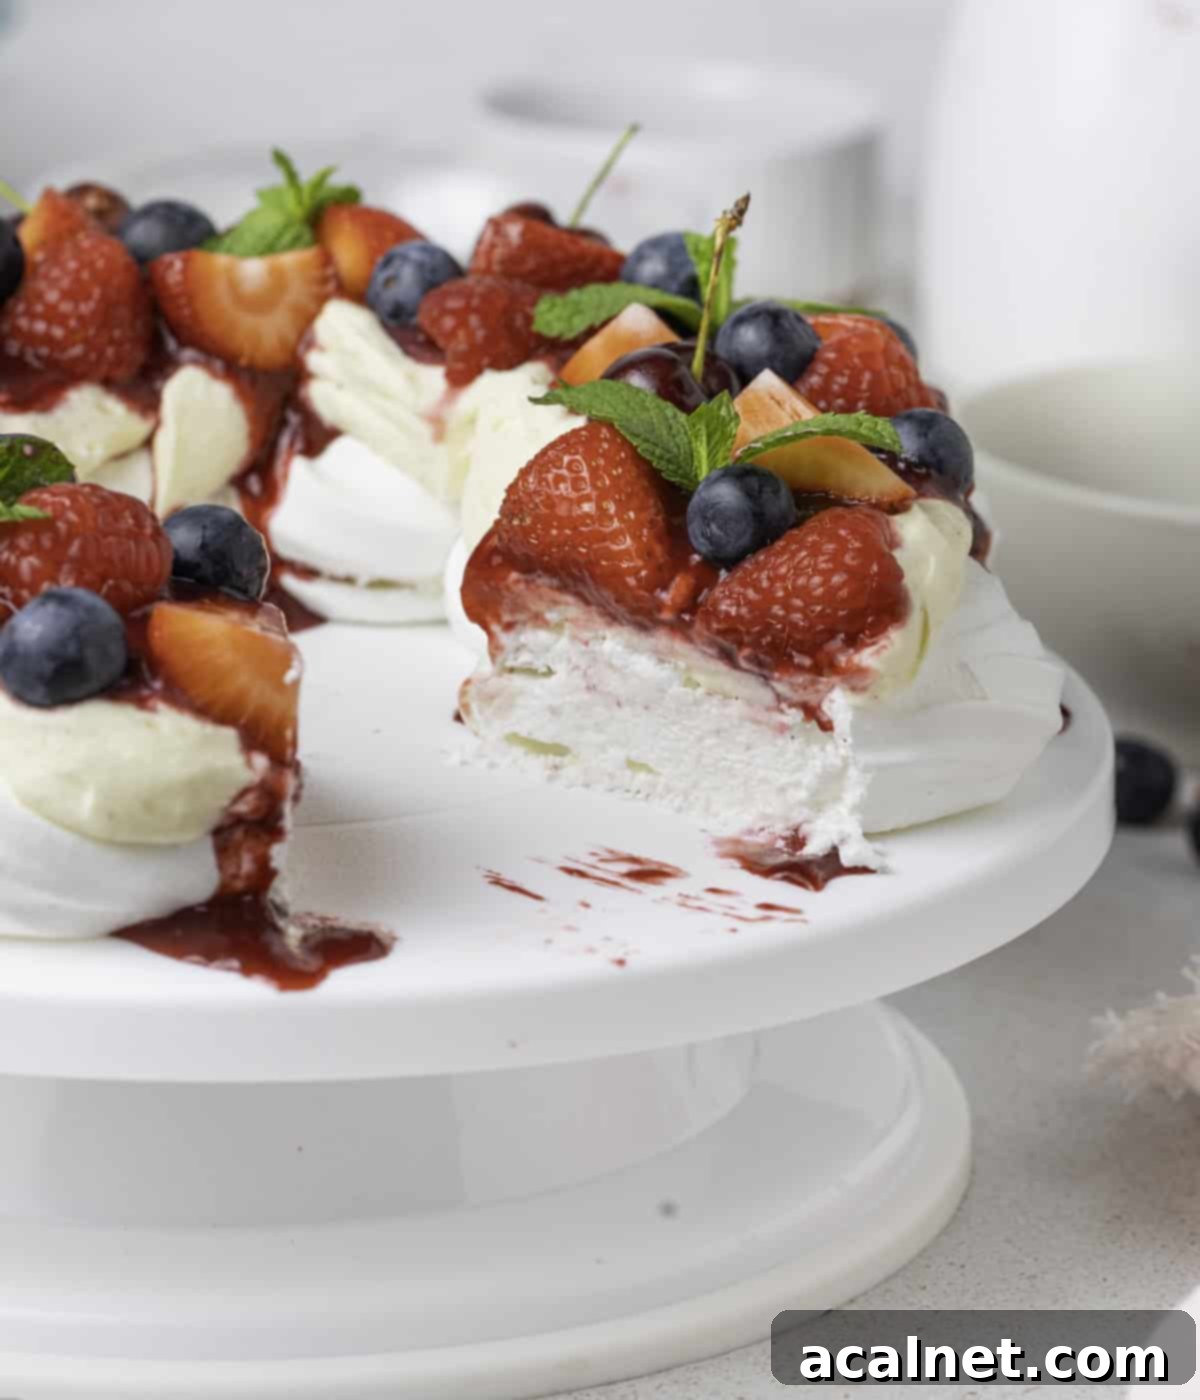
- Perfect Meringue Texture: Experience the magic of a pavlova that boasts a wonderfully crisp exterior, giving way to a soft, fluffy, and delightfully chewy marshmallow-like interior. This contrasting texture is what makes a great pavlova truly unforgettable.
- Luxurious Mascarpone Whipped Cream: Forget plain whipped cream! Our recipe incorporates rich Mascarpone Whipped Cream, which adds an incredible depth of flavor and a velvety, stabilized creaminess that holds its shape beautifully and feels utterly decadent.
- Bright & Tangy Raspberry Coulis: To perfectly balance the sweetness of the meringue and cream, we’ve included a homemade, vibrant raspberry coulis. Its tartness cuts through the richness, creating a harmonious flavor profile that’s simply irresistible.
- Bursting with Fresh Fruits: Adorned with a colourful array of fresh fruits, this pavlova wreath is not only visually stunning but also bursting with natural flavors and nutrients, making it feel both indulgent and refreshing.
- Effortlessly Impressive: While it looks incredibly sophisticated, this Christmas wreath pavlova recipe is surprisingly straightforward to make. Most components can be prepared in advance, allowing for a stress-free assembly on the day of your event.
- A True Holiday Centrepiece: Whether you’re an avid baker or a novice, this dessert is guaranteed to be the star of your holiday spread, drawing oohs and aahs from everyone around the table. It’s an authentic Australian (or New Zealander, depending on who you ask!) dessert, perfect for celebrating the festive season!
Essential Ingredients for Your Pavlova Wreath
Crafting the perfect pavlova wreath starts with understanding the role of each ingredient. Below, you’ll find a detailed breakdown of what you’ll need and why each component is crucial for achieving that irresistible balance of textures and flavors. Remember, high-quality ingredients make all the difference!
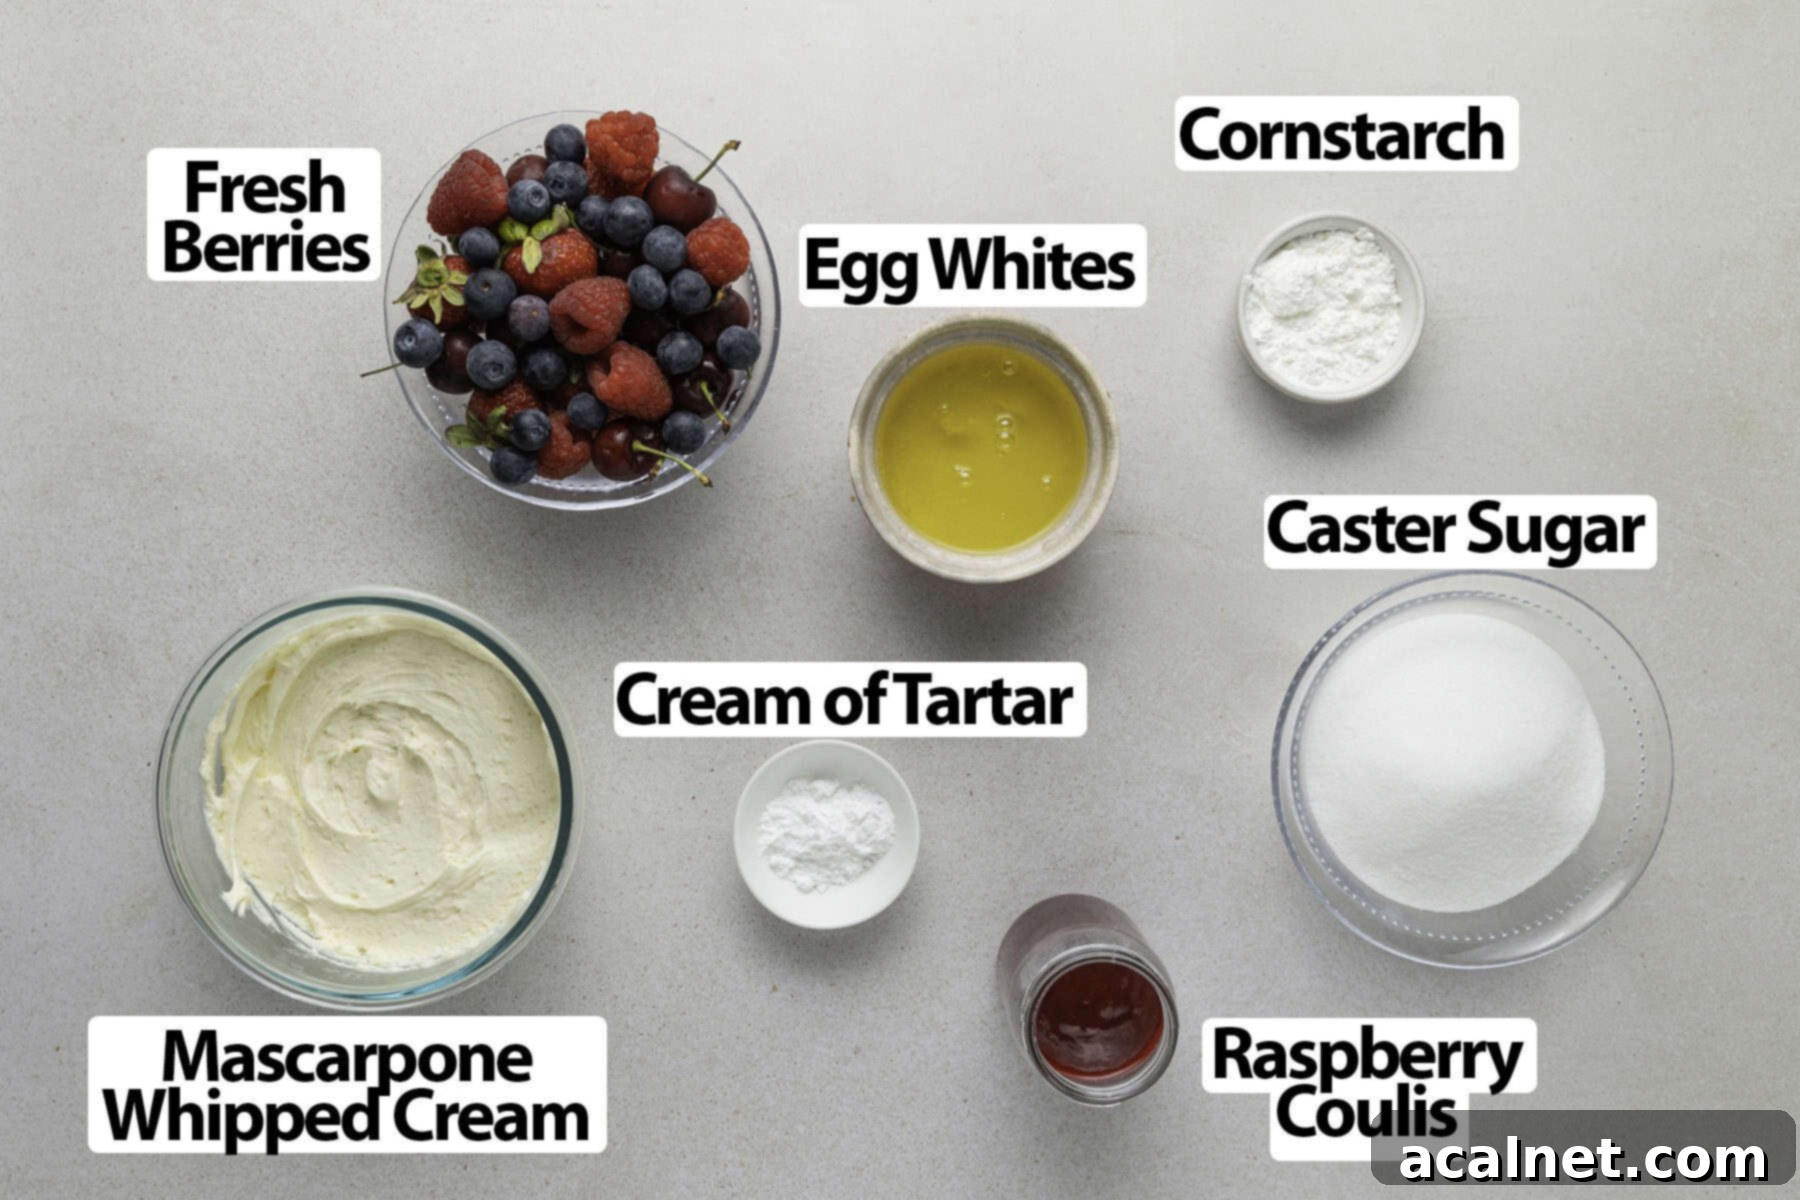
For precise quantities and measurements, please refer to the recipe card below.
What is Pavlova Made Of? The Meringue Foundation:
- Egg Whites: The backbone of your pavlova. Always use fresh, large egg whites for optimal results. It’s paramount to ensure there are absolutely no traces of egg yolk, as even a tiny drop of fat can prevent the egg whites from whipping correctly to stiff peaks. For reference, the recipe uses approximately 150 grams of egg whites, which typically comes from 5 large eggs (around 30 grams each). If your eggs differ in size, adjust the quantity to match the total weight for consistency. I’ve found fresh egg whites, despite potentially taking slightly longer to whip and not reaching the same initial volume as aged ones, provide a more stable meringue due to their stronger protein structure, leading to a more reliable pavlova.
- Caster Sugar: Also known as extra-fine white granulated sugar. The fine granules of caster sugar are essential as they dissolve quickly and thoroughly into the egg whites, creating a smooth, glossy, and stable meringue. Using coarser sugar risks a grainy texture and weeping issues.
- Cornstarch: Or cornflour. This secret ingredient is vital for creating the signature marshmallowy interior of the pavlova. It helps to stabilize the meringue and thickens the inside, preventing it from collapsing while giving it that delightful soft chewiness.
- Cream of Tartar: Often overlooked, cream of tartar is a true game-changer for pavlova! It’s an acidic powder that acts as a stabilizer, preventing the egg proteins from sticking together too quickly and ensuring the tiny air bubbles created during whipping remain intact. This results in a more robust and voluminous meringue. If you don’t have cream of tartar, you can substitute it with an equal amount of white vinegar or fresh lemon juice, which serve a similar stabilizing purpose.
Delicious Toppings for Your Pavlova Wreath:
- Whipped Cream: For this recipe, I’ve used a luscious Mascarpone Whipped Cream, made with heavy/thickened cream, icing sugar (powdered sugar), vanilla paste, and, of course, mascarpone. The mascarpone adds an unparalleled richness, density, and stability, making the cream incredibly luxurious and less prone to deflating. If mascarpone isn’t available, a classic sweetened whipped cream or Chantilly Cream will also work beautifully.
- Raspberry Coulis: This simple yet impactful coulis is made from fresh or frozen raspberries, caster sugar, and a touch of lemon juice. The bright, tangy flavor of the raspberry coulis perfectly complements the sweet meringue and creamy topping, adding a refreshing burst with every bite. You can experiment with other berry coulis if you prefer.
- Fresh Fruits: A vibrant mix of fresh berries is perfect for garnishing, including juicy strawberries, tart raspberries, plump blueberries, and sweet cherries. These not only add incredible flavor and texture but also contribute to the festive wreath aesthetic. Feel free to customize with any of your favorite seasonal fruits to make the dessert truly your own.
How to Craft Your Perfect Pavlova Wreath: Step-by-Step Guide
Creating this stunning pavlova wreath is a process that’s both rewarding and enjoyable. Follow these detailed steps to ensure a flawless, impressive dessert.
1. Mastering the Meringue Base
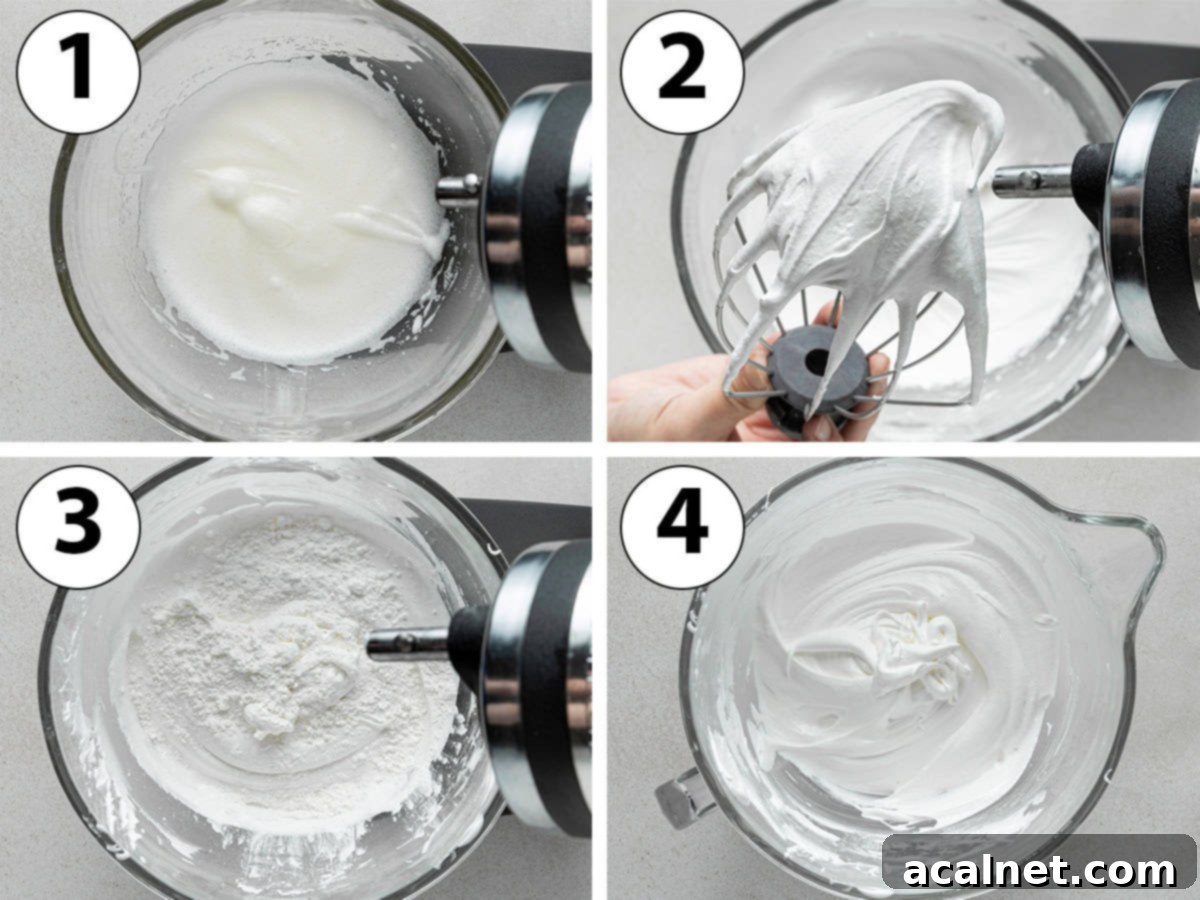
- Begin by preheating your oven to a low 100 degrees Celsius (215 degrees Fahrenheit). The key to a perfect pavlova is a slow, low bake which helps prevent cracking and ensures a beautifully white, shiny, and stable meringue shell.
- Photo 1: Place your fresh egg whites into the impeccably clean bowl of your stand mixer, fitted with the whisk attachment. Start whipping on medium speed for about 3 to 5 minutes. Watch as the egg whites transform, doubling in volume and turning a cloudy white, resembling “light shaving cream” – this is just before they reach soft peaks.
- While the mixer continues to work on medium-low speed, begin adding the caster sugar gradually, one tablespoon at a time. This slow addition, with a 10 to 15-second pause between each spoonful, is crucial for allowing the sugar to fully dissolve into the egg whites. Continue until all the sugar has been incorporated. Make sure to occasionally stop and scrape down the sides of the bowl to ensure everything is evenly mixed.
- Photo 2: Once all the sugar is in, increase the mixer speed to medium-high or high. Continue whipping for another 3 to 5 minutes until you achieve very stiff, glossy peaks. The meringue should be thick enough to hold its shape firmly, and when you lift the whisk, the peak should stand upright without drooping. To ensure the sugar has completely dissolved, rub a small amount of meringue between your fingers – it should feel perfectly smooth, with no grainy texture. If you still feel sugar granules, continue whipping until smooth.
- Photo 3: Gently add the cornstarch and cream of tartar to the meringue.
- Photo 4: Briefly whip for approximately one minute on medium-low speed, just until the dry ingredients are fully incorporated without deflating the meringue.
2. Crafting the Elegant Wreath Shape
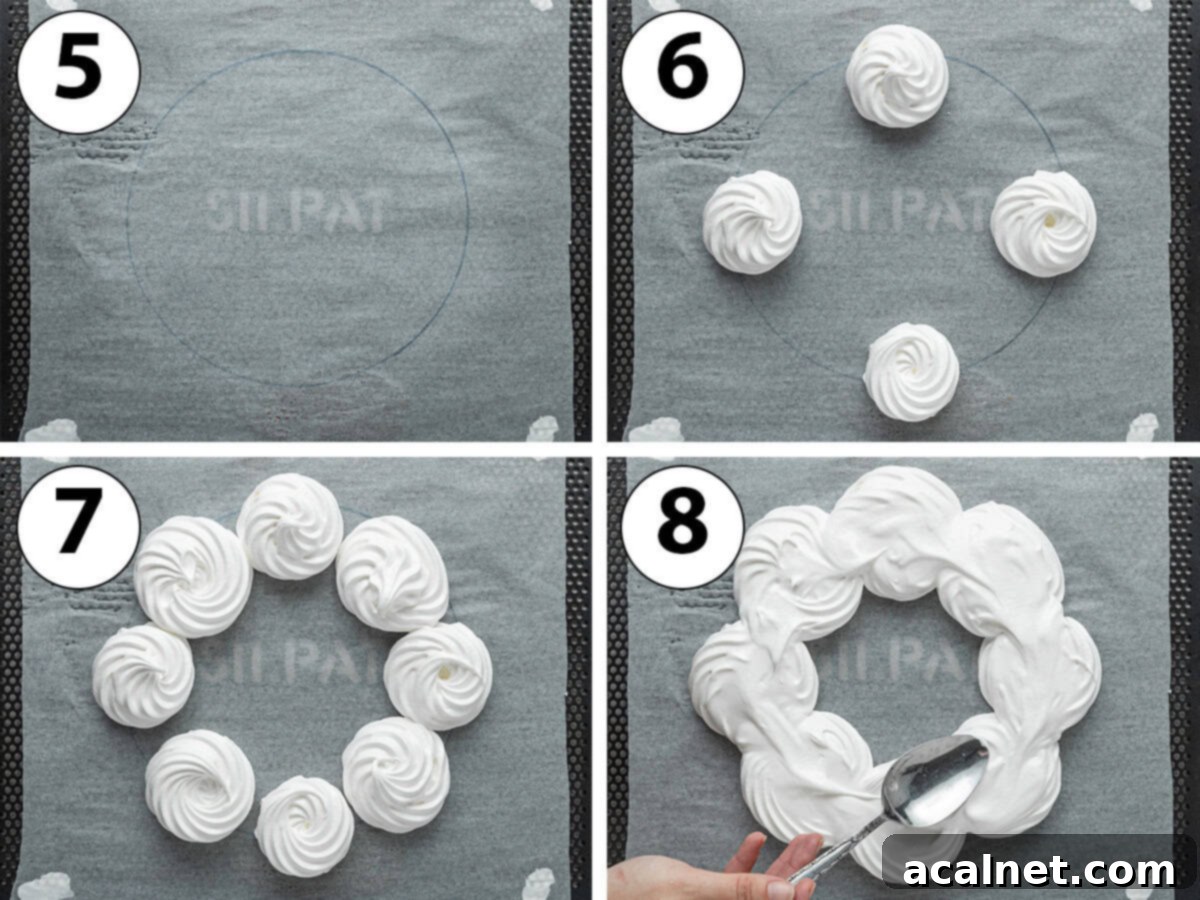
- Carefully transfer the glossy meringue into a large piping bag fitted with a 1.5 cm open star tip. Prepare your baking sheet by laying a piece of baking/parchment paper on it. On the reverse side of the paper (so the pen marks don’t transfer to the meringue), draw a large circle, approximately 20 cm (8 inches) in diameter. A large cake ring or dinner plate can serve as a perfect guide. For optimal baking, consider using a perforated baking sheet, which promotes even air circulation.
- Photo 6: Begin piping your wreath. Create four substantial mounds of meringue directly over the drawn circle. Start by piping one at the “North” (top edge), then “South” (bottom edge), “East” (right side), and “West” (left side) of the circle, using a circular motion for each dollop. Each mound should be roughly 5 cm (2 inches) tall and 8 cm (3 inches) wide, creating a robust base for your wreath. If you’re serving a larger crowd, you can opt for more individual, slightly smaller mounds to create a wider wreath.
- Photo 7: Now, fill in the gaps between your initial four mounds by piping four more identical mounds. If there are still any small spaces, use any remaining meringue to connect and fill them, forming a continuous wreath shape composed of eight distinct, yet connected, meringue mounds.
- Photo 8: To achieve a smooth and polished look, gently use the back of a spoon or a small offset spatula to lightly smooth the tops of the meringue mounds and seamlessly connect them, creating an elegant, unified wreath. If you prefer not to use a piping bag, you can easily create the wreath shape by simply spooning dollops of meringue around the drawn circle.
- Carefully place the baking sheet on the lowest rack of your preheated oven. Bake for a duration of 45 minutes to 1 hour. The pavlova is done when its exterior feels completely dry and hard to the touch all around. It should lift easily from the baking paper without sticking. Crucially, resist the urge to open the oven door during baking. Once baked, turn off the oven and leave the pavlova inside to cool down completely, for about 2 hours, or until it reaches room temperature. This gradual cooling prevents the meringue from cracking due to a sudden temperature change.
Pro Tip: Secure your baking paper to the baking tray by placing small dollops of sticky meringue in the corners. This prevents the paper from shifting during piping.
3. Preparing the Luscious Mascarpone Whipped Cream
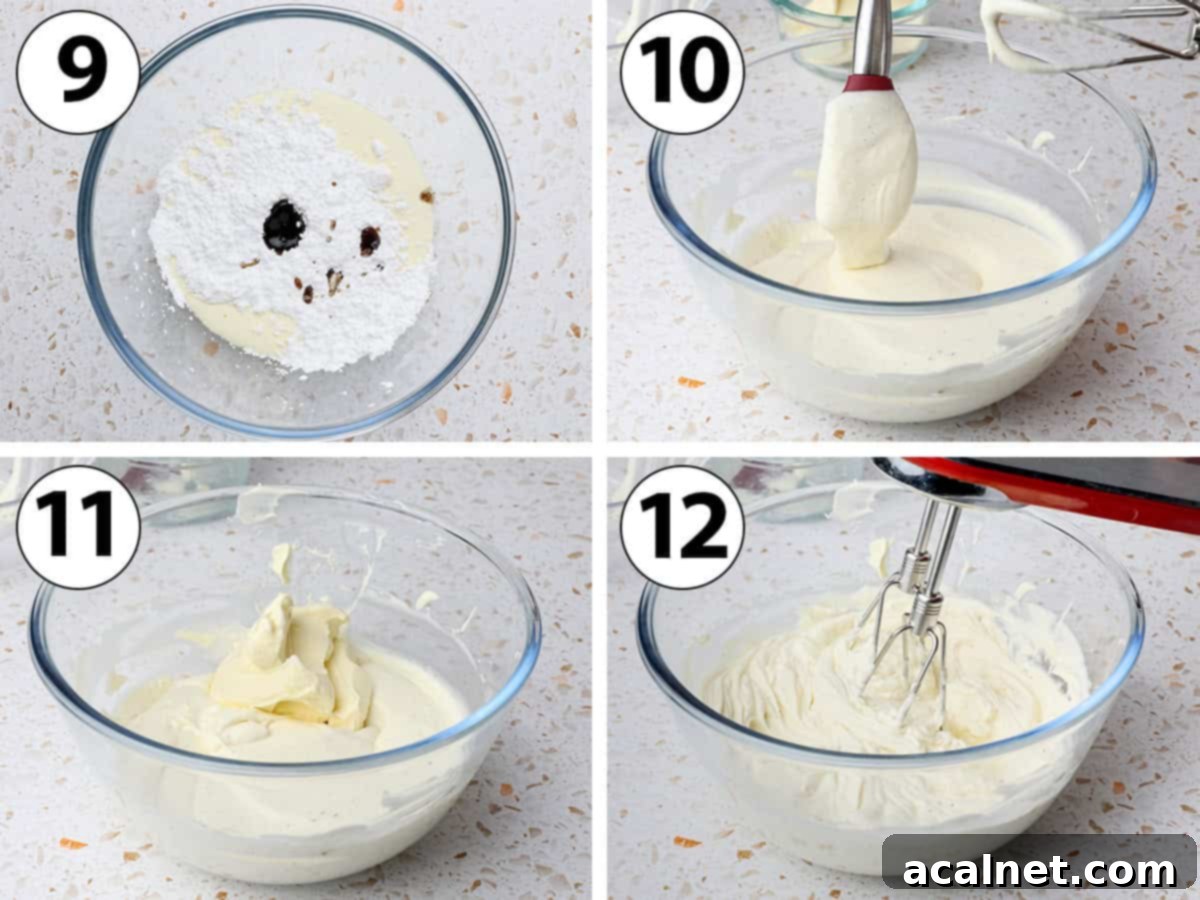
- Photo 9: In a large mixing bowl (or the bowl of your stand mixer fitted with the whisk attachment), combine the very cold heavy cream (ensure it has a minimum of 30% fat content), powdered sugar, and vanilla paste. The colder the cream, the better and faster it will whip.
- Photo 10: Whip the mixture on medium speed for approximately 5 minutes, or until the cream begins to thicken and reaches soft peaks. This means the cream will hold a gentle peak that slightly curls over when the whisk is lifted.
- Photo 11: Now, add the cold mascarpone cheese to the bowl. Keeping the mascarpone cold is essential for maintaining its texture and preventing it from becoming too liquid.
- Photo 12: Continue whipping on medium to medium-high speed for a couple more minutes, until the cream reaches stiff peaks. At this stage, the cream should be firm enough to hold its shape perfectly when the whisk is removed. Be vigilant and stop whipping as soon as stiff peaks are achieved to avoid over-whipping, which can result in a grainy or curdled texture.
- If you’re not using the cream immediately, cover the surface directly with plastic wrap to prevent a skin from forming and store it in the refrigerator.
For more detailed insights into this incredibly stable and delicious frosting, explore my full Mascarpone Whipped Cream recipe.
4. Crafting the Tangy Raspberry Coulis
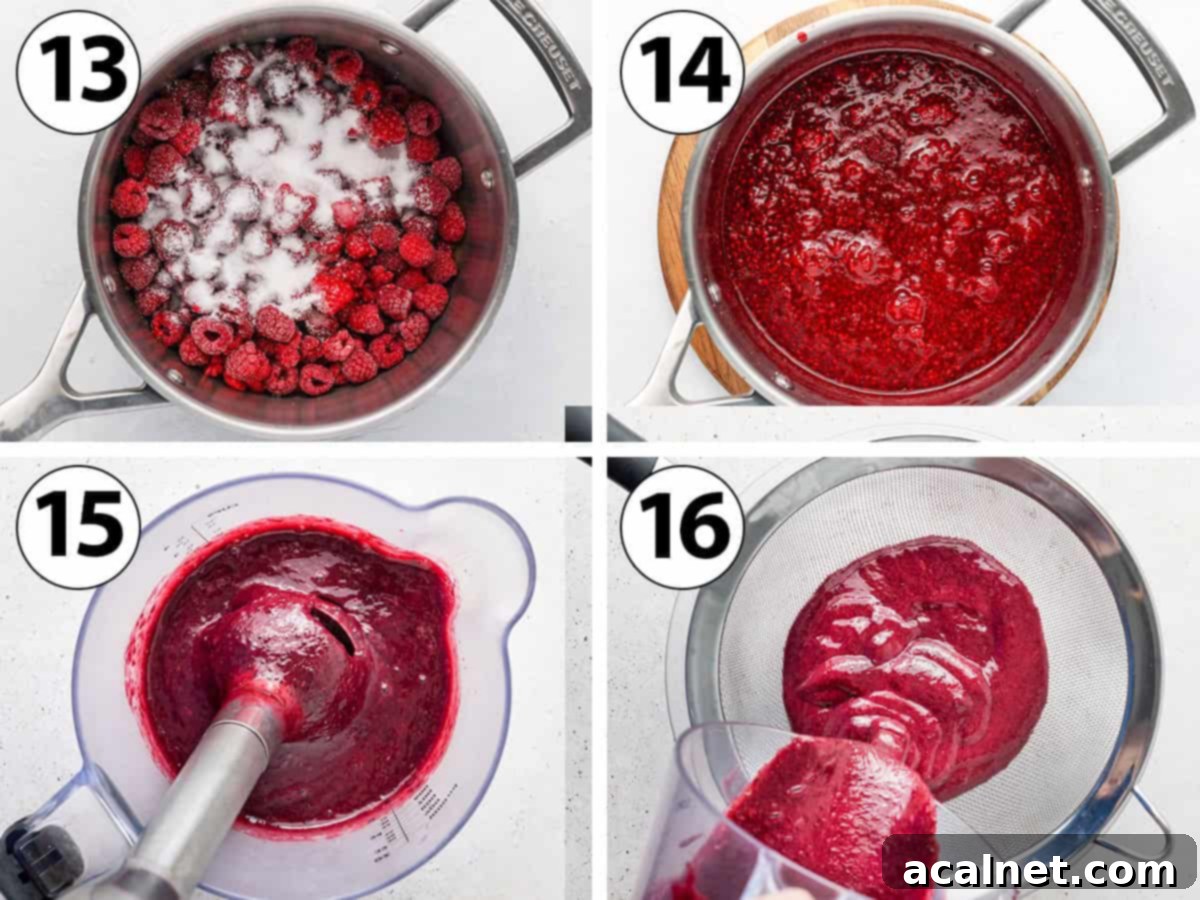
- Photo 13: In a small saucepan, combine your raspberries (either fresh, or frozen that have been thawed and drained), caster sugar, and lemon juice. If you’re using fresh berries, you might need to add a few drops of water at the start to prevent them from sticking and burning.
- Photo 14: Place the saucepan on the stove over low to medium heat. Cook gently for 10 to 15 minutes, stirring occasionally, until the raspberries break down and transform into a thick, syrupy compote. Be careful not to let the mixture come to a rolling boil, as this can affect the flavor and consistency.
- Photo 15: Once the compote has thickened, use an immersion blender directly in the saucepan (or transfer to a regular stand blender) to blend the mixture until it’s completely smooth and uniform.
- Photo 16: For a perfectly smooth coulis, pour the blended mixture through a fine-mesh sieve set over a clean bowl. Use the back of a spoon to press down on the solids, extracting as much liquid as possible, then discard the remaining raspberry seeds.
- If you’re not serving the raspberry sauce immediately, transfer it into an airtight jar or container and store it in the refrigerator until ready to use.
5. Assembling Your Breathtaking Pavlova Wreath
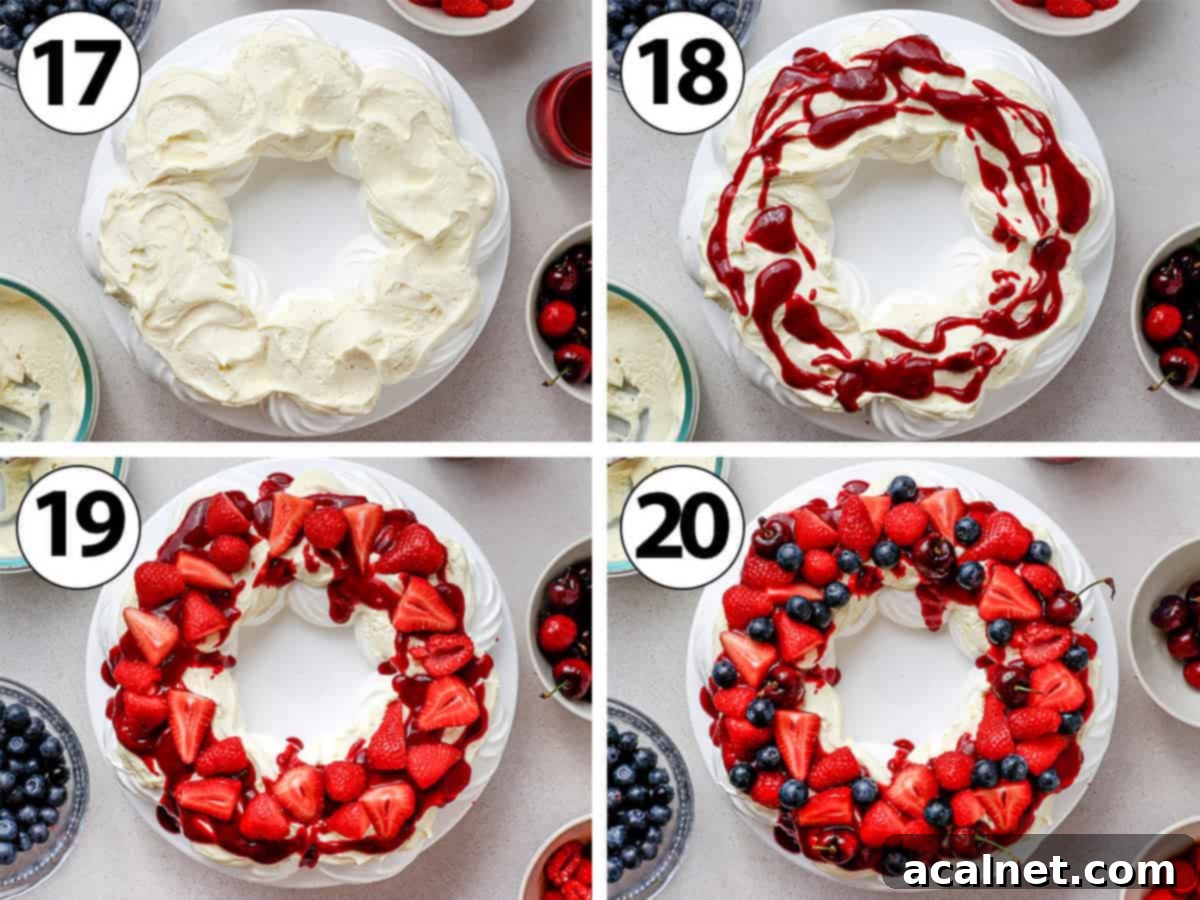
- Begin by preparing your fresh fruits. Wash them thoroughly, pat them completely dry, and cut them to your desired size. For a visually appealing wreath, I recommend halving strawberries and larger raspberries, while keeping blueberries and cherries (with their stems for an extra pop of color and volume) whole.
- Carefully transfer your baked and completely cooled pavlova wreath shell onto a cake turntable or your chosen cake stand.
- Photo 17: Gently dollop the prepared mascarpone whipped cream over the top surface of the pavlova wreath. Using the back of a spoon or a small spatula, carefully spread the cream to create an even, generous layer that fully covers the meringue base.
- Photo 18: Now, artfully drizzle the vibrant raspberry coulis over the whipped cream. Don’t be shy; allow some of the coulis to beautifully drip down the sides of the wreath for an even more enticing presentation.
- Photo 19: Begin arranging your fresh fruits. Start with the larger pieces, such as halved strawberries and raspberries, evenly distributing them across the wreath. Gently press the fruits into the cream to help them adhere.
- Photo 20: Next, use the smaller fruits, like cherries and blueberries, to fill in any gaps or areas that need more volume and color, creating a lush, abundant appearance.
- For a final flourish, optionally garnish with a few fresh mint leaves to add a touch of green and aromatic freshness.
- Pavlova is at its absolute best when served immediately after assembly. The meringue shell is delicate and highly susceptible to moisture, which can cause it to soften. However, if you need to prepare it slightly in advance, it will remain perfectly delightful for a few hours when stored in the fridge before serving your dinner.
Frequently Asked Questions About Pavlova
The origin of pavlova is a famously debated topic, a sweet source of contention between Australia and New Zealand for decades, with each country proudly claiming to be its birthplace. While the exact country of origin remains a mystery, what is certain is that this iconic dessert was named in honor of the renowned Russian ballerina Anna Pavlova. She captivated audiences during her tours of both Australia and New Zealand in the 1920s, inspiring this elegant, light-as-air confection. Regardless of its true genesis, the pavlova has become a cherished culinary symbol in both nations.
Cream of tartar, chemically known as potassium bitartrate or tartaric acid, is a fascinating dry white powder. It is actually a natural byproduct of grape fermentation during the wine-making process. In baking, this acidic powder is a vital ingredient, particularly for meringues like pavlova. Its primary role is to stabilize the delicate air bubbles created when whipping egg whites, helping them achieve maximum volume and maintain their structure. Furthermore, it plays a crucial part in preventing the sugar and egg whites from crystallizing, which can lead to a coarse or gritty meringue. Due to its acidic nature, cream of tartar can be effectively substituted with an equal amount of white vinegar or fresh lemon juice, which provide similar stabilizing benefits.
Absolutely! The beauty of pavlova lies in its versatility. You can easily customize the toppings to suit your taste, seasonality, or dietary preferences:
- Mascarpone whipped cream: While our mascarpone cream is incredibly delicious, you can certainly replace it with a classic Chantilly Cream (sweetened whipped cream flavored with vanilla extract or paste) for a lighter option, or even a coconut cream whip for a dairy-free alternative.
- Raspberry Coulis: Feel free to swap the raspberry coulis for any other fruit coulis that you love. Consider a Mixed Berry Coulis, a sweet Strawberry Coulis, or a vibrant Blueberry Coulis. For a chunkier texture, try a fruit compote like this Raspberry Compote. Other fantastic classic toppings include a tangy Lemon Curd, an exotic Passion Fruit Curd, or a refreshing Passion Fruit Coulis for a tropical twist.
- Fresh fruits: Fresh berries are a traditional choice, especially during the Australian Christmas period when they are abundant and at their peak. However, you can truly use any combination of your favorite seasonal fruits. For a winter Christmas, beautifully Red Wine Poached Pears would be an exquisite and elegant option. Pomegranate arils add a gorgeous ruby-red color and a lovely crunch, while slices of kiwi or mango can bring a tropical flair. Don’t hesitate to get creative with your fruit selection to customize your pavlova wreath to perfection!
Pavlova, and meringues in general, are delicate creations that are quite sensitive to moisture. This means they don’t fare well when exposed to humidity, particularly from refrigeration, which can cause the crisp shell to soften. Therefore, for the best texture and appearance, it is highly recommended to assemble your pavlova wreath as close to serving time as possible. The good news is that you can prepare almost all of the individual components – the meringue shell (once cooled), the mascarpone whipped cream, and the raspberry coulis – in advance. This allows you to perform just the final assembly right before your guests arrive, minimizing last-minute stress and ensuring a stunning, fresh dessert.
Expert Tips & Troubleshooting for Your Pavlova
Achieving a perfect pavlova is a delightful culinary art. Here are some key tips and solutions to common issues to ensure your pavlova wreath turns out flawlessly every time:
- The meringue is not smooth & shiny and / or grainy: This usually indicates issues with the whipping process. An under-whipped meringue won’t achieve the necessary volume and stability, resulting in a dull, less shiny appearance. Conversely, an over-whipped meringue can become brittle and grainy. A common cause of graininess is sugar not being properly incorporated or fully dissolved. It is absolutely crucial to add the caster sugar slowly, allowing 10-15 seconds between additions, to ensure each granule completely dissolves into the egg whites. This slow process creates a stable, glossy, and smooth meringue.
- Baking low and slow is key: The best method to achieve a pavlova that boasts a beautiful crisp white and shiny exterior, a fully dried shell, and a soft, marshmallowy interior is to bake it at the lowest possible temperature for an extended period. This gentle, slow drying process allows the meringue to cook through without browning or cracking, creating the ideal texture.
- My pavlova cracked in the oven: Cracking is a common issue that typically arises if the oven temperature is too high, or if the egg whites were over-whipped. When the temperature is too high, the air bubbles trapped within the meringue expand too rapidly, causing the structure to crack. Cracks can also appear after the pavlova is removed from the oven if it wasn’t fully cooled inside the oven, or if the interior wasn’t completely baked/dehydrated. Always ensure a very gradual cooling process to minimize stress on the meringue.
- How to tell my pavlova is fully baked: A perfectly baked pavlova wreath should feel completely dry and firm to the touch on its exterior. It should also detach easily from the baking paper without any sticky residue. The “baking” process for pavlova is more akin to a slow dehydration, allowing the meringue to dry out thoroughly. Leaving it to cool inside the turned-off oven ensures this continued, gentle drying, resulting in a stable and robust shell.
- What causes sticky pavlova: Pavlova, being a meringue-based dessert, is highly sensitive to humidity. The sugar in the meringue readily absorbs moisture from the air, which can cause the crisp shell to become slightly sticky or soft. To prevent this, always store your fully cooled pavlova base in an airtight container, keeping it away from any humid environments.
- Why is my pavlova weeping: When a pavlova appears to be ‘weeping,’ it means the sugar within the meringue has drawn moisture and turned into a visible syrup. This issue commonly occurs if the sugar was not properly incorporated and fully dissolved into the egg whites during the whipping stage, if the sugar granules were too coarse (always use fine caster sugar!), or if the ambient humidity is excessively high. Ensuring thorough sugar dissolution is key to preventing weeping.
Storing Your Pavlova Wreath & Components
Given the delicate nature of pavlova and its sensitivity to humidity, it is always best to assemble and serve it immediately for optimal freshness and texture. However, the individual components can be prepared in advance to streamline your holiday baking. Here’s how to best store each part:
- Pavlova wreath shell: Once your meringue base is completely cool (after spending 2 to 3 hours cooling in the oven with the heat off), carefully transfer it into an airtight container. Store it in a cool, dry place, away from any sources of humidity, for up to 24 hours. This helps maintain its crispness.
- Mascarpone whipped cream: This stabilized cream can be prepared up to 48 hours in advance. Store it in the fridge, ensuring it’s covered tightly with plastic wrap directly touching the surface of the cream. This prevents oxidation and the formation of a skin, keeping it fresh and ready to use.
- Raspberry coulis: Your homemade raspberry coulis will keep beautifully in the fridge for several days when stored in an airtight jar or container. It can also be made well in advance and frozen. If freezing, you might find it needs to be gently re-cooked over low heat once thawed to evaporate any excess water and restore its original consistency.
Unfortunately, a fully assembled pavlova or a pavlova meringue shell cannot be frozen successfully. Freezing and thawing will cause the meringue to become soft, sticky, and weepy due to moisture absorption, ruining its signature texture.
Explore More Holiday Dessert Inspiration
- Speculoos Biscoff Cheesecake
- Strawberry Mousse Cake
- Biscoff Tiramisu
- Apple Crumble Cheesecake
- Pear Frangipane Tart
- Chocolate Brioche Wreath
I am so excited to share that my debut cookbook
“Bite-Sized French Pastries for the Beginner Baker”
is now available for purchase!
Recipe Card

Pavlova Wreath
Print Recipe
Ingredients
Pavlova Wreath
- 5 large Egg Whites, from fresh eggs (approx 150 grams)
- 300 gr Caster Sugar, or superfine granulated sugar
- 6 gr (1 1/2 teaspoon Cream of Tartar, or white vinegar
- 15 gr Cornstarch
Mascarpone Whipped Cream
- 120 ml Heavy / Thickened Cream, min 30% fat content
- 30 gr Powdered Sugar, or icing sugar
- 1 teaspoon Vanilla Paste
- 120 gr Mascarpone
Raspberry Coulis
- 120 gr Raspberries, fresh or frozen, thawed and drained
- 15 ml Lemon Juice
- 40 gr Caster Sugar
To assemble
- 300 to 400 gr Fresh Berries (or seasonal fruits), I used a mix of strawberries, raspberries, blueberries and cherries
- Fresh Mint Leaves, to taste
Instructions
Pavlova Wreath
- Preheat your oven on 100 degrees Celsius / 215 degrees Fahrenheit. On a piece of baking paper / parchment paper, draw a large circle that is about 20 cm (8 inch) wide. Flip the paper over (so you don’t pipe over the pen mark) and place over a flat baking sheet.
- Place your egg whites in the bowl of your stand mixer fitted with the whisk attachment. Whip on medium speed for 3 to 5 minutes or until the eggs have doubled in volume and turned white (just before they reach soft peaks).
- While the mixer is working on medium low speed, add the sugar one tablespoon at a time, waiting 10 to 15 seconds between each addition to make sure the sugar is well incorporated. Continue until all the sugar has been added. Stop to scrap the edges of the bowl if required.
- Increase to medium high / high speed and whip for another 3 to 5 minutes or until you reach stiff peaks. The meringue should be very glossy and stiff. The sugar should have fully dissolves (see note 1).
- Add the cornstarch and cream of tartar. Whip for about a minute on medium low speed to incorporate the dry ingredients.
Piping the wreath
- Transfer the meringue into a large piping bag fitted with a 1.5 cm open star tip and get the prepared baking sheet with the circle drawn (see note 2).
- Pipe 4 large mounds of meringue on top of the drawn circle in circular motion, going North (top edge of the circle), South (bottom edge of the circle), East (right side of the circle) and West (Left side of the circle). Each mound should be about 5 cm (2 inch) tall and 8 cm (3 inch) wide.
- Fill in the space between each mound by piping four more mounds. If there is space left between the mounds, use any leftover meringue to fill them in. You should get a wreath shape made out of 8 individual mounds (see note 3).
- Using the back of a spoon (or small offset spatula), lightly smooth out of the of the wreath to get a flat surface and connect each individual mound.
- Place on the lowest rack of your oven and bake for 45 minutes to 1 hour. The pavlova should feel hard and completely dry to the touch all around. If the pavlova starts turning yellow, it means your oven temperature is too high.
Turn off the oven and leave the pavlova to cool down inside the oven for about 2 hours, or until it reaches room temperature.
Mascarpone Whipped Cream
- In a large mixing bowl (or bowl of your stand mixer fitted with the whisk attachment), combine the cold heavy cream, powdered sugar and vanilla paste. Whip on medium speed for about 5 minutes or until you reach soft peaks.
- Add the cold mascarpone. Continue to whip on medium to medium high speed for a couple of minutes or until you reach stiff peaks. Stop as soon as the cream looks stable to avoid over-whipping which would result in a grainy whipped cream.
- If not using straight away, cover with plastic wrap touching the surface of the cream and store in the fridge.
Raspberry Coulis
- Combine the raspberries (see note 4), sugar and lemon juice inside a small saucepan. Place on the stove over low to medium heat and cook without letting it boil for 10 to 15 minutes – or until the raspberries have turned into a thick compote.
- Blend the compote with an immersion blender until completely smooth. Pour through a thin-mesh sieve and discard any raspberry seeds.
- If not using straight away, transfer into a jar or container and keep in the fridge.
To assemble
- Wash all your fruits, pat them dry and cut them to size if required. I cut the strawberries and raspberries in half, kept the blueberries whole as well as the cherries with their stem for colour and volume.
- Place the baked and fully cool pavlova wreath shell on a cake turntable or cake stand.
- Place small dollops of the whipped cream over the pavlova and gently spread it with the back of a spoon or spatula to fully cover the top of the wreath.
- Generously drizzle the raspberry coulis over the whipped cream, letting it drip over the sides of the wreath.
- Starting with the largest pieces of fruits (strawberries then raspberries), gently press the fruits into the cream and coulis to evenly cover the wreath. With the smaller fruits (cherries and blueberries), fill in any holes or areas that might not look full enough.
- Finish with a few leaves of fresh mint.
- Serve straight away (see note 5).
Would you like to save this recipe?
We’ll email this post to you, so you can come back to it later!
Notes
- to check the sugar has completely dissolved, rub a little bit of the meringue between your fingers. You shouldn’t feel any grains of sugar. If you can still feel the sugar, continue to whip for a little bit longer. Make sure to stop as soon as you reach stiff peaks and the sugar has dissolved to avoid over-whipping the meringue.
- you can use small dollops of sticky meringue as glue between the baking paper and baking tray to make sure it does not move. I used a perforated baking tray to create an even air flow under the pavlova.
- If you do not want to use a pastry bag to pipe the meringue, you can simply use a large spoon and dollop the meringue around the drawn circle. You can also make a thinner wreath with more than 8 mounds (10, 12, 14,…) if preferred.
- If using fresh raspberries, you may need to add a few drops of water at the start to prevent the fruits from burning.
- Pavlova is best served straight away as any humidity will weaken the meringue shell and eventually turn it sticky and soft. That being said, it should be absolutely fine for a few hours in the fridge if you want to make it just before you start your dinner.
Nutrition (per serving)
Made this festive recipe?
We’d love to hear from you! Please let us know if you liked it by leaving a comment below. Don’t forget to tag us on Instagram @a.baking.journey with a photo of your beautiful creation!
