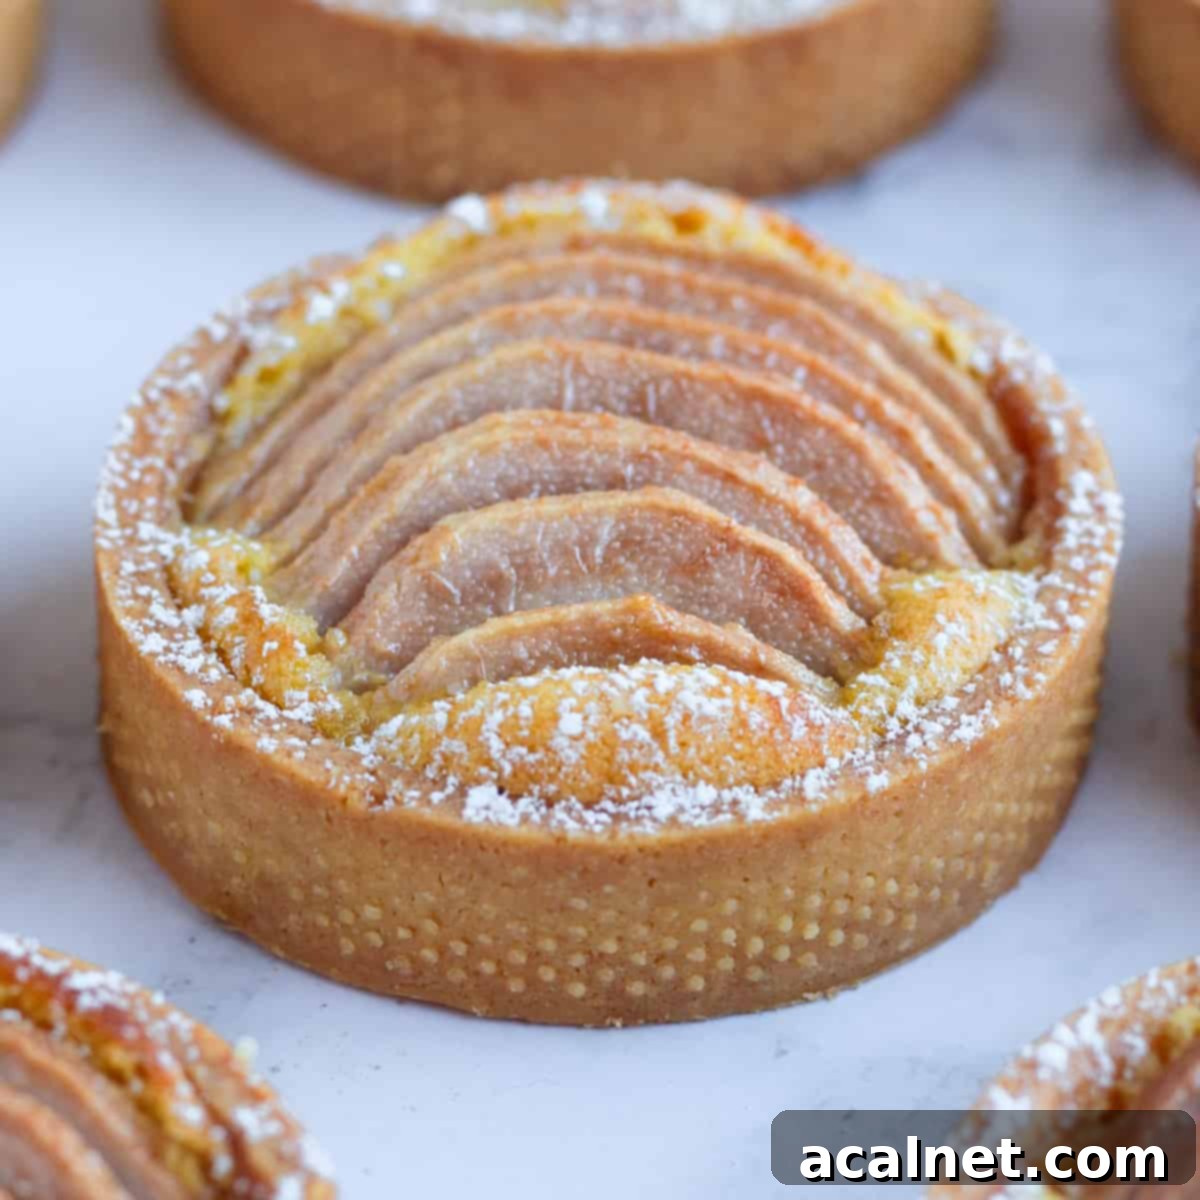
Decadent Pear Frangipane Tartlets (Tartes Bourdaloue): A Classic French Pastry Recipe
Indulge in the exquisite charm of these Pear Frangipane Tartlets, famously known as Tartes Bourdaloue in France. This classic French pastry masterpiece brings together a delicate sweet shortcrust pastry shell, a luscious almond cream filling, and tender, melt-in-your-mouth poached pears. Each bite offers a harmonious blend of textures and flavors, making these elegant pear tarts an absolute delight that is sure to impress both your family and guests. Perfect for any occasion, from a festive holiday gathering to a sophisticated afternoon tea, these mini French pear almond tarts are a true testament to timeless baking.
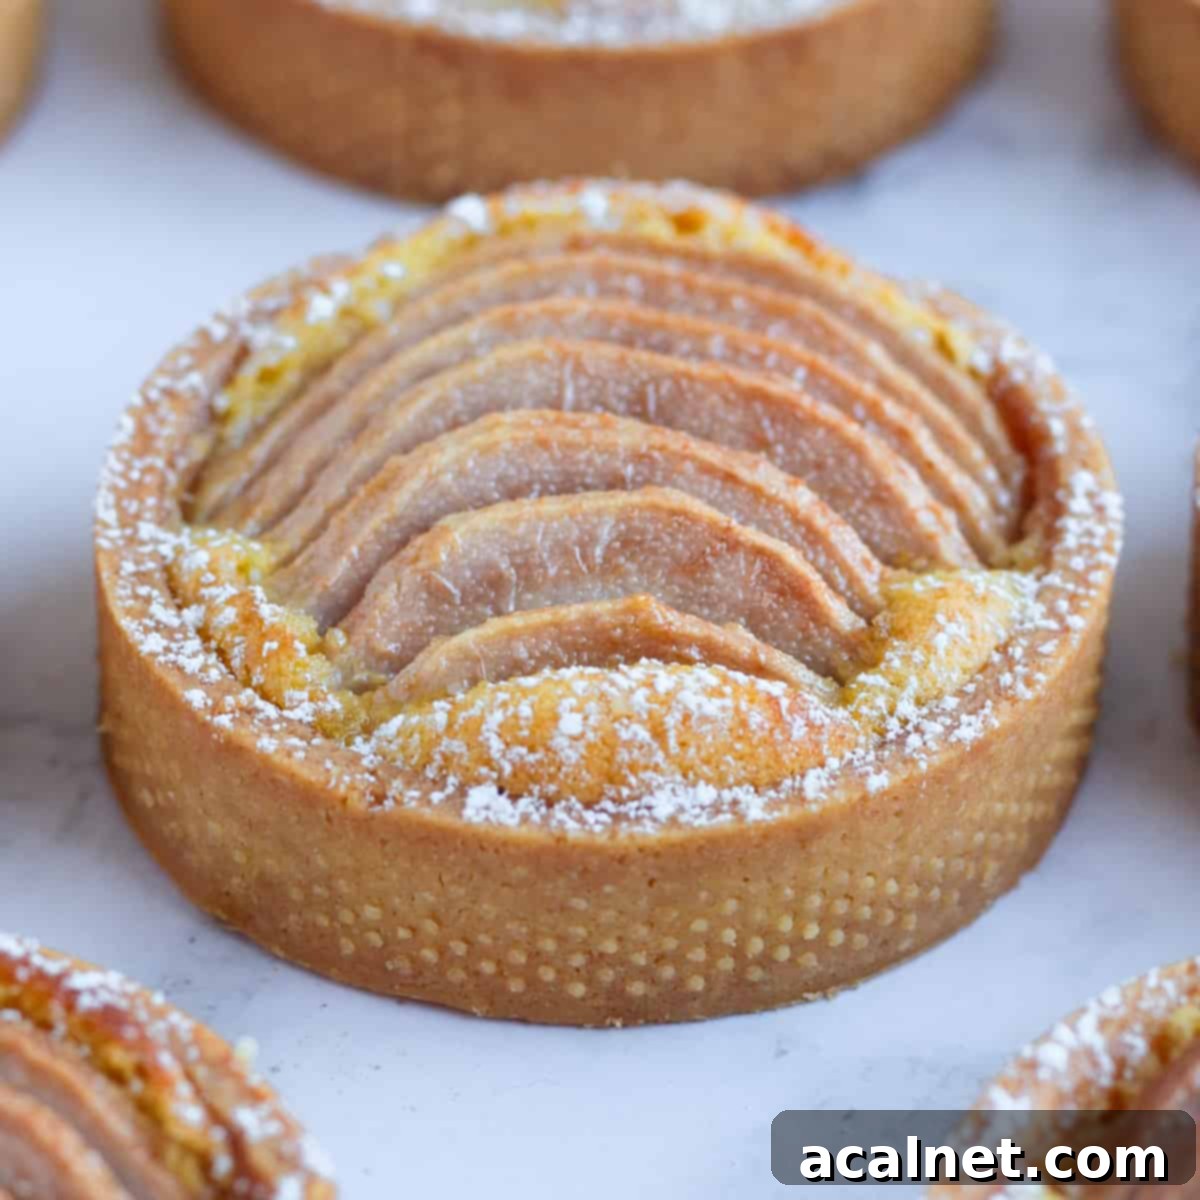
Why You’ll Adore These Pear Frangipane Tartlets
These Mini Pear Frangipane Tarts are a quintessential French dessert that flawlessly combines crunch, sweetness, lightness, and an irresistible aroma. It’s a recipe that truly “ticks all the boxes” for a sophisticated yet comforting pastry.
Imagine biting into a perfectly crispy, buttery pastry base, followed by a generously piped layer of almond cream that is light in texture but profoundly rich in flavor. Topped with exquisitely soft poached pears, these tartlets offer a multi-layered sensory experience. This recipe is essentially a scaled-down version of larger French tarts, like my popular Pear Frangipane Tart and Apple Frangipane Tart, and serves as a delightful autumn and winter counterpart to my summery Raspberry Frangipane Tartlets, Apricot Frangipane Tart, and Peach Frangipane Tart!
Pears are simply a magnificent fruit for baking, especially when they are in season. Their subtle sweetness and delicate texture pair exceptionally well with the rich, nutty notes of almonds, as evidenced in my beloved Almond Pear Cake. When gently poached, pears transform into an incredibly soft, luscious fruit that practically melts in your mouth, adding an unparalleled elegance to these tartlets.
I find immense joy in crafting desserts with seasonal winter fruits. Whether it’s the simplicity of Puff Pastry Apple Tartlets or Pear Tartlets, the vibrant zest of a French Orange Tart, or the refined complexity of these Frangipane Tarts with Poached Pears, winter fruits offer a world of baking possibilities. While this recipe might appear lengthy due to its multiple components, don’t be intimidated! Each step is straightforward, and the process is far easier than it seems, culminating in a truly rewarding baking experience.
This recipe for Pear Frangipane Tartlets meticulously combines three distinct yet harmoniously integrated elements, each contributing to the overall perfection of the dessert:
- Sweet Shortcrust Pastry (Pâte Sucrée): This is a foundational French tart pastry, renowned for its tender crumb and rich flavor. It provides the perfect crisp and buttery base, ideal for holding creamy and fruity fillings without becoming soggy. Its slight sweetness complements the almond cream and pears beautifully.
- Almond Cream Filling (Frangipane): A delightful, easy-to-make cream, this frangipane boasts a rich almond flavor. Made with just four core ingredients, it bakes up into a light, custardy texture that is both satisfying and incredibly fragrant, providing a luxurious bed for the poached pears.
- Poached Pears: These are firm pears, gently simmered in a flavorful liquid until they become exquisitely soft and tender. Poaching not only enhances their natural sweetness but also infuses them with additional aromas, creating a fruit that truly melts in your mouth and forms the elegant crown of each tartlet.
Crafting the Perfect Sweet Shortcrust Pastry (Pâte Sucrée)
The foundation of any exceptional tart is its crust, and for these Pear Frangipane Tartlets, we use a classic French Pâte Sucrée. This sweet shortcrust pastry is celebrated for its delicate, sandy texture and buttery richness. It’s a joy to work with and bakes up beautifully crisp, providing a sturdy yet tender base that won’t become soggy when filled.
Essential Pastry Ingredients
You’ll need just six simple ingredients, each playing a crucial role in creating this delightful pastry:
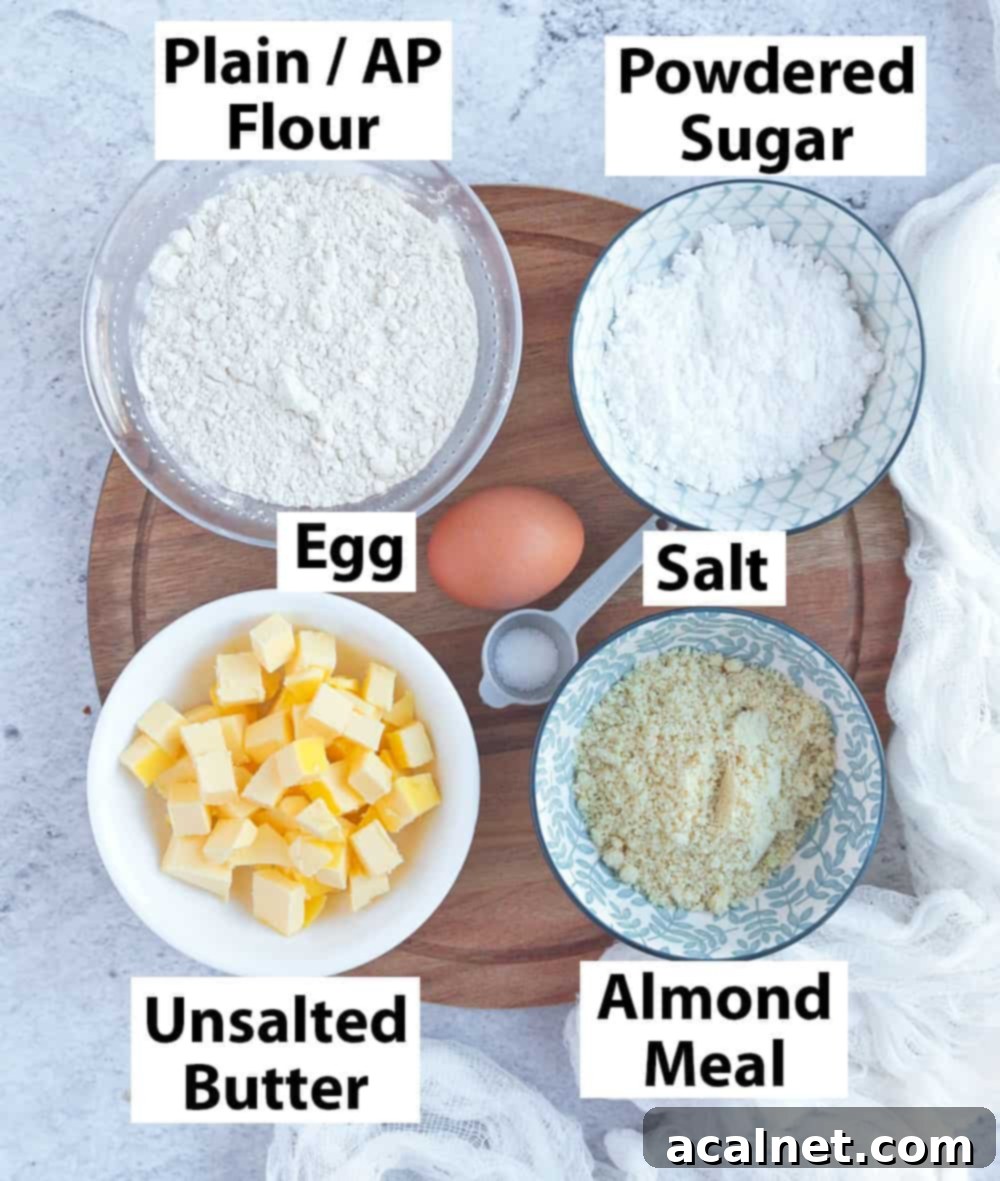
- Unsalted Butter: Essential for flavor and a tender texture. Ensure it’s very soft and at room temperature for easy creaming and a smooth dough.
- Eggs: Like the butter, eggs should be at room temperature to emulsify properly with the other ingredients, creating a cohesive and well-bound dough.
- Powdered Sugar (Confectioner’s Sugar / Icing Sugar): This is preferred over granulated sugar because its fine texture blends seamlessly into the butter, resulting in a wonderfully smooth and tender pastry without any grittiness.
- Almond Meal: A secret weapon for enhancing flavor and improving texture. Almond meal adds a delicate nuttiness and helps to reduce the gluten development in the flour, which in turn minimizes shrinking during baking – a common issue with pastry!
- Plain / All-Purpose Flour: The primary structural component. Use good quality flour for the best results.
- Salt: A pinch of salt is crucial for balancing the sweetness and enhancing all the other flavors in the pastry.
Step-by-Step Pastry Preparation
Creating Pâte Sucrée is a straightforward process, especially when you follow these steps carefully:
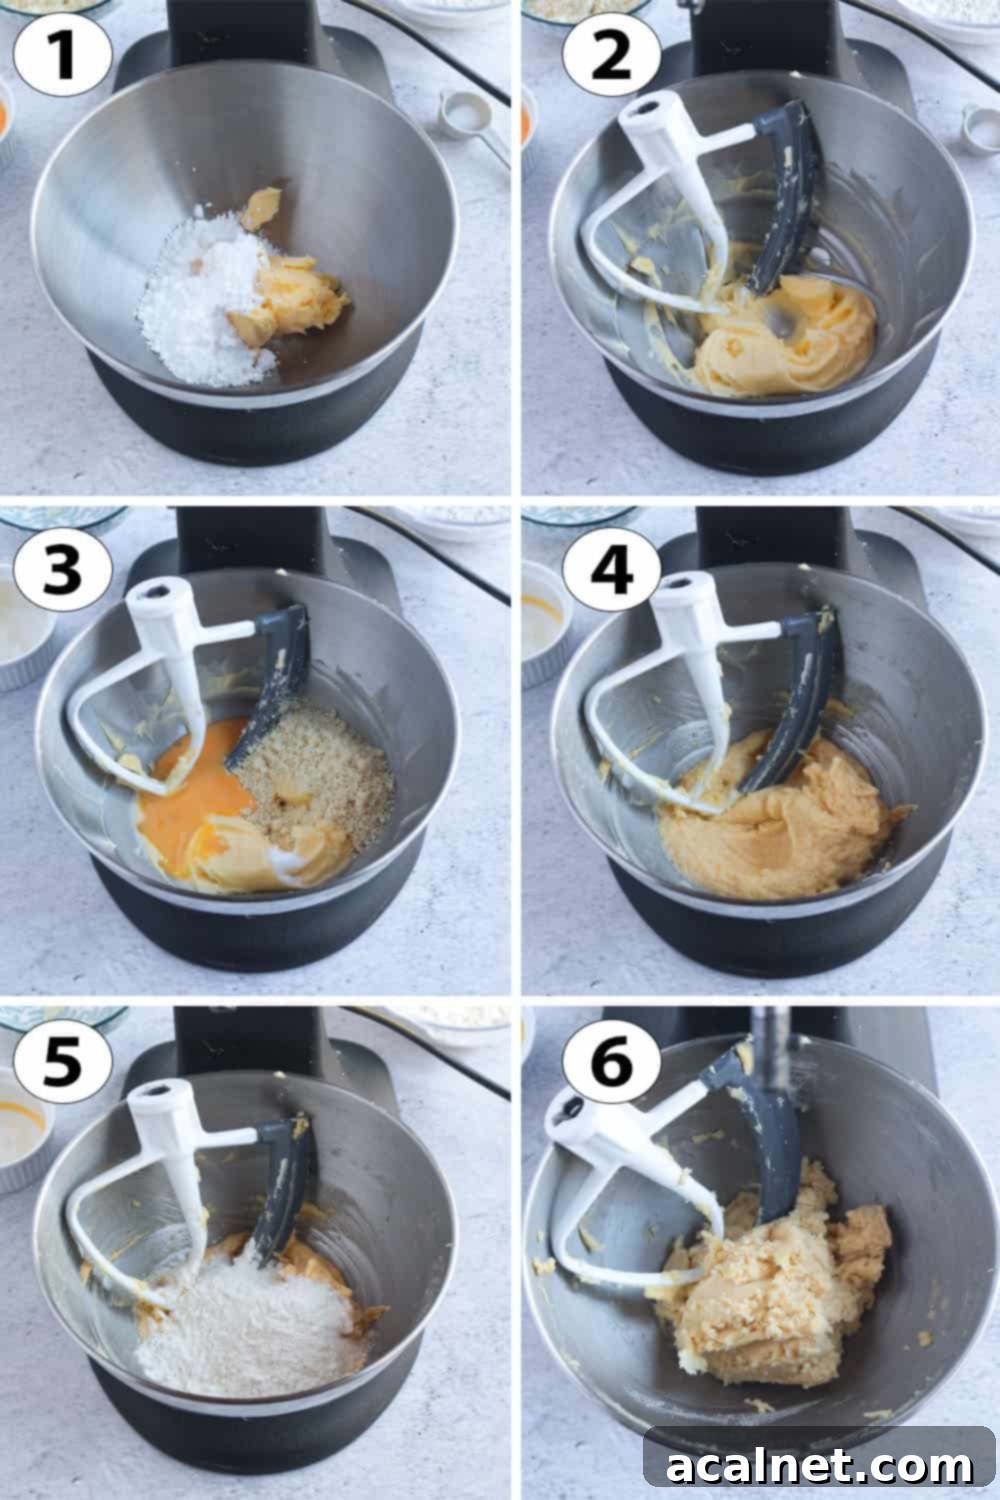
- Cream Butter & Sugar (Photo 1 & 2): In the bowl of your stand mixer fitted with the paddle attachment (or a large bowl with a hand mixer), combine the very soft room temperature butter and powdered sugar. Cream them together on medium speed for about 2 to 3 minutes, until the mixture becomes pale, light, and fluffy. This aeration is key for a tender pastry.
- Incorporate Wet & Flavorful Ingredients (Photo 3 & 4): Add the room temperature egg, salt, and almond meal to the creamed butter and sugar. Mix on low speed until all ingredients are just combined. Avoid overmixing at this stage.
- Add Flour & Form Dough (Photo 5 & 6): Gradually add the plain/all-purpose flour to the mixture. Mix on the lowest speed only until the dough just comes together. The moment you see a cohesive dough form, stop mixing! Overworking the flour will develop too much gluten, leading to a tough and chewy pastry, and will also encourage shrinkage.
- Chill the Dough: Gently flatten the dough into a disc, then place it between two sheets of baking paper. Roll it out to a uniform thickness (about 2-3mm or 1/10 inch) before chilling. Transfer the rolled dough, still between the baking sheets, to a flat tray and refrigerate for at least 1 hour, or up to 24 hours. Chilling is vital; it allows the gluten to relax and the butter to firm up, preventing the pastry from shrinking during baking.
- Line & Blind-Bake: Once thoroughly chilled, use the pastry to line your chosen tartlet rings or pans. For perfectly crisp edges, I highly recommend 10 cm / 4 inch perforated pastry rings, as they allow for better air circulation. Alternatively, standard tartlet pans or even a muffin pan (like for these Tartlet Shells) will work. Prick the bottom of each pastry shell with a small fork. Return the lined pans to the fridge to rest for another hour. This second chilling period further stabilizes the pastry.
- Preheat & Blind-Bake: Preheat your oven to 160°C (325°F). While the oven preheats, place the prepared pastry shells in the freezer for about 10-15 minutes. This quick freeze helps to “shock” the butter, further preventing shrinkage. Blind-bake the pastry shells for approximately 15 minutes, or until the bottom feels dry to the touch and has a very light golden color. Remove them from the oven and set aside to cool completely before filling.
For an in-depth guide on this pastry, including comprehensive step-by-step photos, expert tips, and troubleshooting advice, refer to my detailed Pâte Sucrée Recipe.
Preparing the Rich Almond Cream Filling (Frangipane)
The second essential component of these delightful Pear Frangipane Tartlets is the frangipane cream. This rich, nutty filling provides a wonderful contrast to the crisp pastry and tender pears. Its simplicity belies its incredible flavor, and like the pastry, it can be prepared in advance, making your baking day much smoother.
Frangipane Ingredients
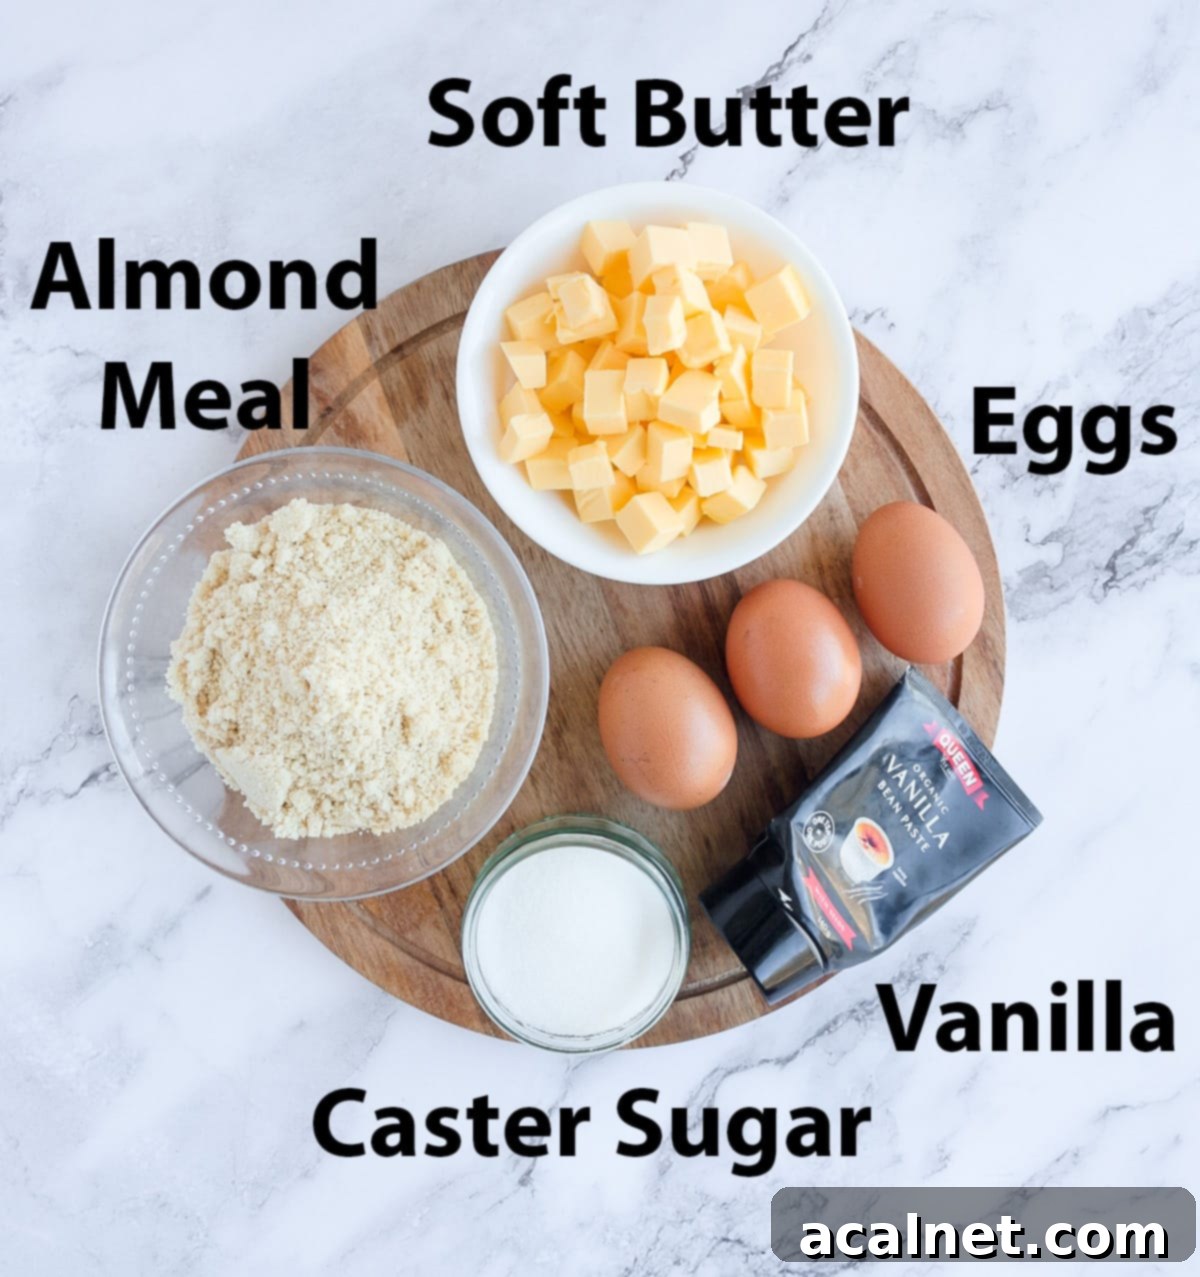
You’ll only need a few basic ingredients to whip up this luxurious frangipane filling:
- Unsalted Butter: Must be very soft and at room temperature. This is crucial for achieving a smooth, well-emulsified cream.
- Caster Sugar (Fine White Sugar): Its fine granules dissolve easily, contributing to the cream’s smooth texture without grittiness.
- Eggs: Ensure they are at room temperature. Cold eggs can cause the mixture to curdle when added to the butter and sugar.
- Almond Meal (Almond Flour): The star of frangipane, providing its distinctive nutty flavor and structure. Sifting it beforehand can help prevent lumps, ensuring a silky-smooth cream.
- Optional Flavouring: A touch of Vanilla (paste or extract) or Almond Essence can further enhance the aroma and depth of flavor. You can also experiment with citrus zest, such as lemon or orange, for a bright, refreshing twist.
Method for Making Frangipane Cream
Making frangipane is very similar to creaming butter and sugar, but with the addition of almonds:
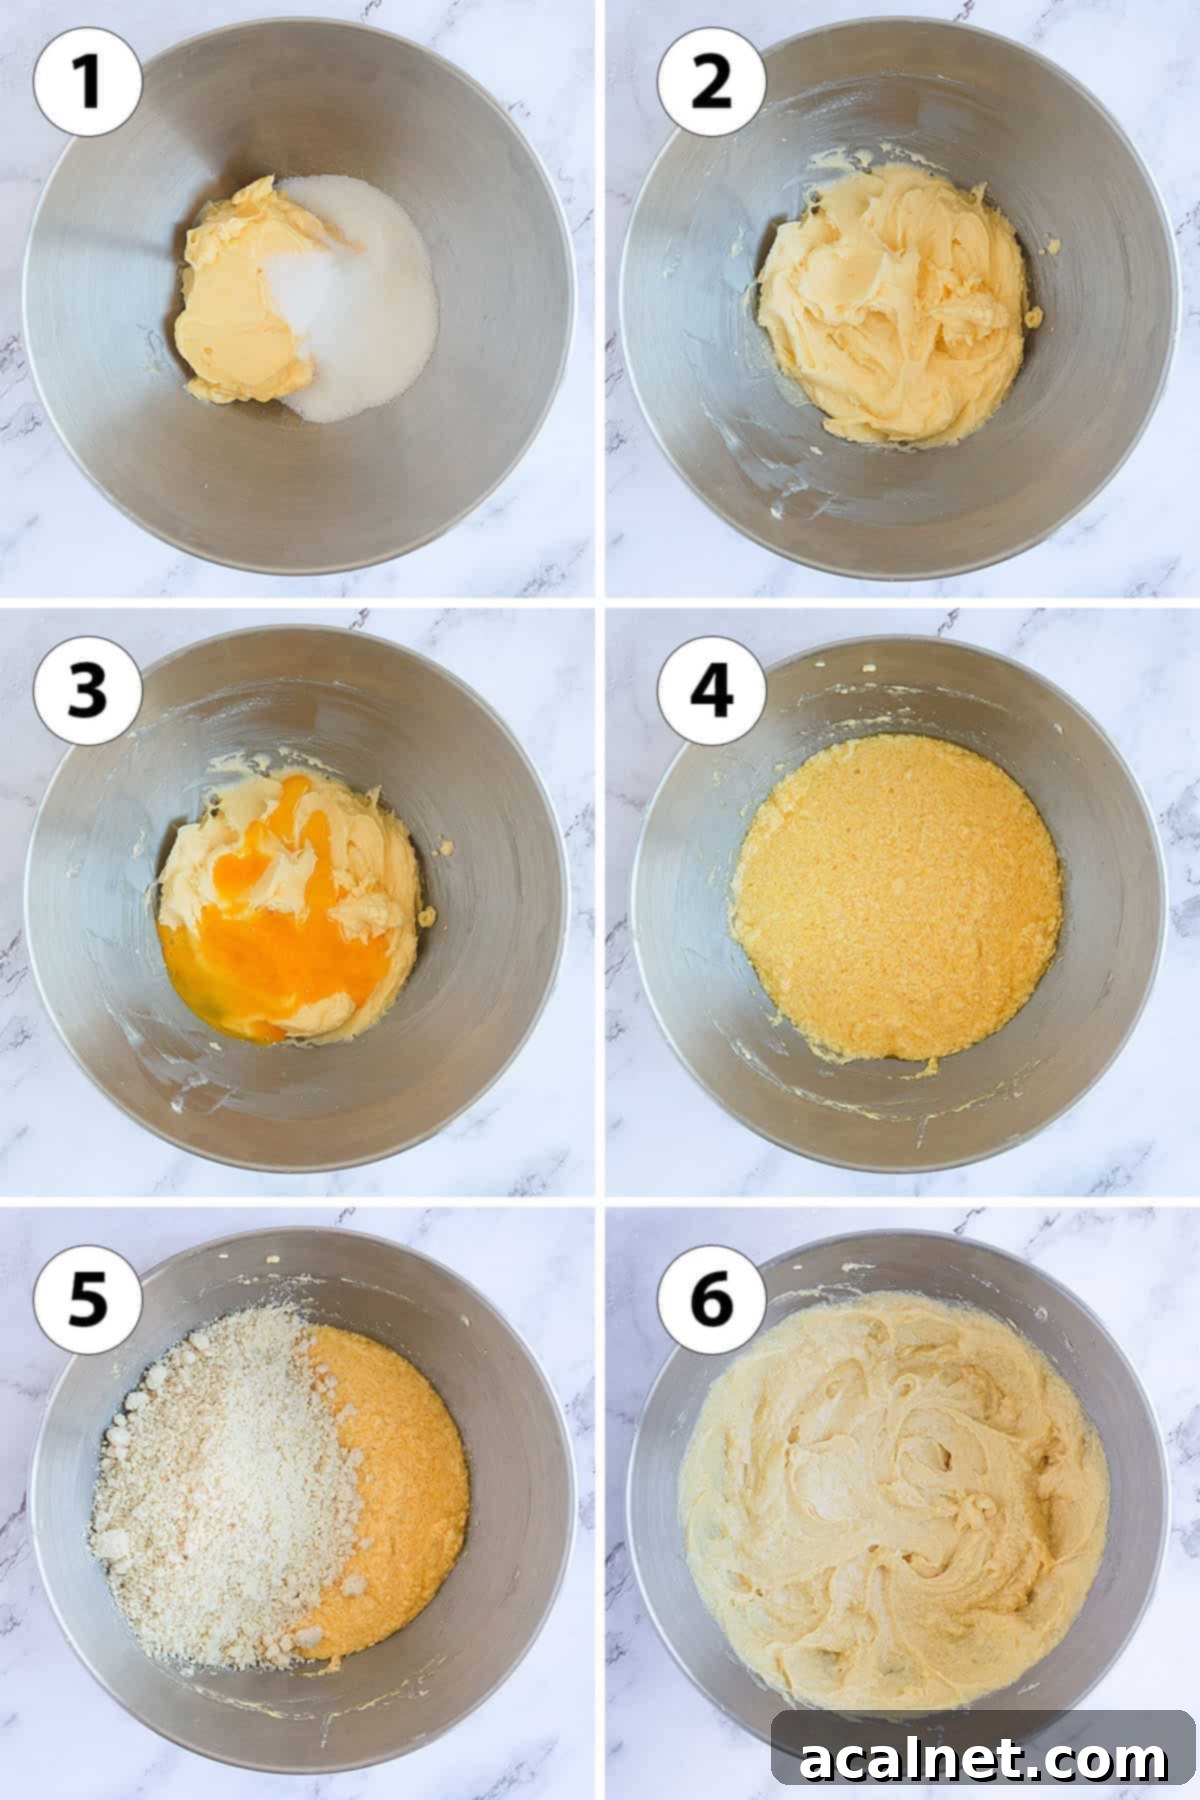
- Cream Butter & Sugar (Photo 1 & 2): In a clean mixing bowl, preferably with a stand mixer, combine the very soft butter and caster sugar. Cream them together on medium speed for 2 to 3 minutes. The mixture should become noticeably pale and almost double in volume, indicating it’s well aerated.
- Add Egg (Photo 3 & 4): With the mixer on low speed, slowly add the room temperature egg. Mix until just combined. Don’t worry if the mixture appears to curdle or split slightly at this point; it will come back together beautifully once the almond meal is added.
- Incorporate Flavoring (Optional): If using, mix in your chosen flavoring, such as vanilla paste or almond extract, ensuring it’s evenly distributed throughout the cream.
- Mix in Almond Meal (Photo 5 & 6): Finally, add the almond meal. Mix on low speed until the mixture is fully combined and smooth. Be careful not to overmix once the almond meal is in.
Your frangipane is now ready! You can either use it immediately to fill your pastry cases, or cover it tightly with plastic wrap (ensuring the wrap touches the surface of the cream to prevent a skin from forming) and refrigerate for up to 24 hours. If chilled, allow it to come back to room temperature for about 30 minutes before piping for easier handling.
Delve deeper into the art of making this almond cream, with more step-by-step photos, advanced tips, and troubleshooting solutions, in my dedicated Almond Cream Filling Recipe.
Perfectly Tender Poached Pears
The crowning glory of these Pear Frangipane Tartlets is the luscious poached pear. Poaching transforms firm pears into unbelievably soft, subtly sweet, and melt-in-your-mouth fruit that perfectly complements the rich frangipane. It’s a simple process that yields incredibly elegant results.
Poached Pear Ingredients
You’ll need just four core ingredients to make these exquisite poached pears:
- Pears: The star! Choose firm, slightly under-ripe pears that will hold their shape well during poaching. Varieties like Bosc, Anjou, or Concorde pears are excellent choices for their texture and ability to absorb flavor without becoming mushy.
- Water: The base for our poaching liquid. While water is standard, you can easily elevate the flavor by substituting a portion with white wine for a sophisticated twist (imagine with Red Wine Poached Pears) or even a light fruit juice.
- Caster Sugar (Fine White Sugar): To gently sweeten the pears as they poach, enhancing their natural flavors.
- Lemon Juice: Essential for two reasons: it adds a bright, slightly acidic note that balances the sweetness, and it prevents the pears from oxidizing and turning brown during and after poaching.
For an added layer of flavor, consider infusing your poaching liquid with warming spices like cinnamon sticks, star anise, ginger slices, or cardamom pods. A strip of lemon or orange zest can also impart a lovely aromatic quality to the pears. Remember, the amount of water needed might vary slightly based on the size and shape of your pot; the pears should be fully submerged to ensure even cooking.
If you’re a true pear aficionado, don’t miss my collection of 25 Easy Pear Desserts for more inspiration!

How to Poach Pears to Perfection
Poaching pears is a gentle cooking method that ensures they remain flavorful and tender:
- Prepare Poaching Liquid (Photo 1): In a medium-sized pot, combine the water, sugar, and lemon juice. Heat the mixture over medium-low heat, stirring occasionally, until the sugar has completely dissolved. If adding spices or zest, incorporate them now.
- Peel Pears (Photo 2): While the poaching liquid is heating, carefully peel your pears. It’s best to keep the stems intact for now, as they offer a natural handle, and the cores can be removed after poaching.
- Gentle Simmer (Photo 3): Once the sugar is dissolved and the liquid is gently simmering, carefully place the peeled pears into the pot. Ensure they are fully submerged. If needed, you can place a piece of parchment paper directly over the pears to keep them submerged. Let them poach on low to medium heat for 10 to 15 minutes. The exact time will depend on the pear variety and its ripeness; they should feel tender when pierced with a knife but still hold their shape beautifully.
- Cool & Slice (Photo 4): Carefully remove the poached pears from the liquid and allow them to cool down slightly. Once cool enough to handle, cut each pear in half lengthwise. Scoop out the core using a small spoon or melon baller. Then, thinly slice each pear half, fanning the slices out to create an elegant presentation for your tartlets.
The goal is a pear that is soft and yielding but not mushy, maintaining its form when sliced. This delicate texture is what truly elevates the frangipane tartlets.

Assembling Your Elegant Pear Frangipane Tartlets
With all three components — the crisp pastry shells, rich almond cream, and tender poached pears — now prepared, it’s time for the exciting final stage: assembly! This is where your individual elements come together to form a cohesive and stunning dessert.
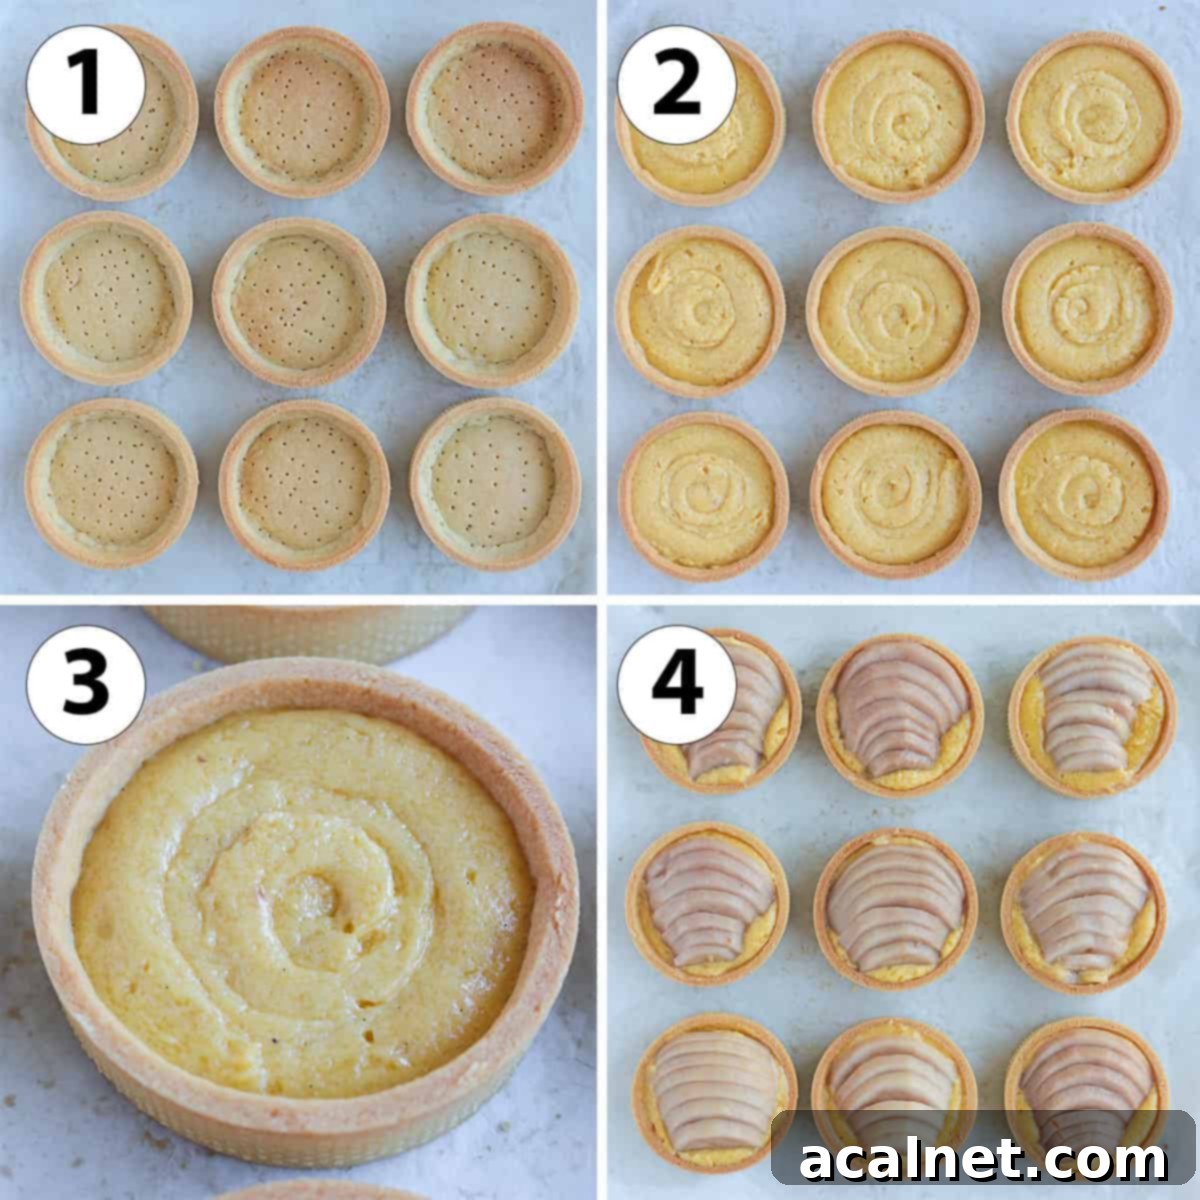
- Prepare Your Pastry Shells (Photo 1): Arrange your partially blind-baked tartlet pastries on a flat baking tray lined with parchment paper. If you used perforated pastry rings, you’ll find that the crusts are sturdy enough to be carefully removed from the rings at this point, maintaining their perfect shape.
- Pipe the Almond Cream (Photo 2 & 3): Transfer the almond cream (frangipane) into a piping bag. If you don’t have a specific round nozzle, simply snip off a corner of the bag to create an opening. Carefully pipe the cream into each blind-baked pastry shell. It’s crucial not to overfill them; aim to fill each pastry case about halfway up. Remember, the frangipane will puff up significantly in the oven, and the weight of the pears will also contribute to its rise.
- Arrange the Poached Pears (Photo 4): Artfully arrange the thinly sliced poached pears over the piped almond cream. You can fan them out or arrange them in an overlapping pattern to create a visually appealing design. For this recipe, I typically use about 8 pear halves for 9 tartlets, strategically arranging the slices to ensure each tartlet is beautifully adorned.
- Bake to Golden Perfection: Place the assembled Pear Frangipane Tartlets into your preheated oven at 160°C (325°F). Bake for approximately 20 to 25 minutes. You’ll know they are ready when the pastry edges are golden brown, the almond cream has puffed up beautifully and is golden, and the pears look tender and slightly caramelized.
- Cool and Finish: Once baked, carefully remove the tartlets from the oven and transfer them to a wire cooling rack. Allow them to cool completely. For a final touch of elegance, once fully cool, you can lightly dust the tartlets with a sprinkle of icing sugar, particularly around the pears, which adds a subtle sweetness and a professional finish.
Expert Tips for Perfect Pear Frangipane Tartlets
Achieving bakery-quality Pear Frangipane Tartlets is easier than you think with a few key strategies and tips:
- Strategic Organization is Key: Success with multi-component desserts like these tartlets hinges on good organization. Plan to have all three elements—the pastry, almond cream, and poached pears—prepared and ready before you begin the assembly. The beauty of this recipe is that each component can be made up to 24 hours in advance, allowing you to spread out the work and enjoy a more relaxed baking process.
- Respect Resting Times for Pastry: Do not skip or shorten the recommended chilling and resting times for the sweet shortcrust pastry. These periods are absolutely critical. They allow the gluten to relax, which prevents the pastry from shrinking excessively in the oven, ensuring your tartlet shells maintain their intended size and shape. Cold butter also results in a flakier, more tender crust.
- Utilize Perforated Tart Rings: For the most professional results and an impeccably crisp crust, I highly recommend using perforated tart rings or tart pans. The small holes facilitate better circulation of hot air around the pastry, leading to a more evenly baked and golden-brown crust, both on the sides and bottom.
- Mastering Pastry Lining: For lining individual tartlet rings, I find the “two-piece technique” incredibly efficient. First, cut thin, long strips of pastry, roughly the height of your rings, to create the sides. Then, cut out circles of pastry slightly smaller than the tart rings for the bottom. Gently press the pastry pieces together at the corners to ensure they adhere well and form a seamless shell. If you prefer a more traditional approach, you can find excellent tutorials online, such as this Cordon Bleu video on lining tarts.
- Room Temperature Ingredients for Frangipane: When making the almond cream, the temperature of your ingredients is paramount. Ensure that both the butter and eggs are at room temperature. This allows them to emulsify correctly, resulting in a smooth, homogenous cream that won’t split or curdle. Cold ingredients can lead to a lumpy or separated filling.
- Avoid Overfilling Pastry Cases: When piping the almond cream into your blind-baked shells, exercise restraint. Only fill the pastry cases about halfway up. The frangipane will puff up significantly during baking, and the addition of the poached pear slices will also contribute to its rise. Overfilling can lead to the cream overflowing the crust or creating a less refined appearance.

Frequently Asked Questions About Pear Frangipane Tartlets
Absolutely, you can! While homemade Pâte Sucrée offers superior flavor and texture, a good quality store-bought shortcrust pastry (pâte sablée or other sweet crust) is a convenient alternative. I highly recommend opting for a shortcrust type of pastry over puff pastry. The key is to choose a tart crust that is designed to remain crisp and won’t absorb too much moisture from the frangipane and pears, ensuring a delightful crunch with every bite.
The variety of pear you choose will significantly impact the final taste and texture of your tartlets. It’s best to select a pear that is firm but not overly hard, and slightly under-ripe. This ensures it will soften beautifully during poaching without becoming mushy or disintegrating. Flavor-wise, the choice between a sweeter or more tart pear is entirely up to your preference. Excellent varieties to consider include:
– Bosc Pears: Known for their firm flesh and ability to hold shape well, with a subtly sweet and spicy flavor.
– Anjou Pears: A versatile choice, they have a juicy, sweet flavor and a relatively firm texture that stands up to poaching.
– Concorde Pears: These are a cross between Conference and Comice pears, offering a sweet, aromatic flavor and a fine, dense texture perfect for poaching.
For the absolute best texture and deepest flavor, yes, poaching the pears is highly recommended. While the recipe will technically work with fresh, un-poached pears, you will end up with a much firmer, crunchier texture, rather than the incredibly soft, tender, and melt-in-your-mouth fruits that poaching achieves. Poaching also infuses the pears with extra sweetness and aroma from the liquid. As an alternative for convenience, you could use canned poached pears, but ensure they are thoroughly drained to avoid introducing excess liquid to your tartlets, which could make the pastry soggy.
Yes, absolutely! This recipe is wonderful for making ahead, which helps streamline your baking process, especially for entertaining. Once baked, the tartlets will remain fresh for up to 3 days when stored properly in the fridge. Moreover, all individual components can be prepared in advance:
– The Pastry: The unbaked dough can be kept in the fridge for up to 24 hours. Alternatively, the blind-baked pastry shells can be stored at room temperature for a day.
– The Almond Cream: The prepared frangipane can be stored in a covered bowl or an airtight container in the fridge for up to 24 hours. Just remember to bring it to room temperature before piping.
– The Poached Pears: Poached pears can be refrigerated for up to 24 hours. Keep in mind that they may oxidize (turn slightly brown) over time, even with lemon juice, but this won’t affect their flavor or texture significantly.
These Pear Frangipane Tartlets are truly at their peak when served fresh on the day they are baked. However, they store well for up to 3 days in the refrigerator. To maintain their quality, place them in an airtight container or individually wrap them tightly with plastic wrap or aluminum foil. They can be enjoyed cold straight from the fridge, or you can gently warm them for a few seconds in the microwave for a just-baked feel, though this might soften the pastry slightly.

Serving Suggestions for Your Pear Frangipane Tartlets
These elegant Pear Frangipane Tartlets are delicious on their own, but a few simple additions can elevate them even further:
- Classic Cream Pairing: Serve them with a dollop of freshly whipped cream, crème fraîche, or clotted cream for a luxurious touch. The cool, airy cream provides a beautiful contrast to the warm, nutty tart.
- A Scoop of Ice Cream: A scoop of vanilla bean ice cream or a complementary sorbet (like pear or apple sorbet) makes for a delightful dessert experience, especially if the tartlets are served slightly warm.
- Coffee or Tea Companion: These tartlets are ideal for an afternoon tea spread or as a sweet treat alongside your favorite coffee or espresso.
- Fruit Coulis: A light drizzle of a raspberry or apricot coulis can add a vibrant color and a touch of fruity tang that complements the pears beautifully.
Explore More French Tart Recipes
If you’ve fallen in love with these Pear Frangipane Tartlets, you’ll be delighted to discover the rich world of French tarts. Here are more exquisite recipes to inspire your baking journey:
- Easy French Apple Tart
- Triple Chocolate Tart
- Strawberry Tartlets with Custard
- Rhubarb Custard Tart
- Lemon Curd Tartlets
- Chocolate Ganache Tart
- Mini Lemon Meringue Tarts
- Orange Tart
- Strawberry Custard Tart
- Mini Chocolate Tarts
- Chocolate Orange Tartlets
Made this recipe?
Let us know if you liked it by leaving a comment below, and tag us on Instagram @a.baking.journey with a photo of your creation!
Recipe: Pear Frangipane Tartlets

Pear Frangipane Tartlets
Print Recipe
Ingredients
Sweet Shortcrust Pastry
- 100 gr Unsalted Butter, soft, at room temperature
- 40 gr Powdered Sugar
- 1 large Egg, at room temperature
- 40 gr Almond Meal
- 1 pinch Salt
- 200 gr Plain / All-Purpose Flour
Almond Cream Filling (Frangipane)
- 50 gr Unsalted Butter, very soft, at room temperature
- 50 gr Caster Sugar
- 1 large Egg, at room temperature
- 50 gr Almond Meal, preferably sifted
- Vanilla Paste or Almond Extract, optional, for flavoring
Poached Pears
- 4 large Pears, firm, e.g., Bosc or Anjou
- 1.5 litre Water, or substitute with white wine for richer flavor
- 50 gr Caster Sugar
- 30 ml Lemon Juice, freshly squeezed, about half a lemon
- Spices (Cinnamon Stick, Star Anise, Cardamom), optional, for infusing poaching liquid
Instructions
Sweet Shortcrust Pastry (Pâte Sucrée)
- In a mixer, cream the soft Butter and Powdered Sugar on medium speed for 2-3 minutes until pale and fluffy.
- Add the room temperature Egg, Almond Meal, and Salt. Mix until just combined. Gradually mix in the Flour until a dough forms; avoid overworking it.
- Roll the pastry thinly (2-3mm) between two sheets of baking paper (see Note 1), then chill on a flat tray for at least 1 hour.
- Line your 10 cm / 4 inch Pastry Rings or Tartlet Pans (see Note 2) with the chilled pastry. Prick the bottom of each shell with a fork, then chill again for at least 1 hour.
- Preheat oven to 160°C (325°F). Place tartlet pastries in the freezer while the oven preheats. Blind-bake for about 15 minutes (see Note 3) until dry to the touch, then cool completely.
Almond Cream Filling (Frangipane)
- Cream the very soft Butter and Caster Sugar on medium speed for 2-3 minutes until pale and voluminous. Slowly mix in the room temperature Egg, then add the Almond Meal and optional flavoring. Mix until combined. Set aside (see Note 4).
Poached Pears
- Peel the pears, keeping the stems intact.
- In a medium pot, combine Water (see Note 5), Caster Sugar, Lemon Juice, and any optional spices. Heat until sugar dissolves. Add peeled Pears and poach on low-medium heat for 10-15 minutes, or until soft but still holding shape (see Note 6).
- Remove pears from liquid and cool slightly. Cut each pear in half, remove the core, and thinly slice each half.
Assembling and Baking the Tarts
- Preheat your oven to 160°C (325°F).
- Transfer the Frangipane Cream to a piping bag (with a round tip or snipped end, see Note 7). Pipe the cream into each blind-baked pastry case, filling about halfway up (see Note 8).
- Artfully arrange the sliced Pear Halves over the cream (see Note 9). Bake for 20-25 minutes, or until pastry is golden, cream is puffed and golden, and pears are very soft.
- Optional: Once fully cool, dust with a little Icing Sugar for a beautiful finish.
Would you like to save this recipe?
We’ll email this post to you, so you can come back to it later!
Notes
General Info:
This recipe yields 9 Tartlets, designed for 10 cm / 4 inch sized pans or rings.
For more detailed insights, step-by-step instructions with photos, expert tips, and troubleshooting for each individual component, please refer to their dedicated recipes:
- Sweet Shortcrust Pastry (Pâte Sucrée)
- Almond Cream Filling (Frangipane)
Specific Notes:
- Pastry Thickness: Aim to roll the pastry relatively thin, about 2 to 3 mm (approximately 1/10 inch) thick.
- Tart Rings: While any 10 cm / 4 inch tartlet pans will work, I highly recommend using perforated tart rings. They promote even baking and a crispier crust due to better air circulation.
- Blind Baking Check: After blind baking, the bottom of the pastries should feel relatively dry to the touch and have developed a very light, barely golden color.
- Frangipane Storage: If you plan to bake immediately after preparing the frangipane, you can keep the cream at room temperature. If making it in advance, cover the bowl with plastic wrap directly touching the surface to prevent a skin from forming, and refrigerate for up to 24 hours.
- Poaching Liquid Volume: The exact amount of water (or other liquid) required may vary depending on the size and shape of the pot you use. Ensure the pears are fully submerged in the liquid; add more water if necessary to achieve this.
- Poaching Time: The cooking time for pears can differ based on their variety and ripeness. They should become tender when pierced but still maintain their shape and not be mushy when sliced.
- Piping Frangipane: If your almond cream was refrigerated, take it out about 30 minutes before you plan to pipe it. Allowing it to return to room temperature will make it softer and much easier to pipe smoothly.
- Filling Quantity: Be careful not to overfill the pastry cases with frangipane. The cream will expand considerably in the oven, and the addition of the pears will also contribute to its volume. Fill only about half the height of the pastry shells with cream.
- Pear Quantity: You will use approximately 8 pear halves for 9 tartlets. Don’t worry, you should have enough leftover slices to creatively arrange for the last tartlet, ensuring all are equally beautiful.
Nutrition (per serving)
