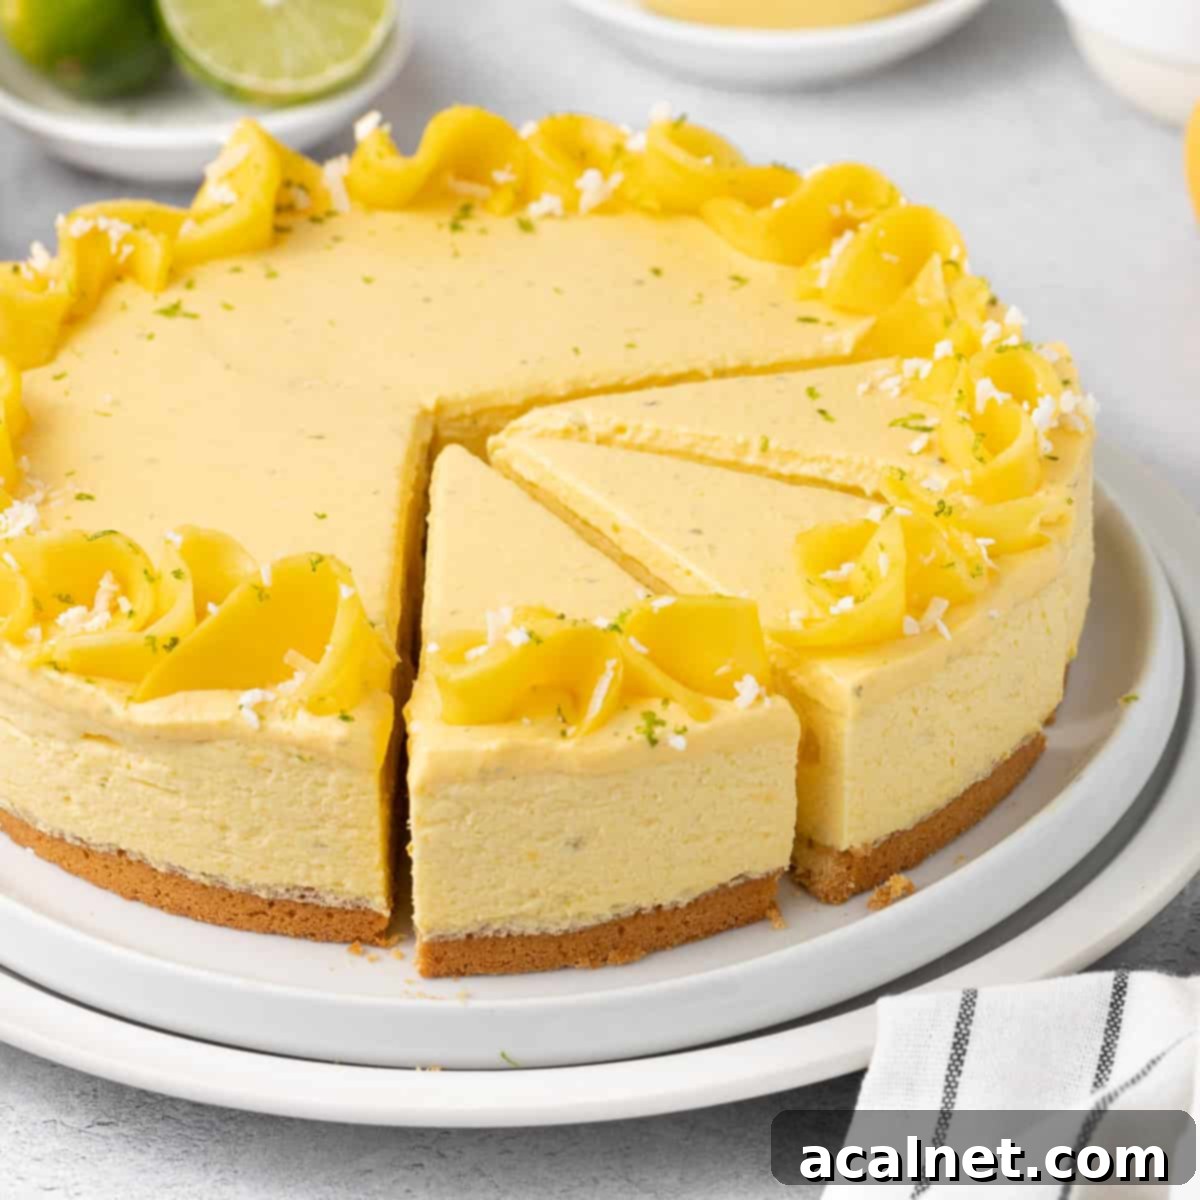
Luscious Mango Mousse Cake: Your Go-To Tropical Summer Dessert
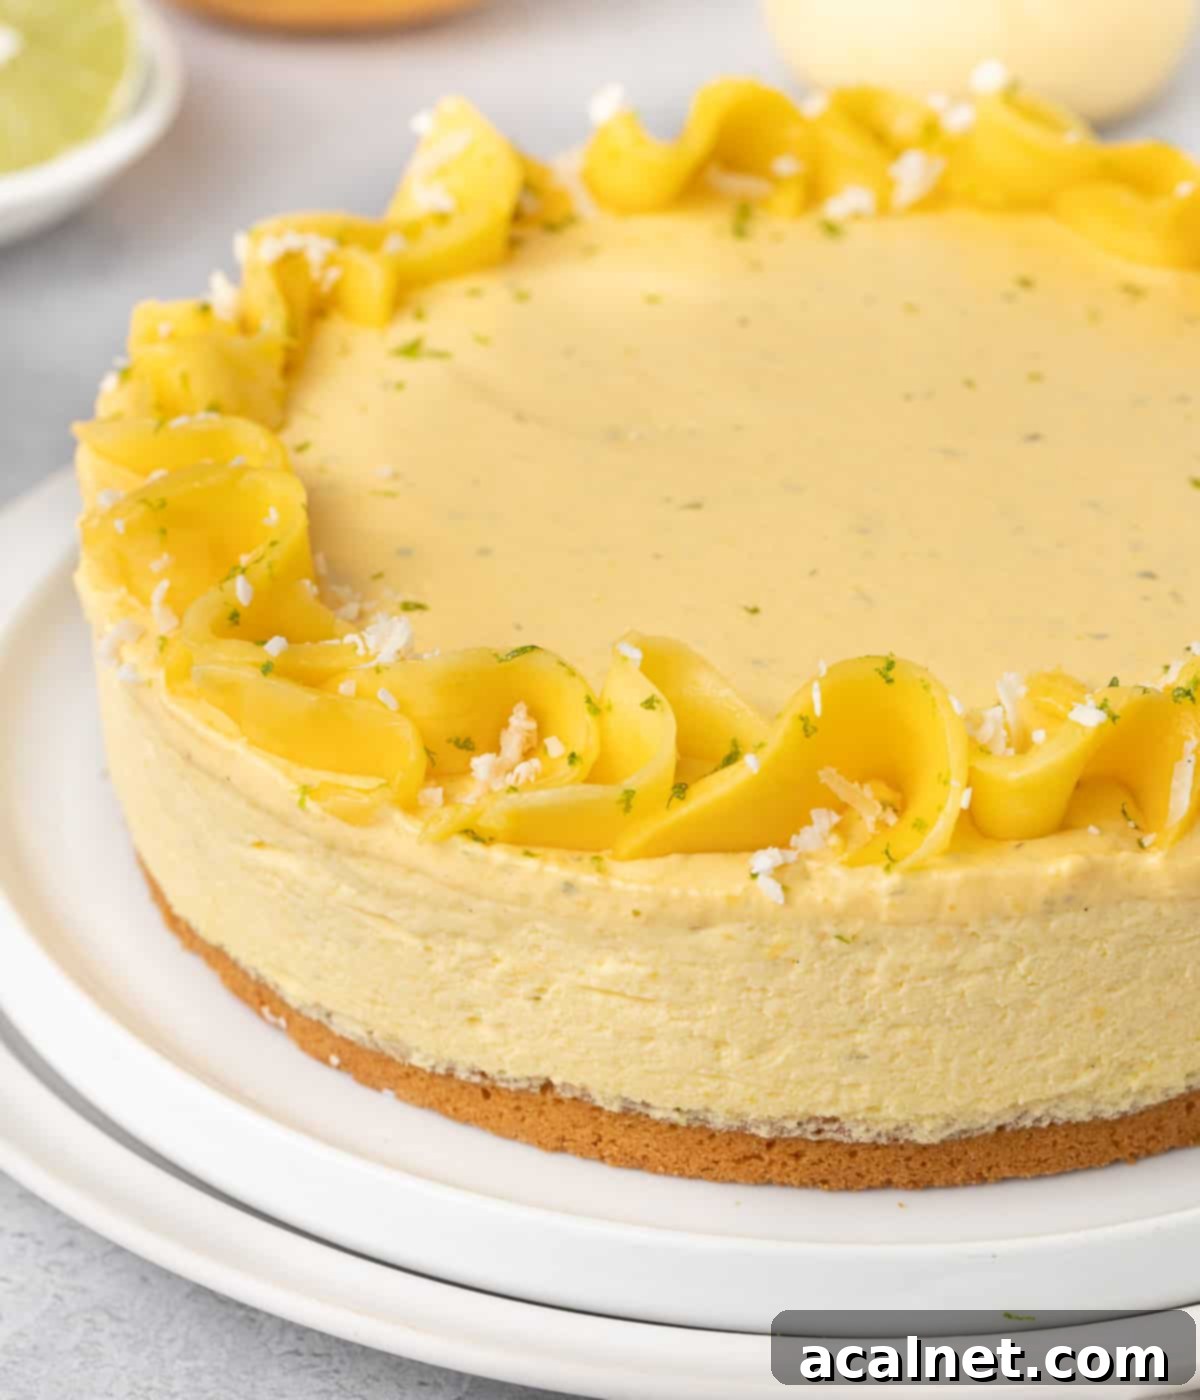
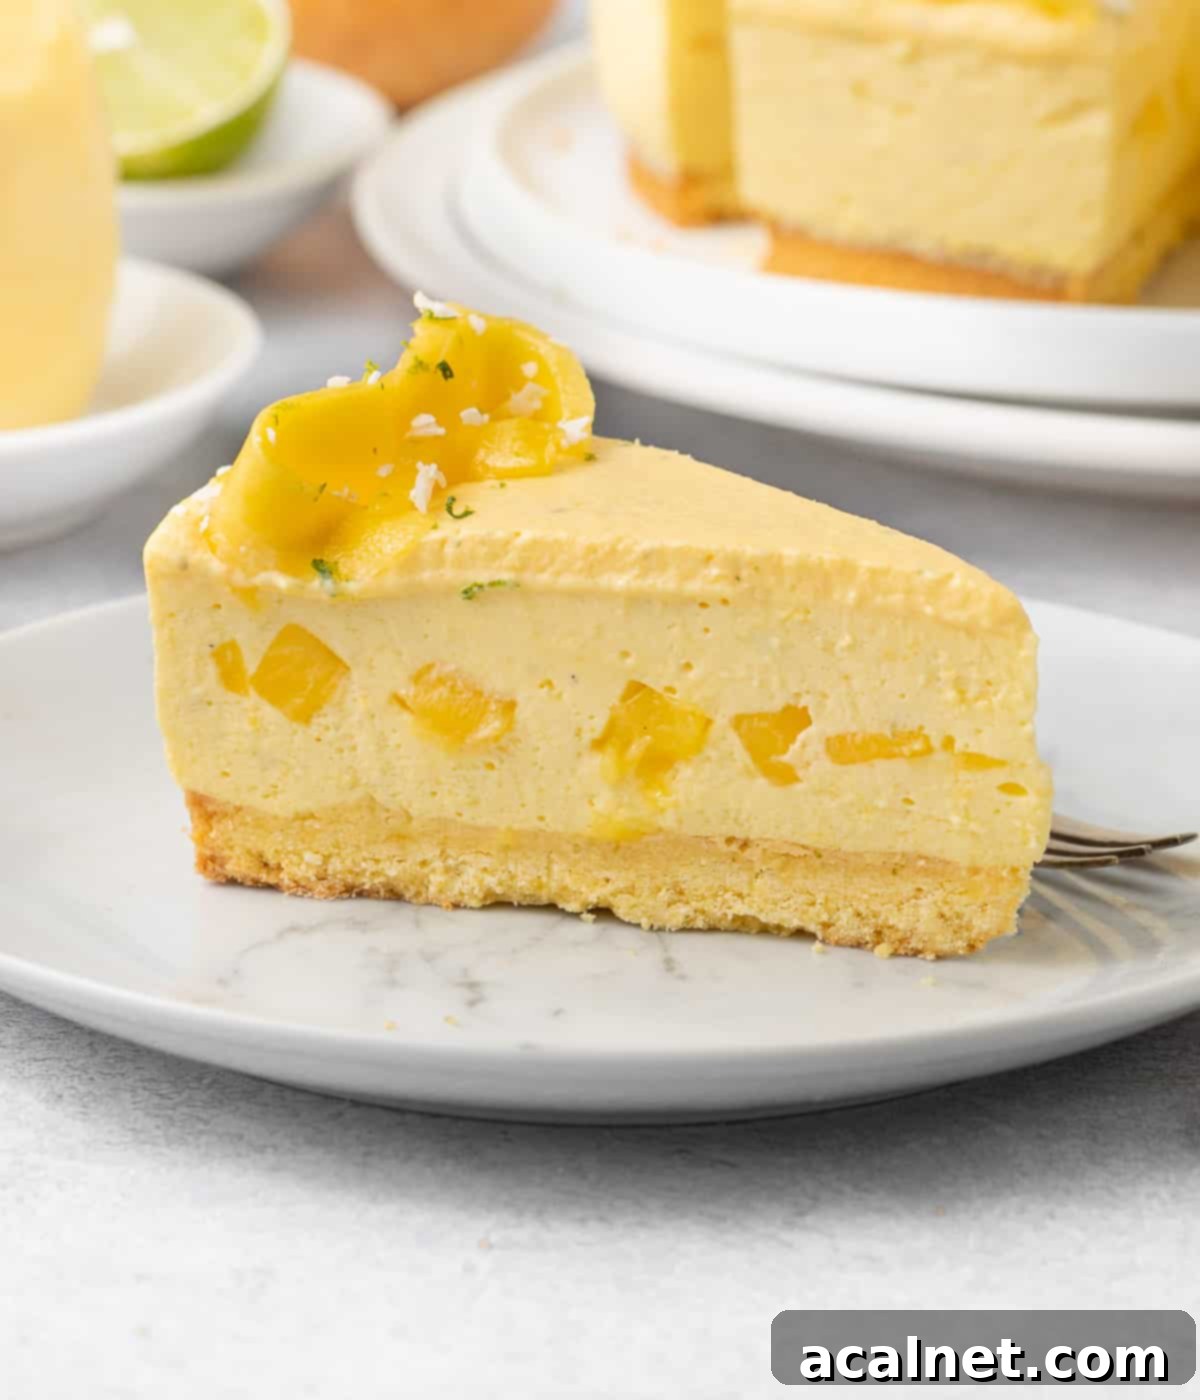
Prepare to be enchanted by this Mango Mousse Cake – an exquisite, incredibly light, and remarkably fresh summer dessert. It’s a showstopper perfect for any special occasion or simply to brighten a warm afternoon. Imagine a delightful symphony of textures and flavors: a rich, buttery, and satisfyingly crunchy sablé base, topped with a cloud-like, airy mango mousse, and crowned with a vibrant, creamy lime and mango curd. This cake isn’t just a dessert; it’s a sensory journey to the tropics!
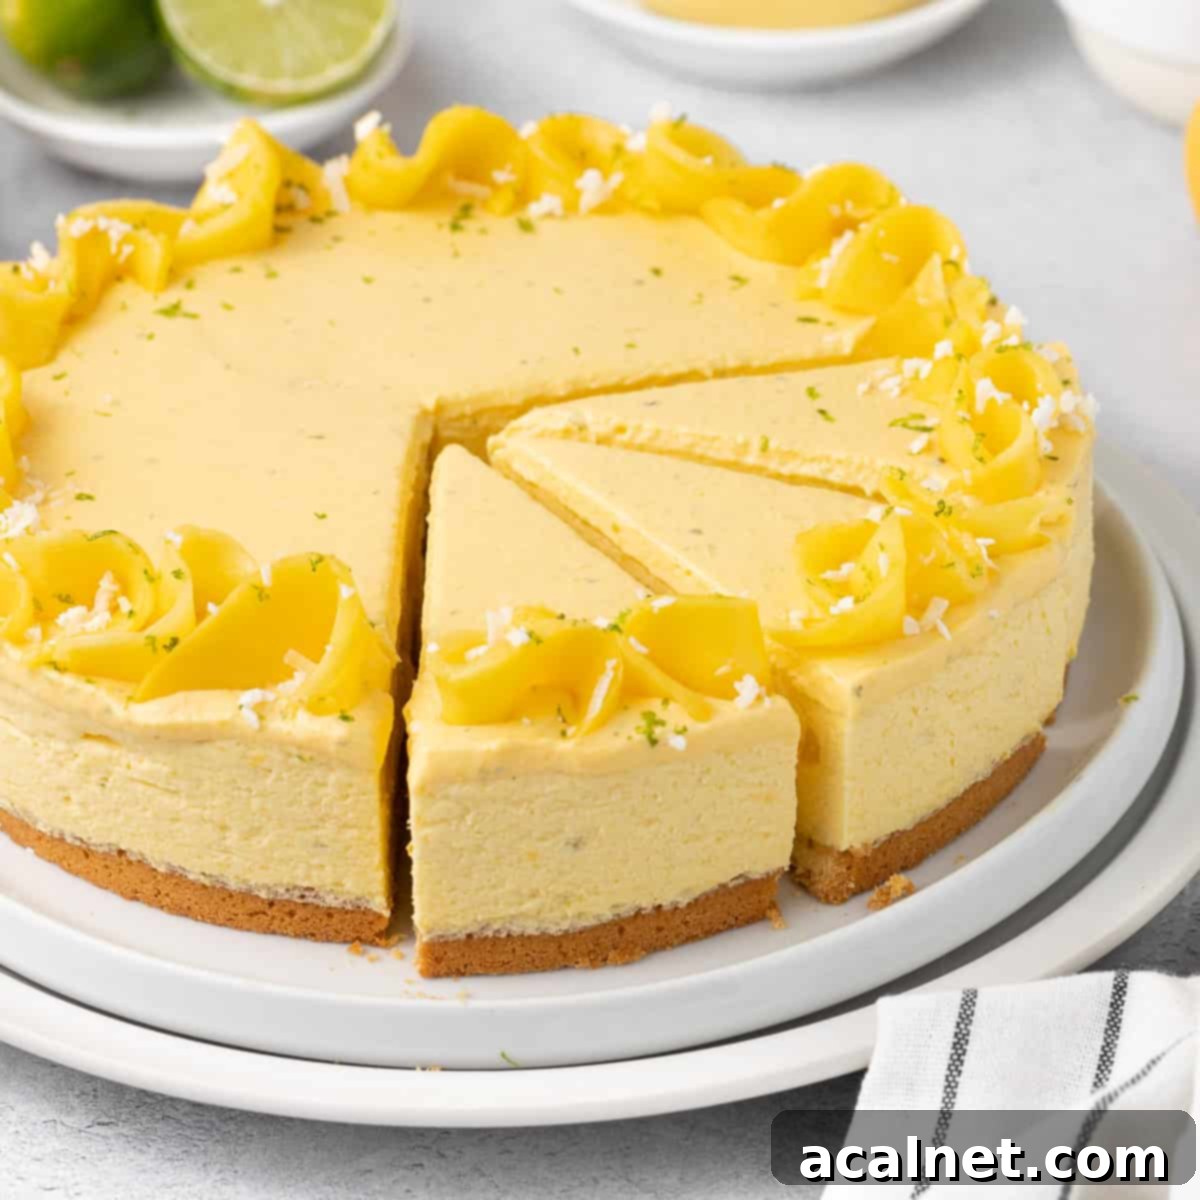
Jump to: Why We Love This Recipe | Ingredients | How to Make | FAQs | Tips | Recipe Card
Why This Mango Mousse Cake Will Be Your New Favorite
There’s so much to adore about this tropical treat, making it an absolute must-try this summer. This mango mousse cake strikes the perfect balance of fresh and bright flavors without being overly sweet, allowing the natural sweetness of ripe mangoes to truly shine. Each bite offers a harmonious blend of textures and tastes: the satisfying crunch of the buttery sablé, the smooth creaminess of the mousse, and the zesty tang of the lime-infused mango curd. It’s an irresistible combination that delights the palate.
The cake is thoughtfully composed of three distinct yet complementary layers, each adding its unique character:
- A Crisp Sablé Breton Base: This is no ordinary crust! We start with a traditional French salted butter cookie base, known as Sablé Breton. Its rich, buttery flavor and delicate crunch provide a perfect foundation, beautifully contrasting the soft mousse above.
- A Velvety Mango Mousse: This light and airy layer is bursting with the tropical essence of mango. It’s made with a smooth mango puree and generously studded with fresh mango cubes, adding delightful bursts of fruitiness and texture.
- A Tangy Mango Curd Topping: The cake is beautifully finished with a luscious, creamy mango curd, enhanced with a hint of zesty lime. This topping not only adds another layer of intense mango flavor but also provides a vibrant, glossy finish.
To elevate its visual appeal and taste even further, we recommend garnishing the cake with fresh, thinly sliced mango strips, a sprinkle of bright lime zest, and a touch of desiccated coconut. This finishing touch adds extra flavor, texture, and an undeniable tropical flair. Whether you’re planning an elaborate dinner party or simply craving a refreshing indulgence, this homemade mango mousse cake is guaranteed to be a hit with everyone who tries it. It’s truly the quintessential dessert for warm weather gatherings!
Explore More Mousse Cake Delights:
- Strawberry Mousse Cake
- Lemon Meringue Cake
Essential Ingredients for Your Mango Mousse Cake
Crafting this elegant mango mousse cake requires a selection of fresh, high-quality ingredients, carefully chosen for their flavor and function. Below is a detailed breakdown of what you’ll need for each layer, along with important tips for success.
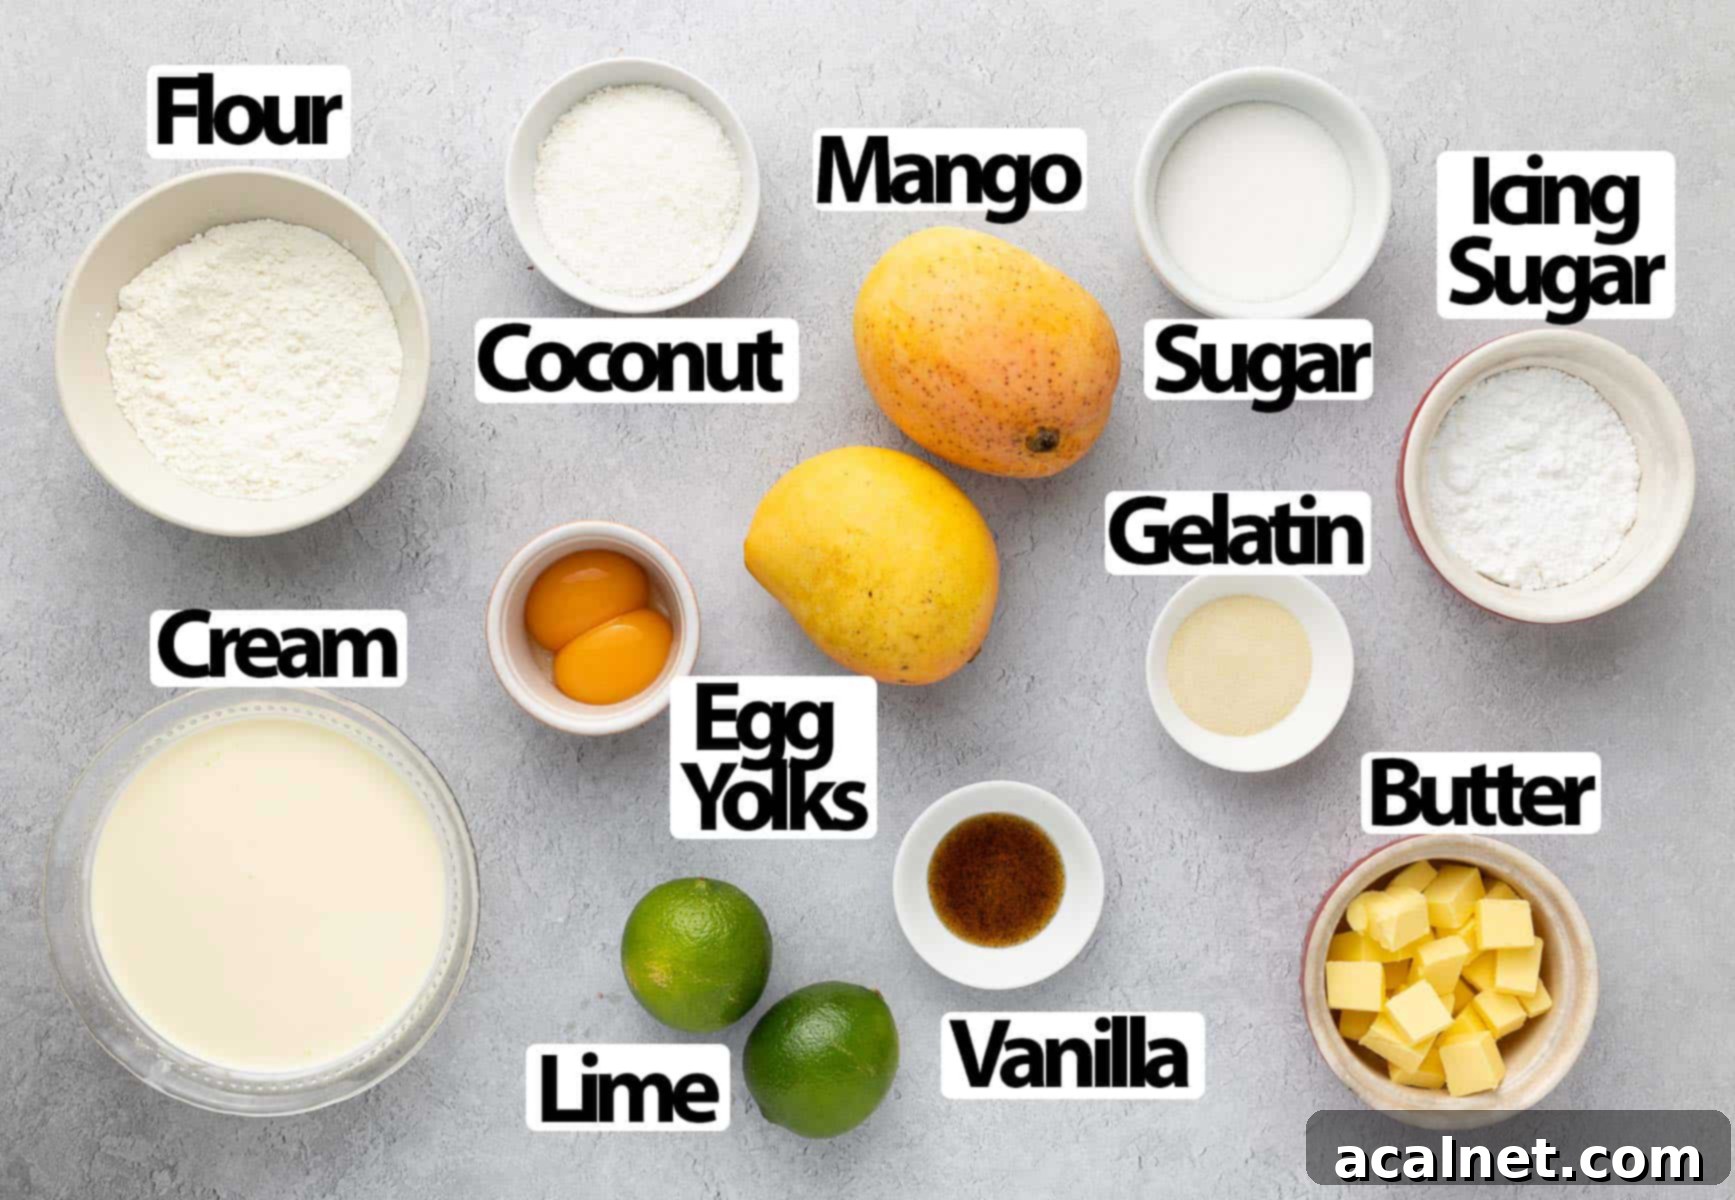
For precise quantities, please refer to the detailed recipe card below.
For the Buttery Sablé Cookie Base:
- Egg Yolks: This recipe specifically calls for egg yolks, which contribute to the rich, tender texture of the sablé. It’s crucial that your egg yolks are at room temperature. Cold yolks won’t emulsify properly with the soft butter, leading to a lumpy mixture. Plan ahead and take them out of the fridge at least 30 minutes before you start.
- Icing Sugar: Also known as powdered sugar, this fine sugar blends seamlessly into the dough, ensuring a smooth texture in your cookie base. Remember to sift it to avoid any unwanted lumps.
- Salted Butter: Use high-quality salted butter that is very soft, almost spreadable, but not melted. The salt in the butter enhances the overall flavor profile of the cookie. If you only have unsalted butter, simply add a good pinch (about 1/4 teaspoon) of fine sea salt when you incorporate the flour.
- All-Purpose Flour + Desiccated Coconut: The foundation of our crust is plain or all-purpose flour. We also include a touch of desiccated coconut. This optional addition brings a delightful hint of tropical flavor and a lovely, subtle chewiness to the crunchy base, complementing the mango perfectly. Feel free to omit it if you prefer a classic sablé.
While a sponge cake base is an alternative, I personally find the crisp, buttery texture of a sablé to be far superior, providing an essential contrast that makes this mango mousse cake truly outstanding.
For the Light and Airy Mango Mousse Layer:
- Fresh or Frozen Mango: You’ll need a combination of smooth mango puree and small, fresh mango cubes. The puree is easily made by blending ripe mango flesh until it’s silky smooth. If fresh mangoes are not in season or readily available, thawed frozen mango puree (ensure it’s 100% mango with no added sugars or preservatives) works wonderfully.
- Lime Juice and Zest: Fresh lime is a game-changer in this recipe! Both the juice and zest are incorporated to add a bright, zesty counterpoint to the sweetness of the mango, making the overall flavor incredibly vibrant and refreshing. Lemon juice and zest can be used as a substitute if lime isn’t available.
- Gelatin Powder: This is a non-negotiable ingredient for achieving the perfect mousse consistency. Gelatin powder, when bloomed in cold water, creates the stable structure needed for the mousse to set beautifully. Unfortunately, this cake cannot be successfully made without gelatin or a suitable gelling agent like agar-agar, which requires different handling.
- Heavy Cream / Thickened Cream: Also known as whipping cream, this ingredient is essential for creating the light and airy texture of the mousse. It’s critical to use cream with at least 30% fat content. If the fat percentage is too low, the cream won’t whip properly, and your mousse layer will lack stability and luxurious texture.
For the Zesty Mango Curd Topping:
This vibrant curd is a simple yet potent combination designed to deliver maximum flavor and creamy texture. It comprises smooth Mango Puree, rich Egg Yolks, granulated Sugar for sweetness, tangy Lime Juice and Zest for brightness, and luscious Butter to create its signature silky consistency.
For the final flourish, I love to adorn the cake with delicate, thinly sliced strips of fresh mango, which I artfully arrange. A sprinkle of fresh lime zest adds a pop of color and an extra layer of freshness, while desiccated coconut provides a subtle, complementary texture and flavor, bringing all the tropical elements together beautifully.
Step-by-Step Guide: Crafting Your Mango Mousse Cake
Making this layered mango mousse cake is a rewarding process, requiring patience and attention to detail. Follow these steps carefully to ensure a stunning and delicious result.
1. Preparing the Coconut Sablé Crust
The foundation of our cake is a crisp, buttery cookie crust. This is the only component that requires baking. You can easily prepare the dough by hand with a whisk and spatula, or for convenience, use a stand mixer fitted with a paddle attachment.
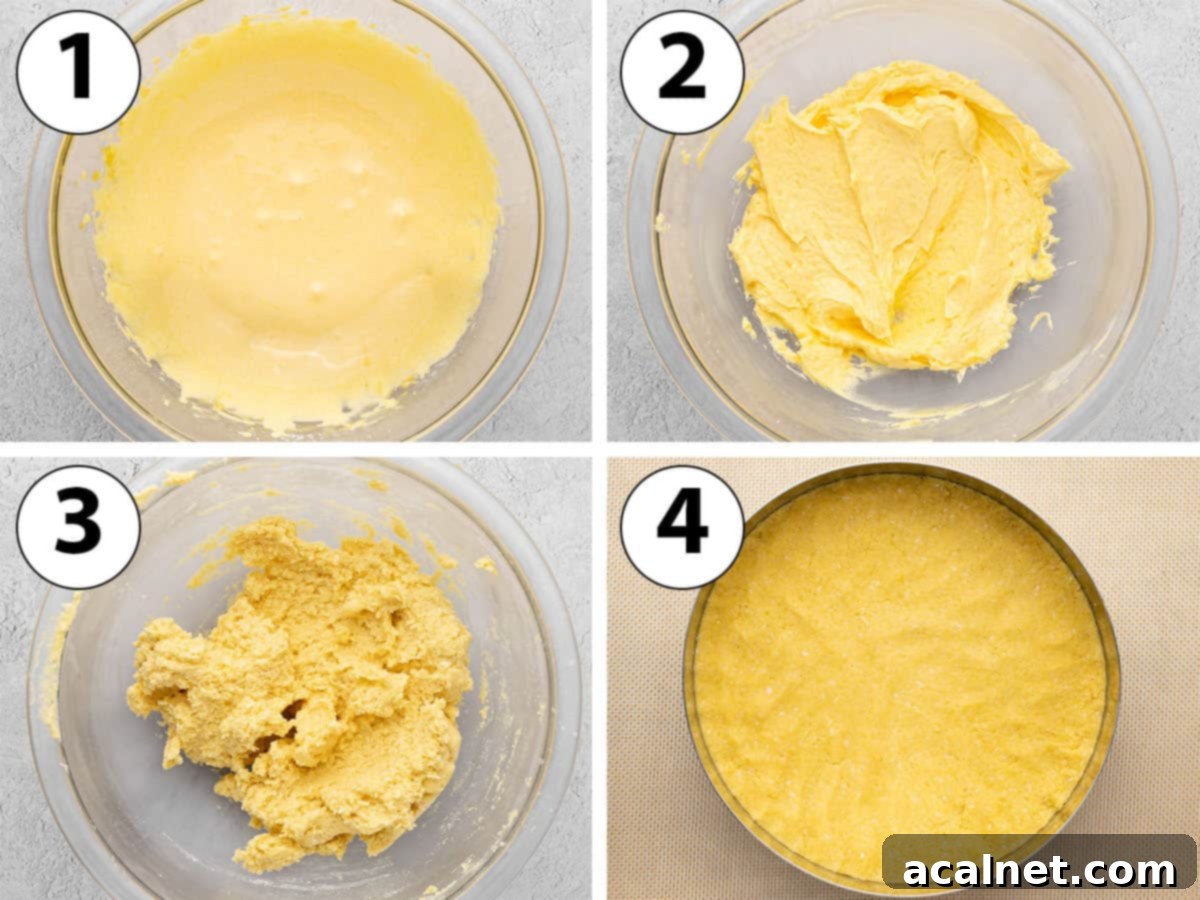
- Begin by placing a large 10-inch (26 cm) cake ring onto a small baking tray that has been lined with baking paper (parchment paper) or a silicone baking mat. This setup will contain the crust while baking.
- Step 1 (Photo 1): In a small mixing bowl, combine the room-temperature egg yolks and sifted icing sugar. Whisk them together for a couple of minutes until the mixture becomes pale, thick, and creamy. This aerates the mixture and ensures a smooth dough.
- Step 2 (Photo 2): Gradually add the very soft (but not melted) salted butter to the egg yolk mixture. Continue whisking until you achieve a thick, homogenous paste. The butter needs to be sufficiently soft to incorporate easily; cold butter will be difficult to blend and may result in a crumbly dough.
- Step 3 (Photo 3): Now, fold in the all-purpose flour and desiccated coconut. Using a stiff spatula, mix until the ingredients come together to form a thick, slightly sticky dough. Avoid overmixing, as this can develop the gluten and make the crust tough.
- Step 4 (Photo 4): Transfer the dough to the prepared cake ring. Press it firmly and evenly across the bottom of the ring to form a uniform layer. The back of a cup or a small offset spatula can be very helpful for smoothing out the surface and ensuring a consistent thickness.
- Chill the dough in the fridge for at least 30 minutes. This helps the butter firm up, preventing the crust from spreading too much during baking. While it chills, preheat your oven to 160 degrees Celsius (325 degrees Fahrenheit). Bake for about 30 minutes, or until the crust turns a beautiful light golden brown. Once baked, transfer the tray to a wire cooling rack and allow the sablé base to cool down completely before proceeding.
2. Crafting the Luxurious Mango Mousse Filling
This is where the magic happens, as we create the light, airy, and intensely flavorful mango mousse that forms the heart of our cake.
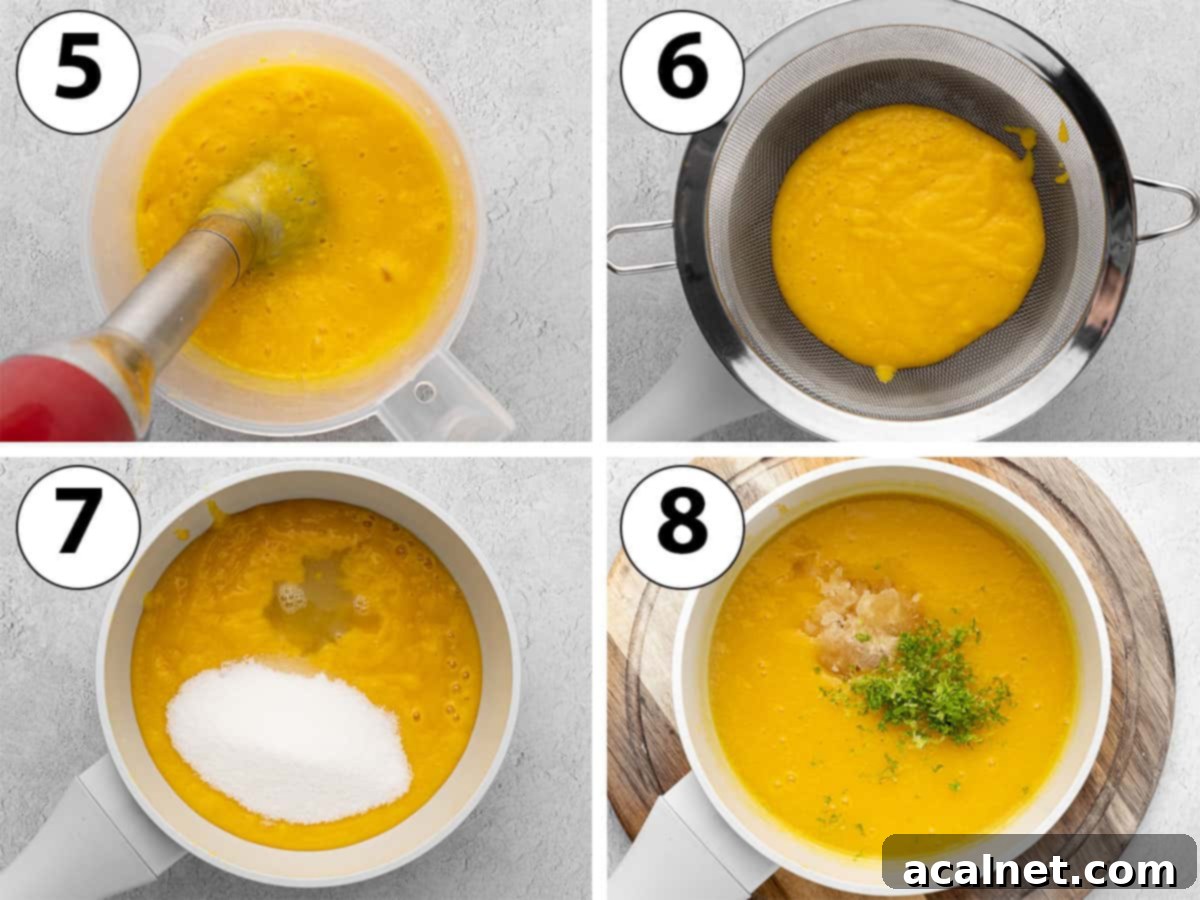
- Once your sablé crust is completely cool, carefully place the cake ring, with the crust inside, onto your chosen serving plate or cake board. For a perfectly smooth and clean edge when unmolding, it’s highly recommended to line the inside of the cake ring with a 5 cm (2-inch) high acetate strip (also known as a plastic cake collar). This small step makes a big difference in presentation.
- Step 5 (Photo 5): To make the mango puree, place the fresh mango flesh (or thawed and drained frozen mango) into a small jug if you’re using an immersion blender, or directly into a regular blender or food processor. Blend until the mixture is incredibly smooth and liquid.
- Step 6 (Photo 6): Pass the blended mango mixture through a fine-mesh sieve set over a small saucepan. This step is crucial for removing any fibrous bits or unblended mango, ensuring your mousse has a silky-smooth texture. Discard any solids left in the strainer.
- Step 7 (Photo 7): To the sieved mango puree, add the fresh lime juice, granulated sugar, and vanilla paste (or vanilla extract). Whisk everything together thoroughly to combine. Place the saucepan on the stove over medium-low to medium heat. Gently heat the mixture, stirring occasionally, until it just begins to simmer. Do not let it come to a rolling boil. Once it starts to simmer, remove it from the heat immediately.
- While the mango mixture is heating, prepare your gelatin. In a small, separate bowl, sprinkle the gelatin powder over one tablespoon of very cold water. Stir briefly and allow it to sit for about 2-5 minutes to “bloom.” The gelatin should absorb the water and turn into a thick, translucent paste.
- Step 8 (Photo 8): Away from the heat, add the bloomed gelatin mixture and fresh lime zest to the warm mango puree. Whisk vigorously and continuously until the gelatin is completely dissolved and fully incorporated into the mango mixture. There should be no lumps of gelatin remaining.
- Transfer this warm mango-gelatin mixture into a clean bowl, or even better, a shallow pan like a brownie or loaf pan. This allows the mixture to cool down more quickly and evenly. Cover the surface directly with plastic wrap to prevent a skin from forming. Chill in the fridge for approximately 1 hour, or until the mixture is cool to the touch but still liquid – it should not be warm, but also not set.
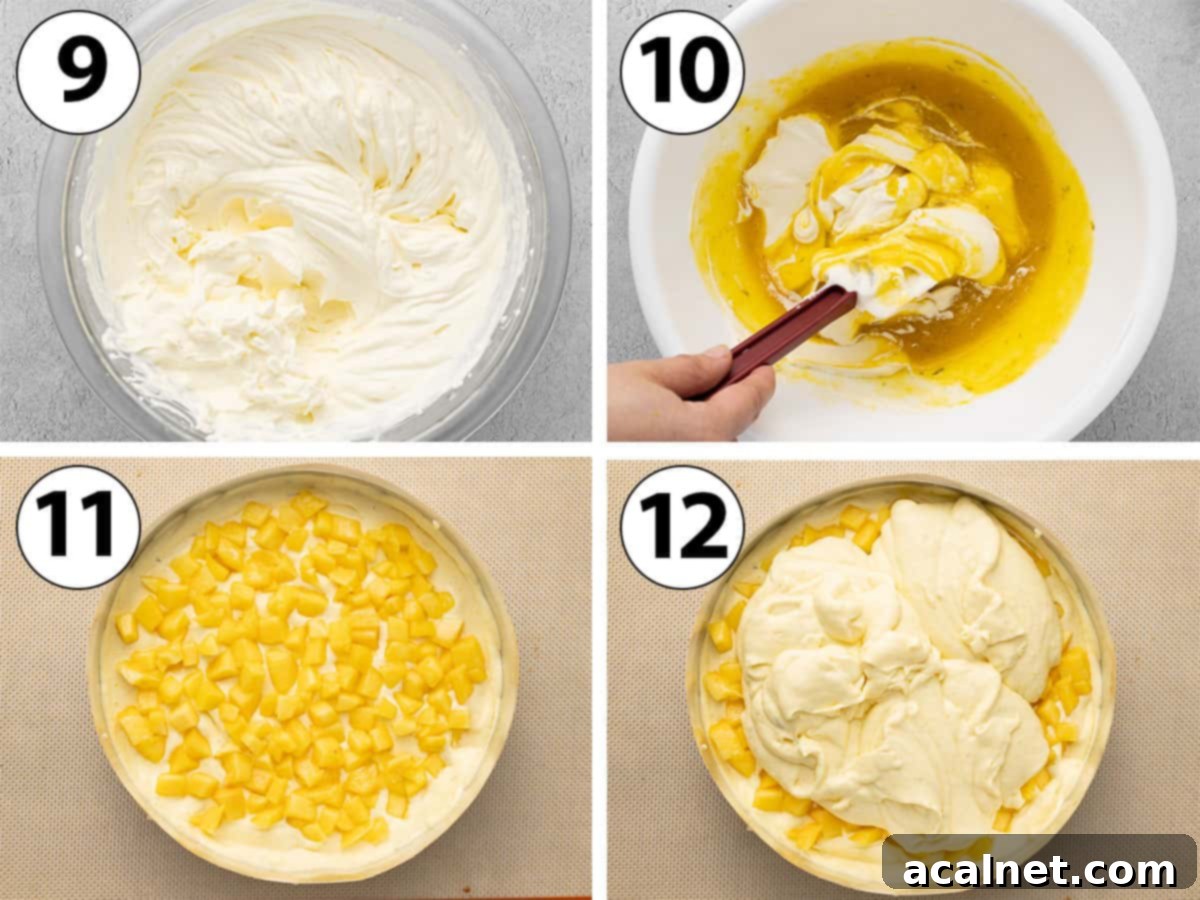
- While the mango mixture cools, prepare your fresh mango cubes. Cut a portion of mango into very small, uniform cubes, about 0.5 cm (1/4 inch) in size. Set these aside.
- Step 9 (Photo 9): In the bowl of your stand mixer (or a large mixing bowl if using a hand-held electric mixer), pour the cold heavy cream. Whip the cream on medium-high speed until it forms stiff peaks. Be careful not to over-whip, as it can turn granular.
- Remove the cooled mango mixture from the fridge and transfer it to an extra-large mixing bowl. If the mixture has started to thicken or set slightly, whisk it well to loosen it and restore its smooth, liquid consistency before proceeding.
- Step 10 (Photo 10): Add a small amount (about a quarter) of the whipped cream to the mango mixture. Gently whisk it in to lighten the mango base. Then, switch to a rubber spatula and gently fold in the remaining whipped cream in 3 or 4 additions. Use a light, lifting motion to incorporate the cream without deflating it. The goal is a very light, airy, and creamy mousse.
- Carefully pour about half of the prepared mango mousse over the sablé crust, inside the cake ring. Use a small offset spatula to spread it into an even layer.
- Step 11 (Photo 11): Evenly scatter the reserved fresh mango cubes over this first layer of mousse. Make sure to leave a clear border of about 2 cm (3/4 inch) around the edges. This prevents the mango cubes from showing on the exterior of the finished cake, maintaining a clean look.
- Step 12 (Photo 12): Gently spoon the second half of the mango mousse over the mango cubes, spreading it carefully with the offset spatula to create another smooth, even layer. At this stage, the mousse might appear quite fluid, which is perfectly normal.
- Place the assembled cake in the fridge to set for a minimum of 4 hours, though ideally overnight. The mango mousse must be completely firm before you proceed with the topping. Patience here is key for clean, defined layers.
3. Adding the Irresistible Mango Curd Topping (Optional, but Recommended!)
This bright and tangy curd adds an extra layer of flavor and a beautiful glossy finish to your mousse cake. It’s truly worth the effort!
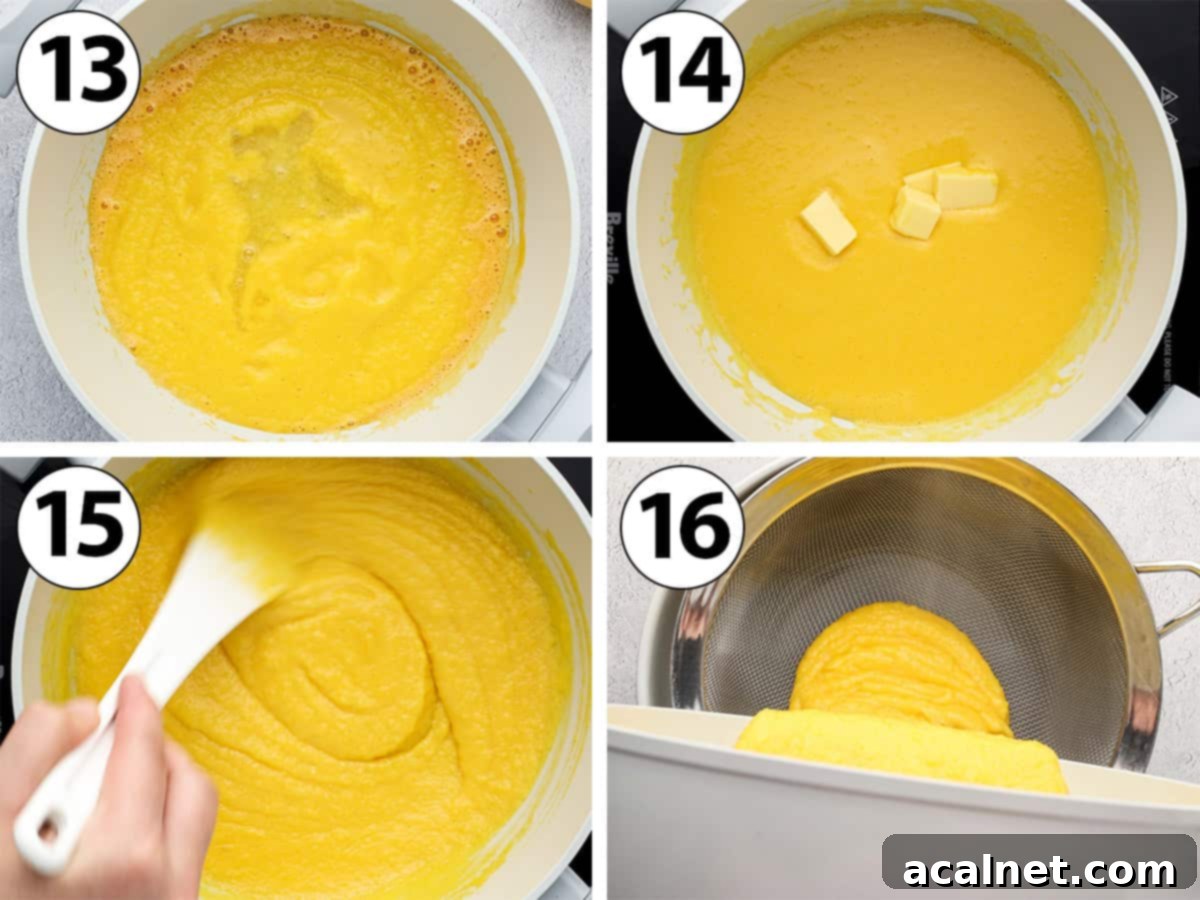
- As with the mousse, start by blending your mango flesh (fresh or thawed frozen) until it’s completely smooth. For an extra smooth curd, you can blend it for longer, add a tiny bit of water to thin it, and then pass it through a fine-mesh sieve. I personally enjoy a slightly thicker, more textured puree for my curd.
- Step 13 (Photo 13): In a non-reactive, heavy-bottomed saucepan, whisk together the egg yolks and granulated sugar until well combined. Then, stir in the smooth mango puree and fresh lime juice.
- Place the saucepan on the stove over very low heat. Stir continuously with a heat-proof rubber spatula or wooden spoon for 3 to 4 minutes. This gentle heating allows the sugar to dissolve completely and prevents the eggs from scrambling. The mixture should begin to thicken ever so slightly. It is vital to keep the heat low and never let the curd boil, as high heat will curdle the eggs.
- Step 14 (Photo 14): Begin adding the cubed unsalted butter, a small amount at a time. Stir constantly, allowing each addition to melt and fully incorporate into the mixture before adding the next. This slow incorporation creates a smooth, emulsified curd.
- Step 15 (Photo 15): Once all the butter is incorporated, continue to cook the curd for another 5 to 8 minutes, stirring constantly. The exact time will depend on your stove’s heat and the size of your saucepan. The curd is ready when it has significantly thickened and coats the back of your spoon or spatula, leaving a clear trail when you draw your finger across it (the “nappe” stage).
- Step 16 (Photo 16): Immediately pour the cooked mango curd through a fine-mesh sieve into a clean bowl. This step catches any small bits of cooked egg or mango fibers, ensuring a perfectly smooth curd. Stir in the lime zest (if using) and let the curd cool down slightly.
- Once cooled a bit, pour the still-warm curd evenly over the fully set mango mousse layer. Use an offset spatula to spread it into a thin, uniform layer. Return the cake to the fridge to chill for at least 2 hours, or until the curd is completely set.
4. The Grand Finale: Finishing and Decorating Your Cake
With all your layers set, it’s time for the exciting part – transforming your creation into a beautifully decorated masterpiece!
- Once both the mango mousse and curd layers are completely set and firm, it’s time to unmold your cake. Carefully lift off the cake ring. If you used acetate strips, gently peel them away from the sides of the cake. You’ll be left with perfectly crisp, clean edges.
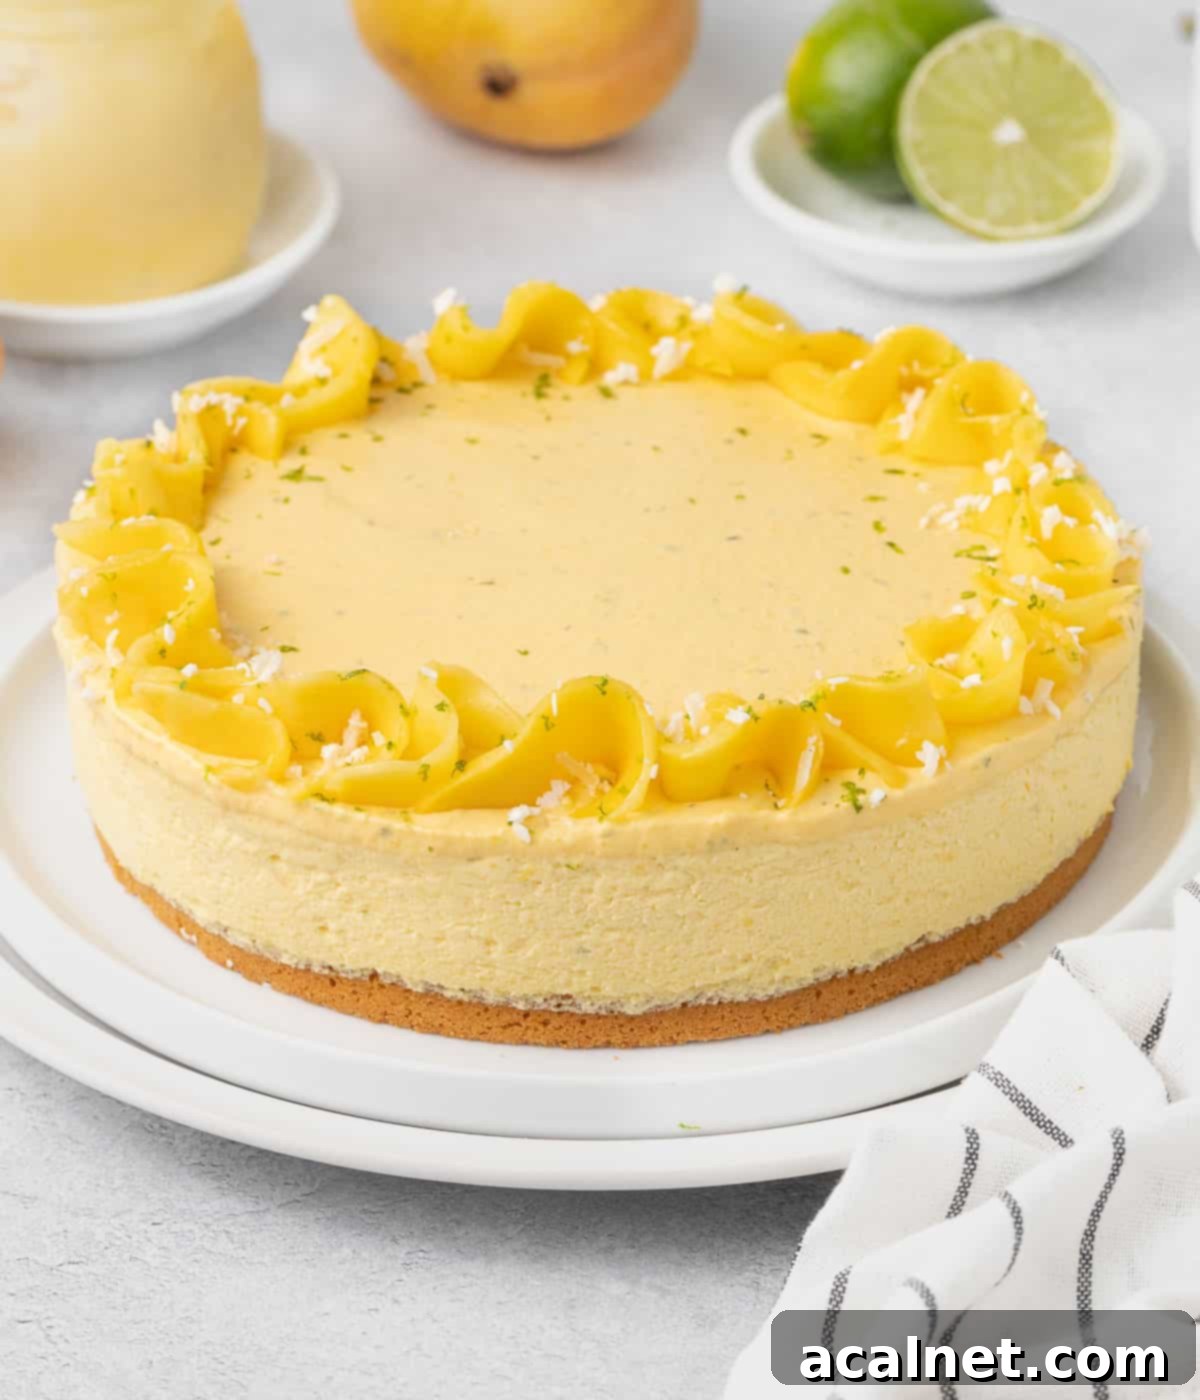
- To decorate this tropical delight, take a fresh mango and cut it into very thin strips. These strips will form a beautiful, natural border. Gently press them into the top of the set mango curd around the edges of the cake. You can arrange them in a simple circle or get creative by unevenly wrapping and swirling each mango slice to create an elegant, fun, and unique pattern.
- Optionally, enhance the cake’s vibrant look and fresh taste by sprinkling additional lime zest and a touch of desiccated coconut over the fresh mango strips. This adds an extra layer of aroma, color, and texture that truly elevates the dessert.
Mango Mousse Cake: Your Questions Answered
Mango puree is simply the smooth, blended flesh of ripe mangoes. To achieve the best texture for this cake, it’s often passed through a fine-mesh sieve to remove any stringy fibers or unblended bits. Yes, you can absolutely use store-bought mango puree! Many specialty stores, especially those focusing on tropical ingredients, offer pre-made mango puree, often found in the freezer section. Just ensure that it’s made from 100% mango, with no added sugars, preservatives, or other fruits, and thaw it completely before use.
Unfortunately, for this particular mango mousse cake recipe, gelatin is a critical ingredient and cannot be omitted without significantly altering the outcome. The mousse relies on gelatin to achieve its light, airy, yet stable and set consistency. Without it, the mousse will remain quite soft and will not set properly, preventing the cake from holding its shape. While agar-agar powder is a common vegan substitute for gelatin, it presents its own challenges for this recipe. Agar-agar sets much more quickly as the temperature drops. This means that by the time the mango mixture cools enough to incorporate the whipped cream, the agar-agar might have already caused it to set, making it impossible to achieve the delicate, folded texture of a mousse. For this recipe’s specific structure, gelatin truly is essential.
For best results and a professional finish, I recommend using a 10-inch (26 cm) cake ring, sometimes referred to as a mousse ring. Lining the inside of the ring with acetate strips (plastic cake collars) is highly beneficial, as it ensures wonderfully clean, smooth edges when you unmold the cake. If you don’t have a cake ring, a springform pan can be a suitable alternative. You can use it with or without its bottom plate, but if you want those crisp, clean sides, you’ll still benefit from lining it with acetate strips or even baking paper cut to fit the height of the pan.
The classic topping for this mousse cake is a thin, creamy layer of homemade Mango Curd, which perfectly complements the mousse. However, you have plenty of room for creativity! For an even fresher, lighter taste, you could substitute the curd with a vibrant Mango Coulis. If you’re looking to introduce another tropical dimension, a luscious Passion Fruit Curd would create an incredibly delicious and tangy contrast. Beyond curds and coulis, simple garnishes of fresh fruit, a dusting of powdered sugar, or a swirl of whipped cream can also provide a beautiful finish. I personally love decorating with thin, swirling slices of fresh mango, along with bright lime zest and a sprinkle of desiccated coconut for color, texture, and an extra burst of tropical flavor.
Expert Tips & Troubleshooting for Perfect Mousse Cake
Achieving a flawless mango mousse cake is well within reach with a few key considerations and troubleshooting tips:
- Embrace Chilling Time: The Secret to Clean Layers: Patience truly is a virtue with this recipe. To ensure each layer sets perfectly and you achieve those beautiful, distinct lines, allow ample chilling time between each step. Rushing the process will result in messy layers and a less stable cake. Because it requires significant chilling, this mango mousse cake is an ideal make-ahead dessert; prepare it 24 to 48 hours before serving for stress-free entertaining.
- Temperature Control is Paramount: Success hinges on working with ingredients and mixtures at the correct temperatures. The mango puree mixture needs to be warm enough to fully dissolve and activate the gelatin, preventing a grainy texture. However, it’s equally important that this mixture cools down sufficiently before you fold in the whipped cream. If the mango mixture is too warm, it will melt the whipped cream, causing your mousse to lose its airy texture and fail to set.
- Achieving Silky Smooth Mango Puree: Not all mango varieties blend equally well. Some can be quite fibrous or stringy, even after blending. If you find your mango puree is still a bit chunky or stringy (which can happen, as mine sometimes does), don’t hesitate to add a few drops of water (or a tiny bit of lime juice) to help thin it out and achieve a smoother consistency. Crucially, always press the puree through a fine-mesh sieve to catch any remaining fibers, ensuring your mousse is perfectly smooth.
- Troubleshooting: “My Mango Mousse Isn’t Setting!”: This is a common concern. Several factors can lead to a mousse that doesn’t firm up properly.
- Insufficient Gelatin: Double-check that you used the correct amount of gelatin powder as specified in the recipe. Too little gelatin will not provide enough structure.
- Incorrect Cream Fat Content: Ensure your heavy or thickened cream has at least 30% fat. Lower fat creams will not whip to stiff peaks and cannot provide the necessary stability for the mousse to set.
- Not Enough Chilling Time: The mousse needs a significant amount of time in the fridge to fully set. If it’s still soft, it might simply need more time to chill, preferably overnight.
- Warm Mango Base: If the mango mixture was too warm when the whipped cream was folded in, it could have melted the cream, preventing proper setting. Ensure the mango base is cool to the touch before combining.
Storing Your Mango Mousse Cake for Optimal Freshness
To maintain its delicate texture and vibrant flavors, this mango mousse cake must be stored in the refrigerator. It is at its absolute best when enjoyed within 2 days of preparation, but it will retain its quality for up to 3 days when properly covered and refrigerated. This makes it an ideal dessert to prepare in advance for dinner parties or special occasions, allowing you to focus on other preparations on the day of the event.
I strongly advise against freezing this cake. The delicate mousse and curd layers contain gelatin and high moisture content, which can cause them to become watery and lose their smooth texture upon thawing. The sablé base may also become soggy. For the best experience, enjoy it fresh from the fridge within the recommended timeframe.
Discover More Delightful Fruity Cake Recipes
If you’ve fallen in love with the fresh, fruity flavors of this mango mousse cake, you’ll surely enjoy exploring other seasonal and tropical delights from our collection:
- Classic French Fraisier Cake
- Elegant Strawberry Charlotte Cake
- Tangy Passion Fruit Cheesecake
- Simple and Moist Plum Yogurt Cake
- Comforting Strawberry Crumble Cake
- Refreshingly Easy Vegan No-Bake Mango Cheesecake
Loved This Recipe?
We’d be thrilled to hear your thoughts! Leave a comment below to share your experience, and don’t forget to tag us on Instagram @a.baking.journey with a photo of your beautiful creation!
Full Recipe Card

Mango Mousse Cake
Servings: 10
Author: Sylvie
Print Recipe
Ingredients
Coconut Sablé Crust
- 2 large Egg Yolks, at room temperature
- 75 gr Icing Sugar
- 75 gr Salted Butter, soft, at room temperature
- 125 gr All Purpose Flour
- 40 gr Desiccated Coconut
Mango Mousse
- 300 gr Mango Flesh
- 60 gr Caster Sugar
- 30 ml Lime Juice
- 7 gr Gelatine Powder, + 1 tablespoon cold water
- 1 teaspoon Lime Zest
- 350 ml Heavy / Thickened Cream, (whipping cream)
- 150 gr Mango Flesh, cut into small cubes, to fill the cake
Mango Curd
- 125 gr Mango Flesh
- 2 Egg Yolks
- 20 gr Caster Sugar
- 15 ml Lime Juice
- 45 gr Unsalted Butter
- 1 teaspoon Lime Zest, optional
To finish the cake
- 1/2 large Mango, or to taste
- 1/2 teaspoon Lime Zest
- Desiccated Coconut, to taste, optional
Instructions
Coconut Sablé Crust
- Place a large 10 inch / 26 cm cake ring over a small baking tray lined with baking paper (parchment paper) or baking mat.
- Place the Egg Yolks and Icing Sugar in a small mixing bowl and whisk for a couple of minutes until thick. Whisk in the very soft Butter until fully incorporated (see note 1).
- Add the Flour and Desiccated Coconut. Mix with a stiff spatula (or a hand mixer) until the mixture turns into a thick, slightly sticky dough.
- Press the dough at the bottom of the cake ring, using the bottom of a cup or small offset spatula to pack it well into an even layer. Chill for 30 minutes.
- Preheat your oven on 160 degrees Celsius / 325 degrees Fahrenheit. Bake for 30 minutes or until lightly golden. Place the tray on a cooling rack and set aside to cool down completely. Transfer over a serving plate or board. Optionally, place a 5 cm / 2 inch high Acetate Strip (plastic cake collar) on the inside of the cake ring. Set aside.
Mango Mousse
- Blend the mango flesh until completely smooth, using an immersion or regular blender. Place a fine mesh sieve over a small saucepan and pour the mango mixture through it. Discard any bits of un-mixed mango left in the strainer.
- Whisk in the lime juice and sugar. Place on the stove and turn on medium low to medium heat. In the meantime, mix the gelatin powder and cold water in a small bowl. Leave for a couple of minute to bloom the gelatin; it should turn into a thick paste.
- Remove the mango mixture from the heat once it starts to simmer, add the gelatin paste and lime zest and whisk well until the gelatin has been completely dissolved.
- Transfer into a shallow pan (such as a brownie pan or loaf pan – see note 2) and cover with plastic wrap touching the surface. Chill in the fridge for 1 hour, or until it doesn’t feel warm to the touch anymore.
- Place the Cream in a large bowl and whip until you reach stiff peaks using an electric mixer (or with a stand mixer).
- Take the mango mixture out of the fridge and transfer it a clean large bowl (see note 3). Add a little bit of the whipped cream to the bowl with the mango mixture and very gently whisk it in. Switch to a spatula and very gently fold in the rest of the whipped cream in 3 or 4 times. You should get a very light, creamy mixture.
- Pour about half of the mango mousse over the sablé crust. Use a small offset spatula to spread it around into an even layer. Spread the mango cubes over the mango mousse, leaving about 2 cm (3/4 inch) around the edges clear. Top with the second half of the mousse. Spread it with the offset spatula to get an even layer.
- Place in the fridge to set for at least 4 hours – preferably overnight. The mango mousse should have completely set before you add any toppings.
Mango Curd
- Blend the mango flesh until completely smooth, using an immersion or regular blender. Optionally, pour the mango puree through a thin mesh sieve (see note 4) and discard any bits of un-mixed mango.
- Place the egg yolks and sugar in a non-reactive, heavy based saucepan. Whisk to combine, then mix in the mango puree and lime juice.
- Place on the stove and turn on low heat. Stir with a heat-proof rubber spatula or wooden spoon for 3 to 4 minutes to allow for the sugar to fully dissolve. It should start to very slightly thicken (see note 5).
- Add the cubed butter a little bit at a time, stirring until completely melted in the mixture before adding more. Once all incorporated, continue to cook for another 5 to 8 minutes (more or less depending on the heat and size of saucepan). The curd should have thickened and coat the back of a spoon or spatula.
- Pour the cooked mango curd into a clean bowl through a fine mesh sieve and remove any bits of cooked eggs. Mix in the lime zest and allow to cool down slightly, then pour over the set mango mousse layer. Smooth out the curd layer out using a small offset spatula. Chill for 2 hours or until set.
To finish the cake
- Once both layers of mousse and curd have fully set, lift out the cake ring and gently remove the acetate strips.
- Cut some mango flesh into very thin strips. Gently press them in the curd around the edges of the cake, swirling the strips around each other.
- Finish with some lime zest and desiccated coconut sprinkled over the fresh mango ring.
Would you like to save this recipe?
We’ll email this post to you, so you can come back to it later!
Notes
- Make sure the butter is at room temperature and soft or you will struggle to mix it in.
- Using a wide shallow pan will allow for the mixture to cool down more quickly and evenly than inside a bowl (where the centre will remain warm for longer while the mixture on the sides will cool down more quickly).
- If the mixture has started to set, whisk it well to loosen it before adding the whipped cream.
- I personally like to keep some texture inside my curd so I used a rather thick mango puree. If you want a very smooth mango curd, you can blend the flesh for longer, add a little bit of water to it and / or pour it through a thin mesh sieve before using it.
- Make sure not to go over medium heat or the eggs will cook too quickly and start to scramble, resulting in a curdle or lumpy curd. The curd should only simmer and never boil.
Nutrition (per serving)
