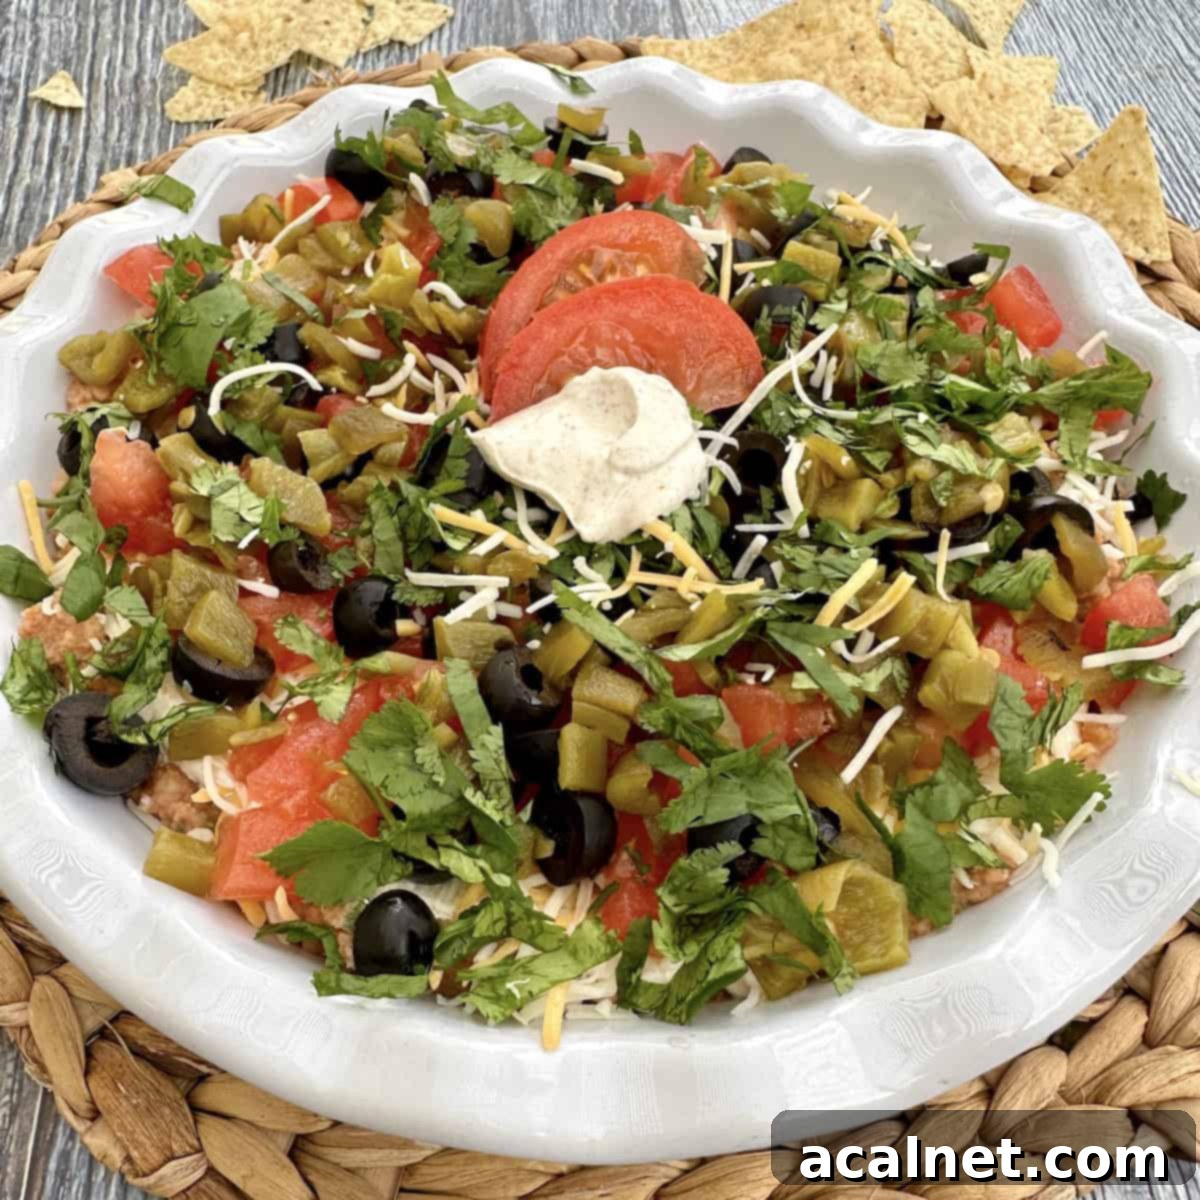
Easy 5 Layer Bean Dip Recipe: The Ultimate Crowd-Pleasing No-Cook Appetizer
Searching for a quick, effortless, yet incredibly delicious appetizer that disappears faster than you can say “fiesta”? Look no further than this fantastic 5 Layer Bean Dip! This timeless classic is consistently a fan-favorite at parties, potlucks, and any gathering, thanks to its vibrant presentation and layers of mouthwatering, taco-inspired flavors. It’s an eye-catching and undeniably delicious way to enjoy the rich taste of bean dip, and the best part? It’s ready in a mere 15 minutes with absolutely no cooking required!
This versatile dip pairs perfectly with a bowl of Homemade Guacamole with Fresh Herbs for an extra layer of flavor and freshness, or alongside creative Individual Charcuterie Cups to round out a spectacular appetizer spread.

Jump to the recipe card for a printable version and full ingredient list.
⭐ Why This 5 Layer Bean Dip Will Be Your New Go-To
This 5 Layer Bean Dip isn’t just a recipe; it’s a culinary lifesaver for hosts and hostesses everywhere. Here’s why it’s guaranteed to become a staple in your entertaining repertoire:
- Effortlessly Easy: With minimal prep and absolutely no cooking required, this layered dip is the epitome of convenience. It’s the perfect last-minute appetizer for unexpected guests, a busy weeknight snack, or a grand holiday feast. You simply layer and serve!
- A Taste of Nostalgia: For many, including my own family, this classic 5 Layer Bean Dip is more than just food; it’s a cherished tradition. Its familiar flavors and festive layers are deeply associated with family gatherings, lively celebrations, and cherished holidays. I’ve prepared this recipe countless times over the years, often alongside hearty dishes like Pinto Bean Chili, delicious Oven-Baked Beef Burritos, and flavorful Easy Mexican Fried Rice. The simple act of serving this dip often sparks fond memories and a comforting sense of tradition.
- The Ultimate Crowd-Pleaser: The irresistible combination of classic Mexican-inspired flavors and universally loved ingredients makes this bean dip incredibly hard to resist. From kids to adults, everyone finds something to love in its harmonious layers. Don’t be surprised if there are rarely any leftovers – it truly vanishes in a flash!
- Customizable and Versatile: While the core five layers are fantastic, this recipe offers endless possibilities for customization. You can easily adapt it to suit different tastes, dietary preferences, or whatever ingredients you have on hand, making it incredibly flexible.
- Visually Stunning: The distinct, colorful layers make this dip a feast for the eyes before it’s even a feast for the palate. It adds a festive touch to any table, proving that delicious food can also be beautiful.
🌮 Essential Ingredients for Your 5 Layer Bean Dip
Gathering your ingredients for this easy layered bean dip is simple. Most items are readily available at any grocery store, ensuring a hassle-free preparation. Here’s a closer look at what you’ll need to create this amazing no-cook appetizer:
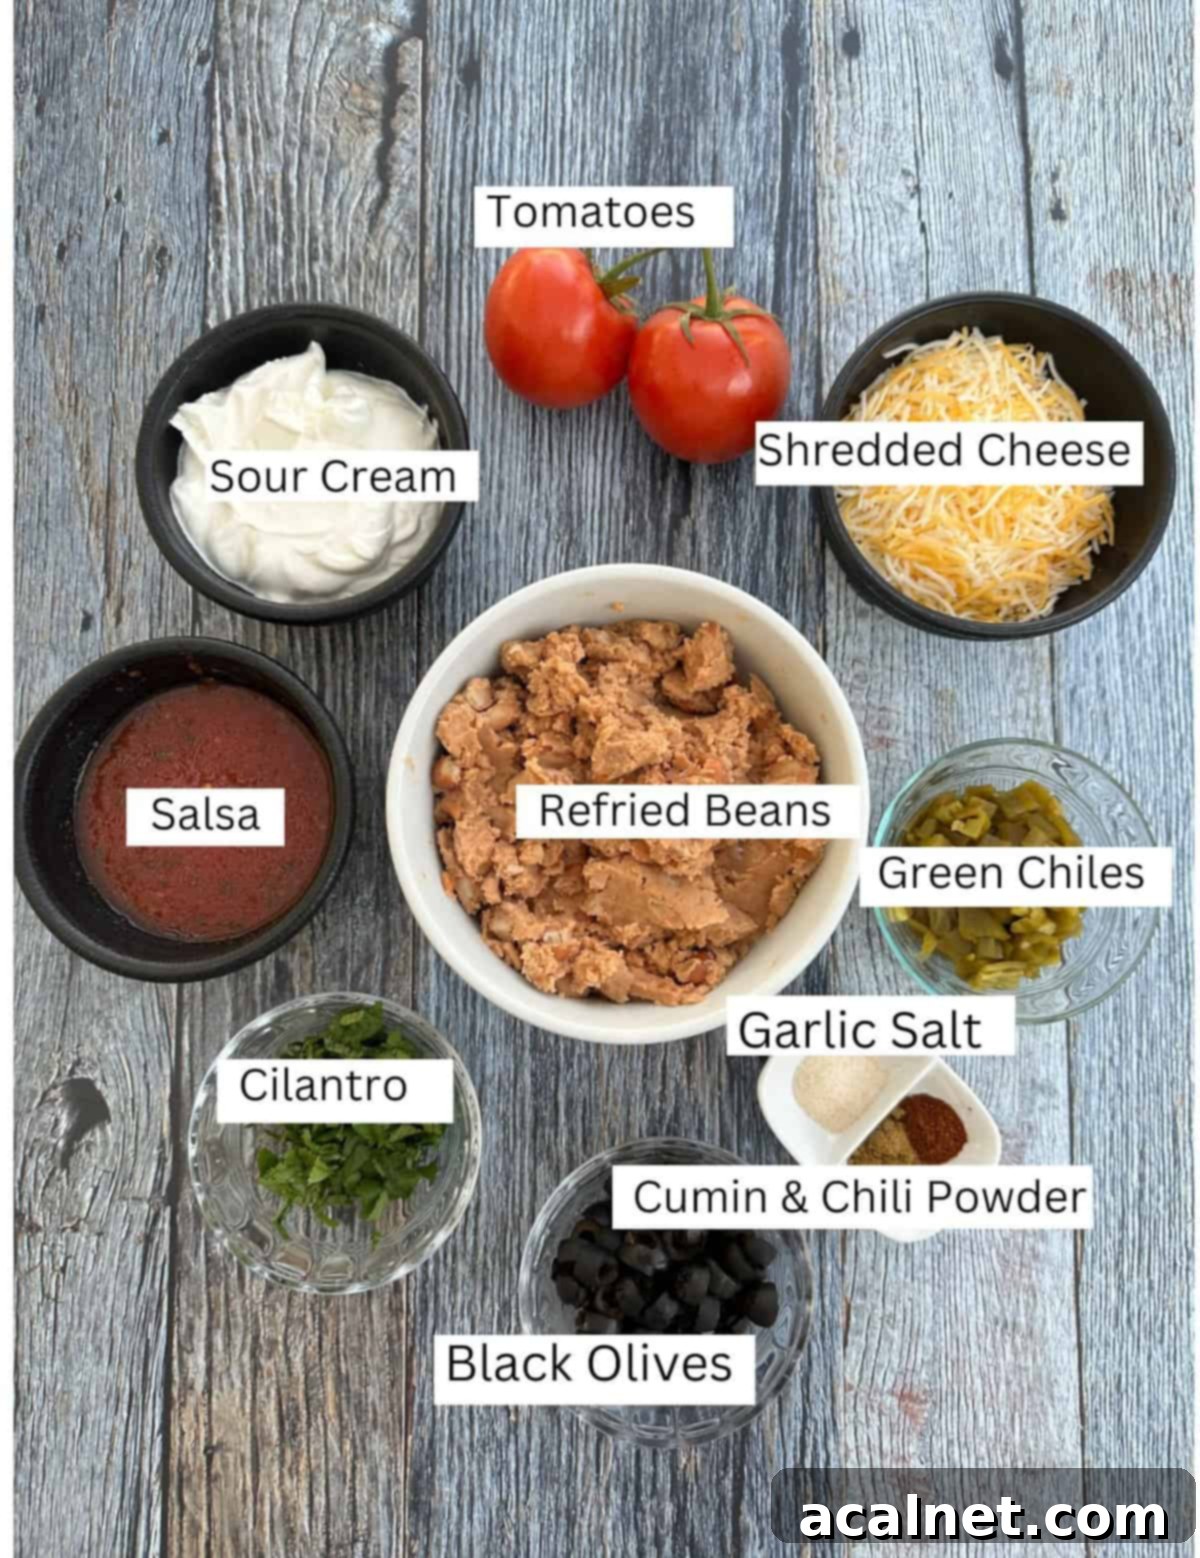
- Refried Beans: The foundation of our delicious dip! While traditional refried pinto beans are common, you have options. I often use (affiliate link) vegetarian-style refried beans for a lighter touch, but refried black beans also offer a wonderful, slightly different flavor profile. Feel free to use your favorite brand or even homemade refried beans if you have them.
- Salsa: This adds a vibrant, zesty kick to the refried bean base. Choose your preferred heat level and chunkiness. A medium chunky salsa works wonderfully here, but mild or spicy varieties are great too.
- Sour Cream: This creates the second, deliciously creamy layer. We elevate its flavor by blending it with a simple yet effective spice mix of garlic salt, chili powder, and cumin. For a healthier twist, you could easily swap the sour cream for Greek yogurt, which provides a similar tang and creaminess. Dairy-free alternatives like coconut or almond-based yogurts can also be used for those with dietary restrictions.
- Shredded Cheese: A generous layer of cheese is essential for any great dip! My go-to is store-bought Mexican Style 4 Cheese Blend (typically a mix of Monterey Jack, Cheddar, Asadero, and Queso Quesadilla) for its perfect melt and balanced flavor. However, feel free to get creative! Sharp Cheddar, Colby Jack, or Pepper Jack (for an extra kick) are all fantastic options. Truly, use whatever type of shredded cheese you have on hand – it will still be delicious!
- Diced Tomatoes: Freshly diced tomatoes add a burst of juicy freshness and color to the top layer.
- Sliced Black Olives: Briny and earthy, sliced black olives are a classic topping that complements the other flavors beautifully.
- Canned Green Chiles: These add a subtle, mild heat and authentic Mexican flavor to the dip. They’re usually found in the ethnic food aisle.
- Fresh Cilantro (Optional): For a final flourish and a burst of herbaceous freshness, a sprinkle of chopped fresh cilantro is highly recommended. If you’re not a fan, feel free to omit it.
Many years ago, my kids affectionately called this “walking taco dip” because of how we often served it at parties. They’d pile large scoops onto a plate, grab a few tortilla chips, and enjoy a portable, deconstructed taco experience while mingling and having fun!
For a comprehensive list of ingredients with precise measurements, please scroll down to the printable recipe card below.
📖 Creative Substitutions & Delicious Variations
One of the absolute best things about this Mexican-inspired bean dip is its incredible versatility. It’s a fantastic canvas for experimentation, allowing you to customize the flavors to perfectly suit your family’s preferences or what you have available. Don’t be afraid to try new combinations! Here are some ideas to get you started:
Layer Swaps & Additions:
- Salsa Exploration: Instead of regular salsa, try different varieties to add unique flavor and texture. Think sweet and spicy mango salsa, smoky roasted tomato salsa, or a vibrant fresh pico de gallo for an extra burst of freshness.
- Olive Adventures: While black olives are traditional, swap them for sliced green olives for a different briny taste. If you’ve recently made Easy Edamame Salad and have Kalamata olives on hand, their tangy, robust flavor would be an exciting addition.
- Onion Power: For an extra kick, or in addition to the green chiles, finely diced red onions or thinly sliced green onions (scallions) can add a delightful sharpness and crunch.
- Jalapeño Zing: To introduce a spicy kick, sprinkle finely diced fresh or pickled jalapeño peppers over the shredded cheese layer. For a more integrated heat, you can even stir them into the refried bean and salsa mixture.
- Guacamole Layer: Absolutely! A creamy layer of guacamole is a popular addition, often turning this into a 7-layer dip. I recommend adding it on top of the refried bean and salsa layer, before the sour cream, to help keep it from browning by minimizing air exposure.
- Seasoned Ground Meat: For a heartier dip, add a layer of seasoned ground beef or turkey (taco-seasoned). This would typically go after the refried beans.
- Crisp Lettuce: Finely shredded iceberg or romaine lettuce can be added as a fresh, cool layer, usually as the final topping.
Flavor Enhancements:
- Taco Seasoning Shortcut: If you have a favorite store-bought taco seasoning blend, you can easily swap out the individual garlic salt, cumin, and chili powder. Use about 1 to 1.5 tablespoons of taco seasoning in the sour cream mixture for a consistent flavor. For homemade goodness, try our Homemade Taco Seasoning!
- Spicy Sour Cream: Add a dash of hot sauce (like Tabasco or Cholula) to your sour cream mixture for an extra layer of heat.
- Cream Cheese Base: For an even richer, tangier sour cream layer, blend in a few ounces of softened cream cheese before adding the spices.
🥗 Simple Step-by-Step Instructions to Make 5 Layer Bean Dip
Creating this delicious 5 Layer Bean Dip is incredibly straightforward. Just follow these easy steps for a perfect, layered appetizer every time:
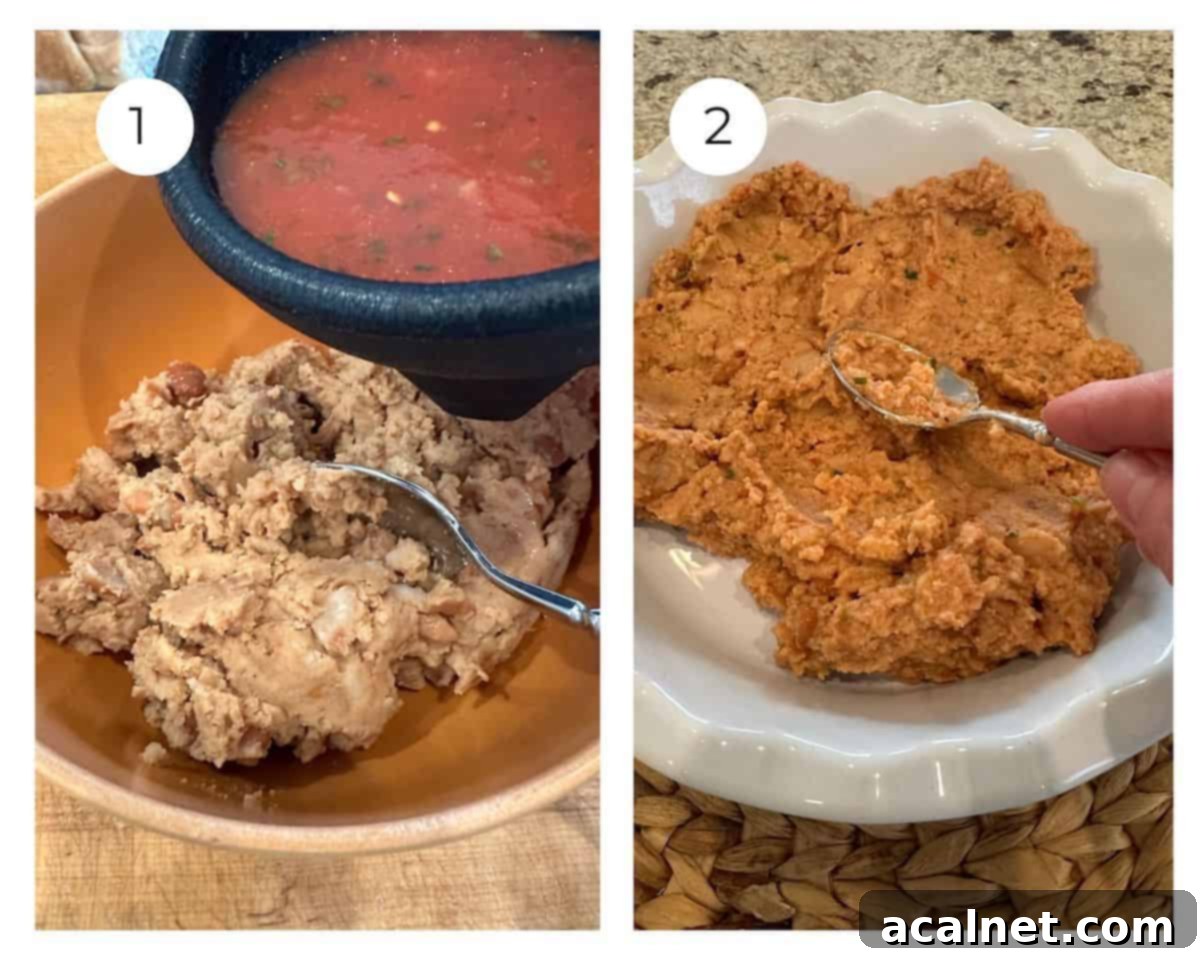
Step 1: Combine the Bean Base. Empty the contents of your canned refried beans into a medium-sized mixing bowl. Add the salsa and stir well to thoroughly combine. This ensures every bite of your base layer is flavorful. (Photo #1)
Step 2: Spread the First Layer. Evenly spread the bean and salsa mixture into your chosen serving dish. A pie plate or a shallow 9″x9″ baking dish works perfectly. Use the back of a spoon to create a smooth, even layer across the bottom of the dish. (Photo #2)
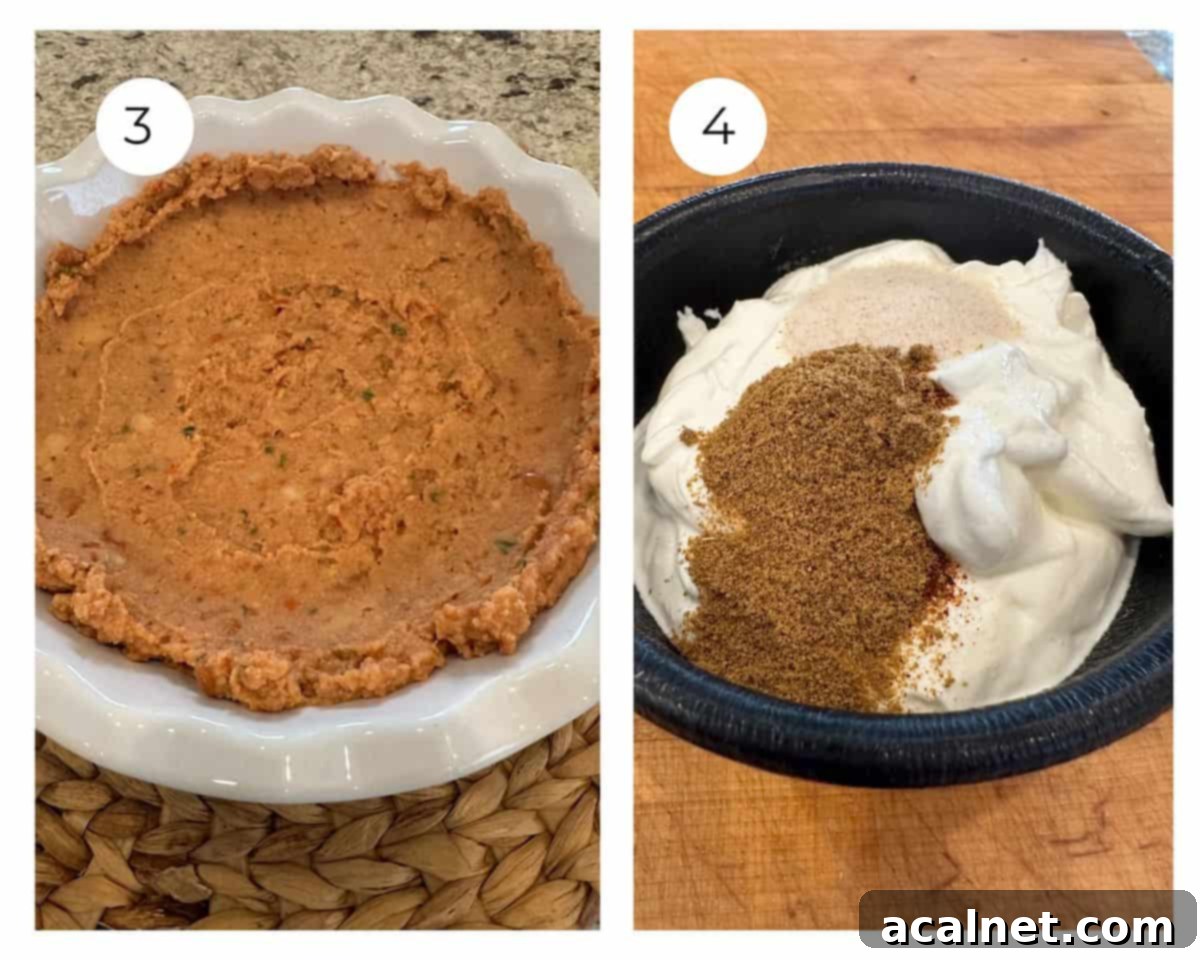
Step 3: Edge It Up (Optional). If you’re using a pie dish, you can gently spread the refried beans slightly up the angled sides of the dish. This creates a visually appealing edge for your layers. (Photo #3)
Step 4: Prepare the Sour Cream Layer. In a separate small bowl, combine the sour cream with the garlic powder, chili powder, and cumin. Stir until all the spices are well incorporated, creating a flavorful, creamy mixture. (Photo #4)
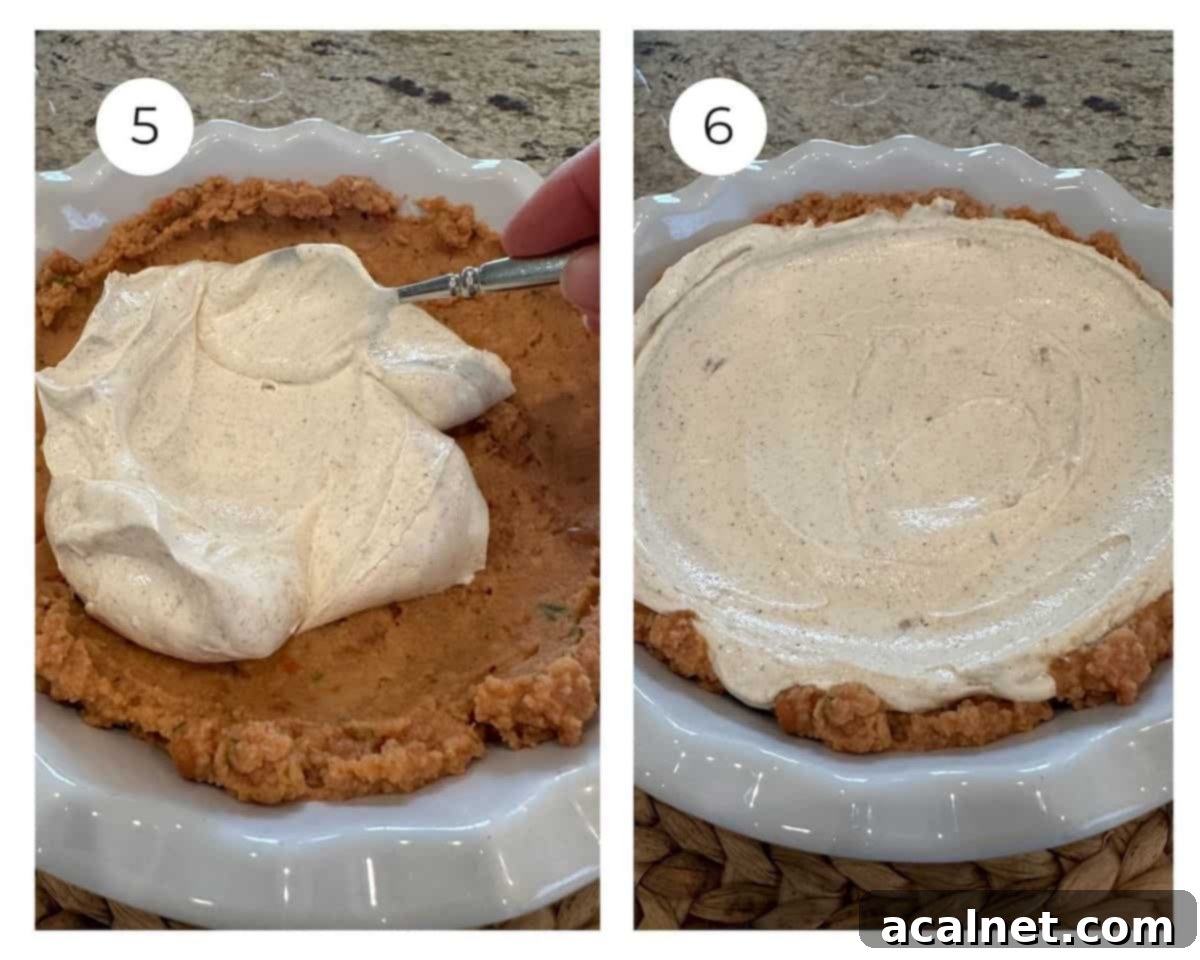
Step 5: Add the Sour Cream. Carefully spoon all of the seasoned sour cream mixture directly on top of the refried bean layer in your serving dish. (Photo #5)
Step 6: Spread Evenly. Gently spread the sour cream to the edges of the dish, ensuring it completely covers the refried beans. Take care to spread it smoothly without mixing the two layers, maintaining those distinct, beautiful lines. (Photo #6)
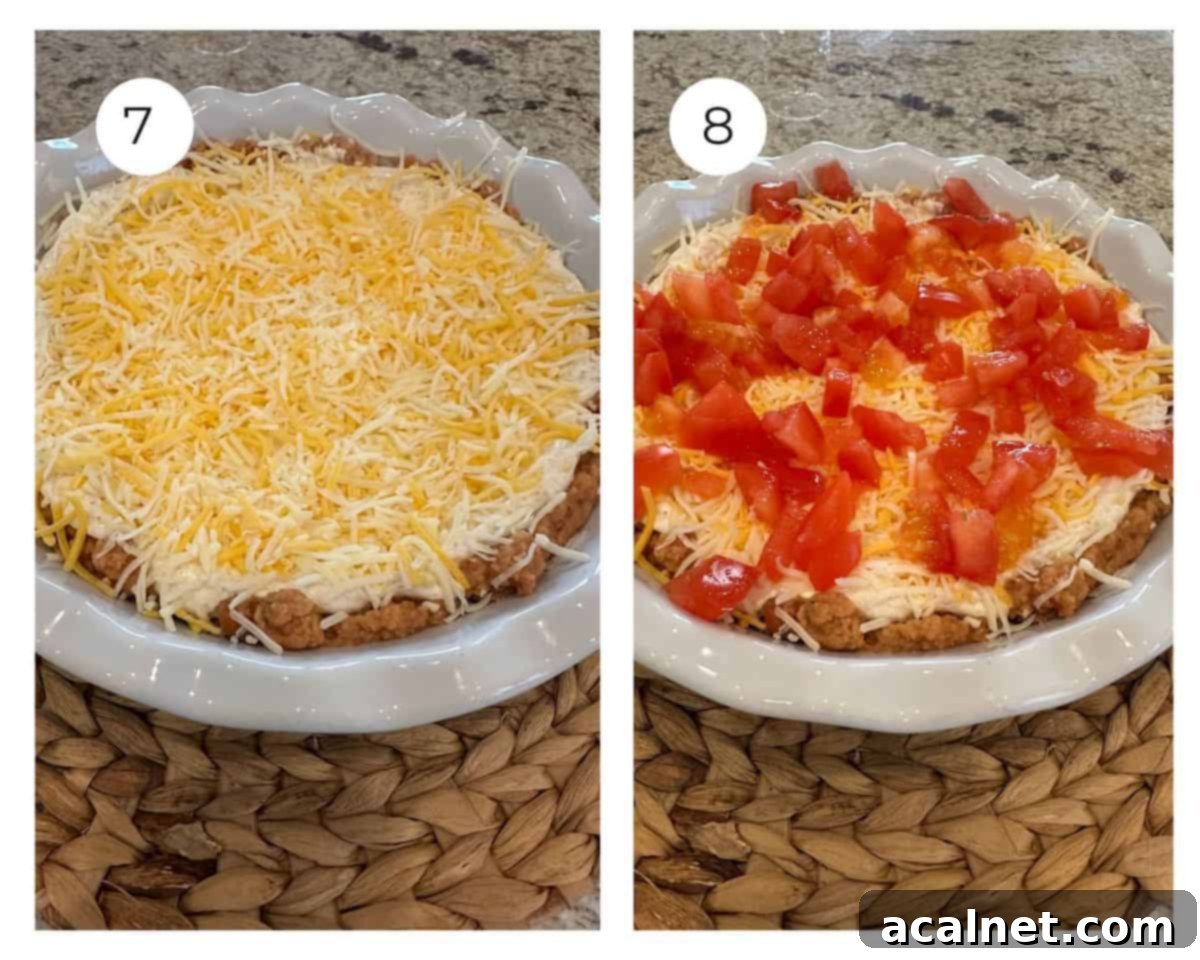
Step 7: Sprinkle with Cheese. Generously sprinkle the shredded cheese over the sour cream layer. This creates a delightful cheesy topping and acts as a barrier for the wetter ingredients. (Photo #7)
Step 8: Add the Tomatoes. Distribute the diced tomatoes evenly on top of the shredded cheese. (Photo #8)
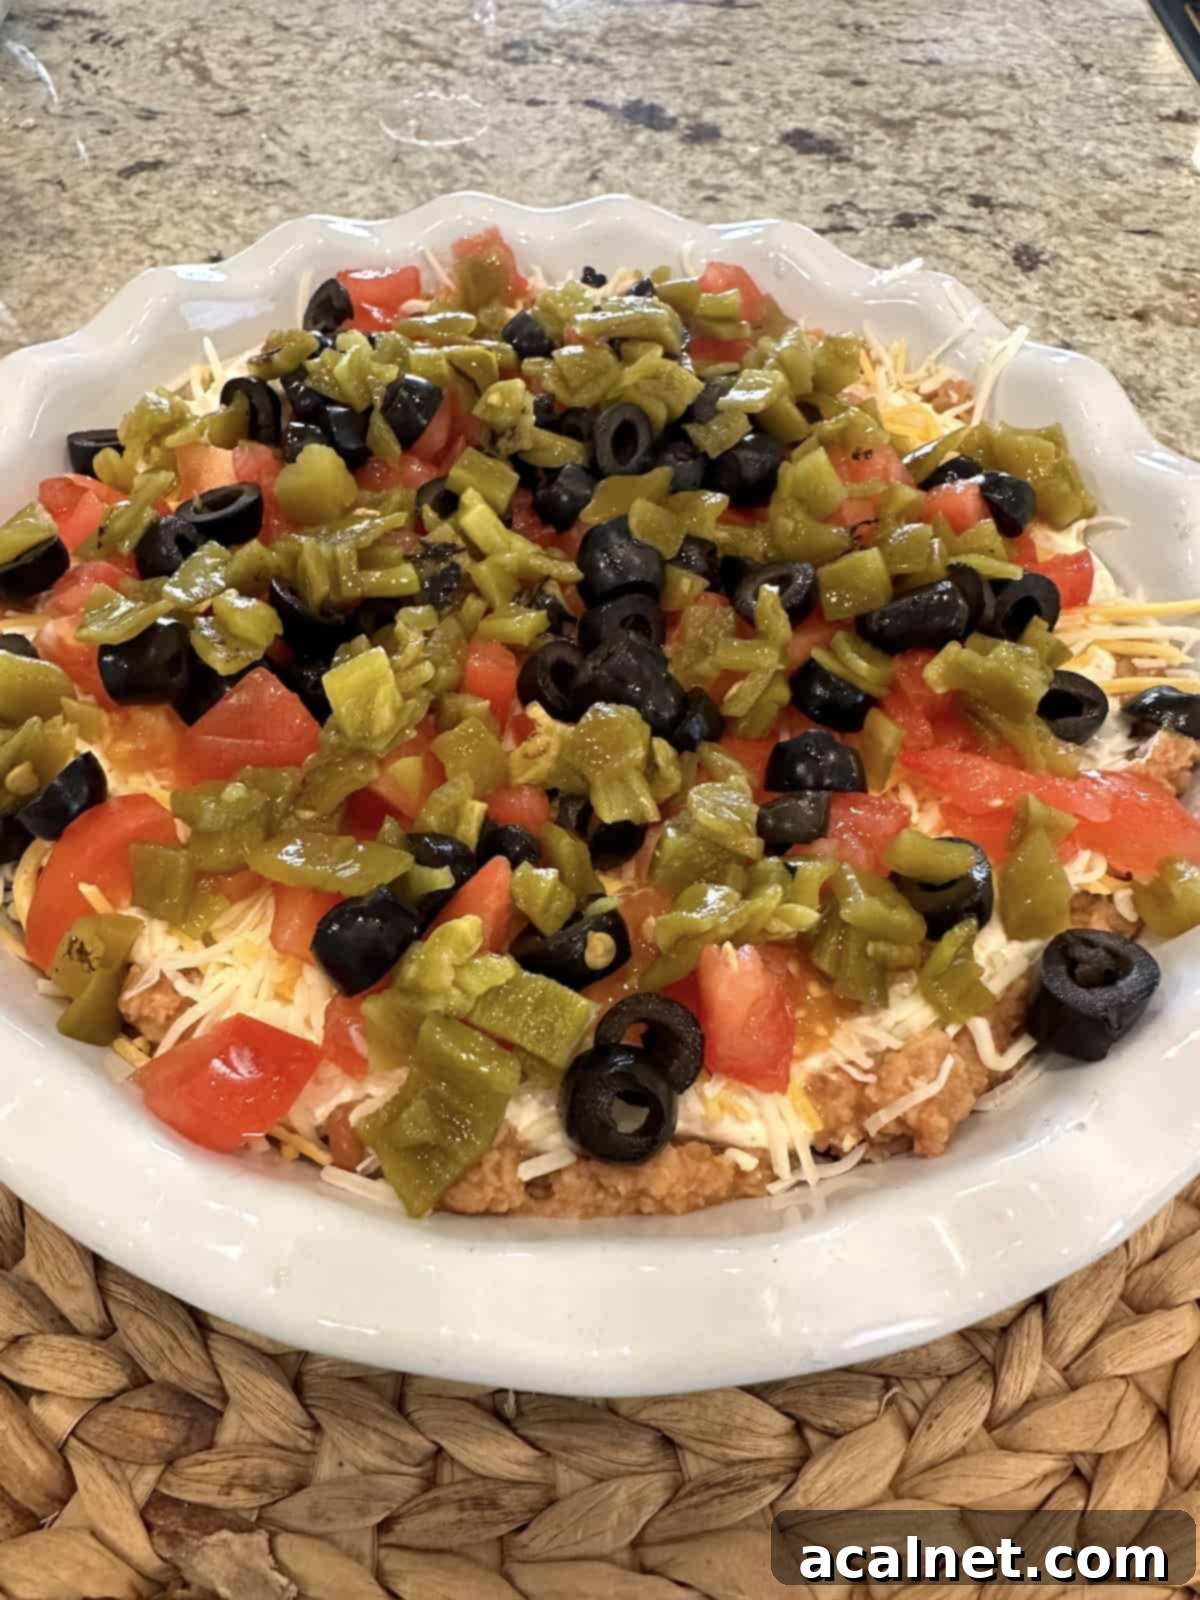
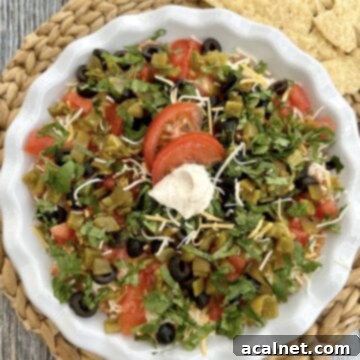
Step 9: Finish with Toppings. For your final layer, evenly spread the green chiles and sliced olives over the tomatoes and cheese. If you love cilantro, sprinkle the fresh chopped cilantro on top for a bright, fresh finish. Your beautiful 5 Layer Bean Dip is now ready to chill and serve!
Tips for the Best Layered Bean Dip:
- Chill Time is Key: While the dip is ready in 15 minutes, allowing it to chill in the refrigerator for at least 30 minutes (or even a few hours) before serving lets the flavors meld beautifully and makes the layers firmer and easier to scoop.
- Even Layers: Take a moment to spread each layer evenly. This ensures every scoop gets a taste of all five delicious components.
- Gentle Spreading: When adding the sour cream layer, be gentle to avoid mixing it into the bean layer, which keeps your dip looking neat and appealing.
- Fresh Ingredients: While canned items are convenient, using fresh, high-quality toppings like ripe tomatoes and vibrant cilantro can really elevate the taste.
- Serving Dish: A clear glass pie plate or a shallow dish allows guests to admire the beautiful layers, adding to the appeal of your appetizer.
💭 Common Questions About 5 Layer Bean Dip
Absolutely! Guacamole is a fantastic addition. I suggest adding it on top of the refried bean and salsa layer and before you add the sour cream. This strategic placement helps to keep air away from the guacamole, which in turn helps to prevent it from turning brown and keeps it looking fresh.
The refried beans are perfectly ready to eat straight from the can, so there’s no need to heat them unless you prefer a warm base layer. Having a warm bottom layer can be a very tasty option, especially on a chilly day, but it’s entirely optional for this no-cook recipe.
Yes, absolutely! This layered bean dip is an excellent make-ahead appetizer. You can assemble all the layers, then simply cover the dish tightly with plastic wrap and refrigerate it. It will be perfectly fresh and delicious when you are ready to serve and enjoy it the next day.
Over the years of making this dip countless times, I found that when salsa was spread as its own distinct layer, it was often too easy to smear it into the sour cream layer during spreading or scooping, making the layers look messy. By blending the beans with the salsa, we still get all that fantastic flavor and moisture, but we also get to maintain the beautiful, clean separation of the layers, which is great for presentation!
Sure thing! While I prefer to put the cheese below the wet toppings (like diced chiles, black olives, and cilantro) because it creates a nice barrier and prevents those moist ingredients from making the sour cream watery, cheese on top is an equally delicious and common way to serve this dip. It’s all about personal preference!
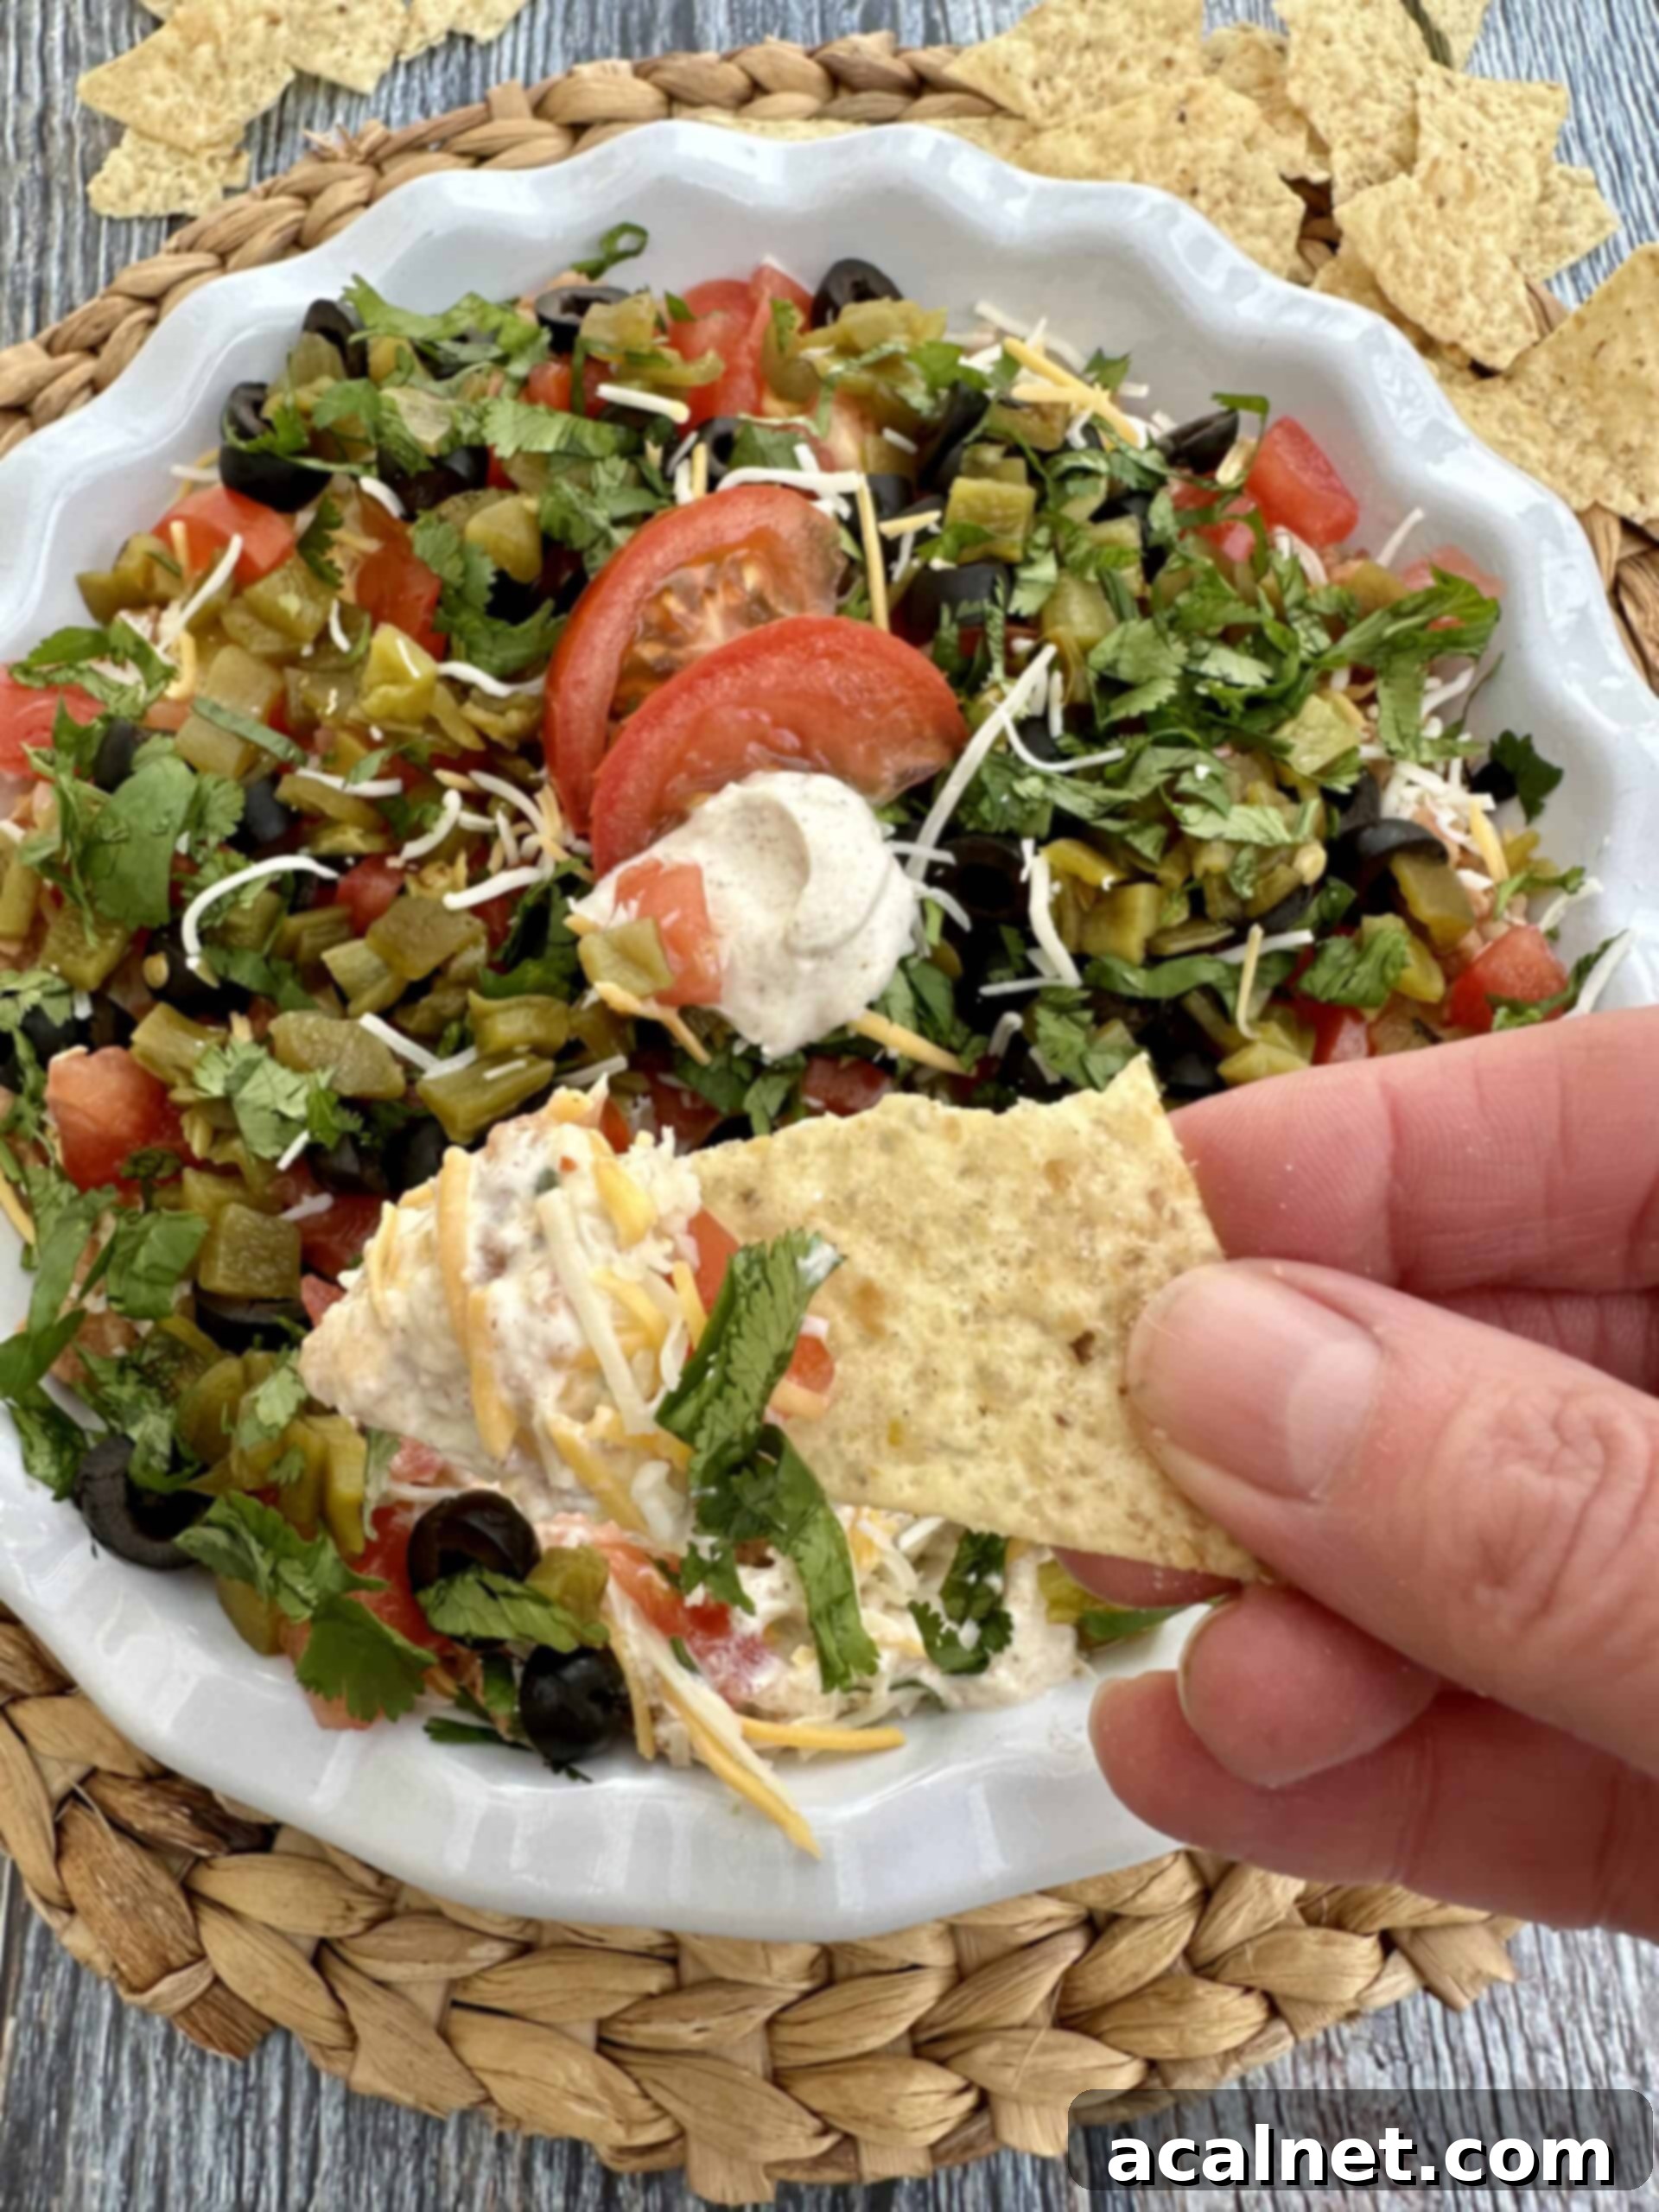
🌮 The Best Dippers to Serve with 5 Layer Bean Dip
No delicious dip is complete without the perfect dippers! The right accompaniment can truly elevate the experience of enjoying this amazing 5 Layer Bean Dip. Here are some of our favorite options:
- Tortilla Chips: This is, without a doubt, the classic and most natural choice for dipping. Their salty crunch provides the ideal texture contrast and enhances the taco-like flavors of the dip. They are sturdy enough to scoop up a generous portion of each layer.
- Pita Chips: Offering a slightly different texture than tortilla chips, pita chips are another excellent choice. They are generally thicker and sturdier, making them fantastic for scooping up a hearty serving of this rich bean dip without breaking. Their mild flavor won’t overpower the dip.
- Sturdy Potato Chips: Don’t underestimate the power of a good potato chip! Be sure to opt for a sturdy, thicker-cut variety that can withstand the weight of the dip. The salty, savory flavor of potato chips actually complements the Mexican-inspired flavors in the bean dip surprisingly well, offering a unique and satisfying combination.
- Fresh Vegetable Sticks: For those looking for a lighter, healthier option or a refreshing crunch, fresh vegetables are a wonderful accompaniment. Serve with crisp carrot and celery sticks, colorful green or red bell pepper strips, and refreshing cucumber slices. Jicama sticks also offer a fantastic, slightly sweet crunch. These not only add vibrant color but also a healthy counterpoint to the rich dip.
- Crackers: Various types of crackers, especially sturdy, plain varieties, can also make excellent dippers, providing a different kind of crispness.
Pro Tip: For an added visual appeal and variety in taste, consider serving your 5 Layer Bean Dip with a mix of both white and blue corn tortilla chips. The different colors add a festive touch to your appetizer spread!
🥣 Leftovers and Storage Tips
While it’s highly unlikely that you’ll have any of this delicious 5 Layer Bean Dip left over, in the rare event that the entire dish isn’t gobbled up by enthusiastic guests, proper storage is key to enjoying it later. Here’s how to handle any remaining dip:
- Refrigeration: Promptly cover any leftover dip tightly with plastic wrap, ensuring it seals well to prevent air exposure. Place the dish in the refrigerator immediately. The plastic wrap helps to keep the layers fresh and prevents the top layers from drying out or absorbing refrigerator odors.
- Enjoy Quickly: For the best flavor and freshness, we recommend enjoying any leftovers within two days. The dip is at its peak quality when fresh, but it will still be delightful for a couple of days in the fridge.
- Reviving Leftovers: If the dip has been sitting for a while, you might find the sour cream layer has slightly firmed up or the tomatoes have released a little moisture. A gentle stir of the top layer (if preferred) or simply letting it sit at room temperature for 10-15 minutes before serving can help. Avoid reheating the entire dip, as it can change the texture of the sour cream and cheese.
- Not Freezer-Friendly: This particular dip does not freeze well. The dairy components (sour cream, cheese) tend to separate and become watery upon thawing, and the fresh vegetables lose their crispness. It’s best enjoyed fresh or from the refrigerator within a couple of days.
🍽 More Delicious Appetizer Recipes to Explore
Without a doubt, this 5 Layer Bean Dip is an easy, incredibly delicious, and universally loved family-favorite recipe. But if you’re looking to expand your appetizer repertoire even further, we have plenty of other exciting options! For instance, another spicy appetizer that consistently receives rave reviews are our Jalapeno Bacon Mummies, which offer a whimsical and savory spin on classic jalapeño poppers. Here are a few more fantastic recipes for you and your guests to enjoy:
- Delicious Crab and Shrimp Dip
- Spiced Walnuts
- Shrimp Cocktail Cups
- Pickle de Gallo Recipe
If you tried this incredible Easy 5 Layer Bean Dip or any other recipe from my website, please consider leaving a 🌟🌟🌟🌟🌟 star rating and a comment below to let me know how it turned out. Your feedback is greatly appreciated!
Printable Recipe Card
5 Layer Bean Dip
Print
Rate
Pin Recipe
Ingredients
- 1 16 ounce can refried beans
- ½ cup salsa
- 1 cup sour cream
- ½ teaspoon garlic salt – – you can substitute the garlic salt, cumin and chili powder for 1 ½ teaspoons of Homemade Taco Spice.
- ½ teaspoon cumin
- ¼ teaspoon chili powder
- 1 cup Mexican Style 4 Cheese Blend – or any shredded cheese of your choice such as Cheddar or Monterey Jack
- 1 cup diced tomato
- 1 2.25 ounce can sliced black olives
- 1 4 ounce can green chiles
- ½ cup fresh cilantro, chopped
Instructions
Prepare the Base and Creamy Layer
- Empty the can of refried beans into a medium-sized bowl. Add the salsa and stir thoroughly until well combined. Spread this bean and salsa mixture evenly into a pie plate or a shallow 9″x9″ baking dish, ensuring it forms a smooth bottom layer.
- In a separate small bowl, blend the sour cream with the garlic salt, cumin, and chili powder until smooth. Carefully spoon this seasoned sour cream mixture over the refried beans, spreading it gently to the edges of the dish. Be careful not to mix the two layers to maintain a clear separation.
Build the Topping Layers
- Sprinkle the shredded Mexican style 4 cheese blend (or your chosen shredded cheese) evenly across the top of the sour cream layer.
- Drain the canned, sliced black olives thoroughly and then spread them evenly over the layer of shredded cheese.
- Dice the fresh tomato into very small, bite-sized chunks for easy scooping. Spread these diced tomatoes on top of the olive layer.
- Evenly spread the canned green chiles over the diced tomatoes. Finish by sprinkling the chopped, fresh cilantro (if using) as the final, vibrant topping.
Chill and Serve
- Cover the assembled dip with plastic wrap and refrigerate for at least 30 minutes, or until you are ready to serve. This allows the flavors to meld and the layers to set. Enjoy with crunchy tortilla chips, sturdy crackers, fresh chopped vegetables, or thick-cut potato chips.
Notes
Serve this versatile dip with plenty of crunchy crackers, an assortment of sliced fresh vegetables, and consider adding a side of our Homemade Herb and Garlic Dip for even more dipping options!
Please note, the nutrition details are estimated using a food database, so they’re just a rough estimate, not an exact science.
