Light & Zesty Lemon Mousse with Tangy Lemon Curd: The Ultimate Refreshing Dessert
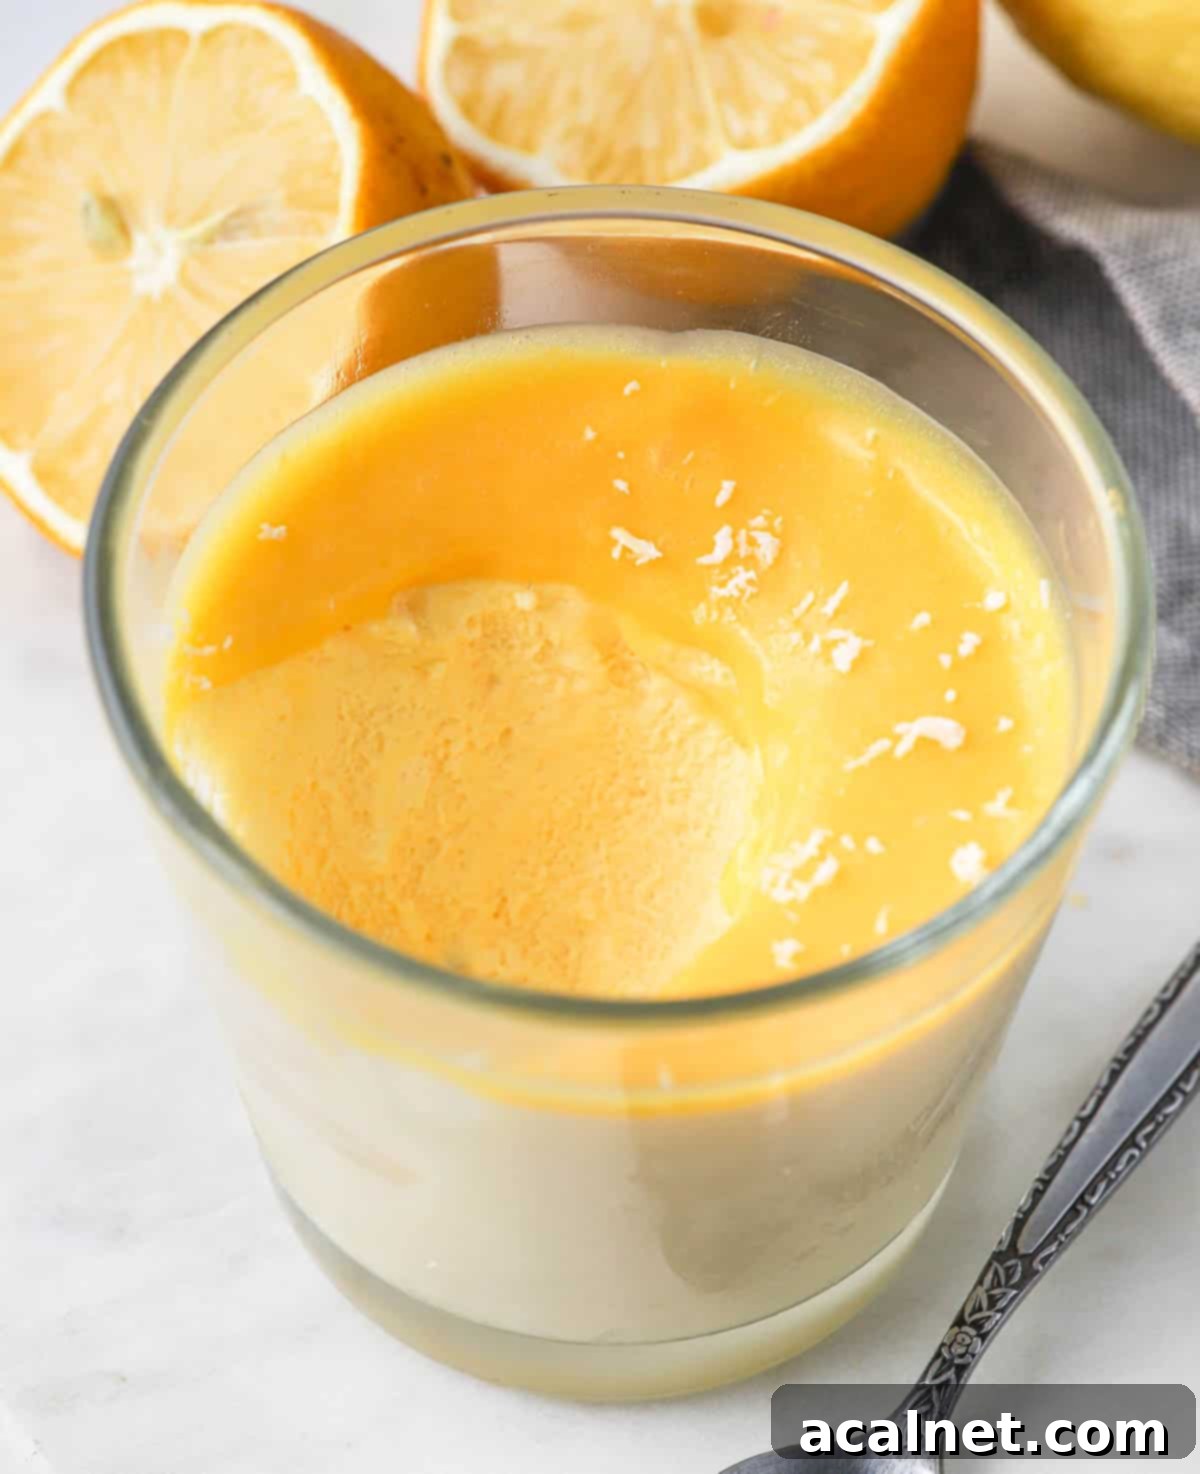
Indulge in the ultimate refreshing treat with this exquisite Lemon Mousse recipe, elegantly topped with a vibrant, tangy lemon curd. This dessert is designed to be super light and airy, making it the perfect cool companion for a warm day. Whether you’re hosting a sophisticated dinner party or simply craving a creamy, yet invigorating dessert, these lemon mousse cups promise to impress with their delicate texture and bright, zesty flavor profile.

Why You’ll Adore This Lemon Mousse Recipe
When the sun is shining and temperatures rise, a heavy or overly rich dessert is often the last thing anyone craves. That’s where these exquisite Lemon Mousse cups shine! They are the epitome of light, refreshing, and utterly delightful. What’s even better is how deceptively simple they are to prepare, yet they boast an elegant presentation that will undoubtedly impress your guests at your next dinner party or gathering.
This recipe delivers a dessert that is:
- Incredibly Light & Creamy: The mousse itself is remarkably airy, melting in your mouth with every spoonful.
- Perfectly Tangy: With just the right amount of tartness from fresh lemons, it’s a vibrant explosion of flavor. We keep the added sugar relatively low, allowing the natural lemon zing to truly stand out.
- Effortlessly Elegant: Despite its simple preparation, the layered look with the glistening lemon curd topping makes this dessert feel sophisticated and special.
- Made with Few Ingredients: The base lemon mousse requires only 5 core ingredients, keeping the process streamlined and accessible.
- Make-Ahead Friendly: You can prepare these cups in advance, allowing them to chill perfectly in the fridge until you’re ready to serve, making entertaining a breeze.
- Customizable: While a homemade Tangy Lemon Curd elevates this dessert, a store-bought version can be used for an even quicker preparation, saving you valuable time.
- Unforgettable Freshness: Prepare to experience one of the freshest desserts you’ve ever tasted, leaving you feeling invigorated and satisfied without the heaviness.
Are you a fan of light, airy desserts?
Explore my curated collection of 15+ delicious Mousse Recipes for more delightful inspiration!
Essential Ingredients for Your Zesty Lemon Mousse
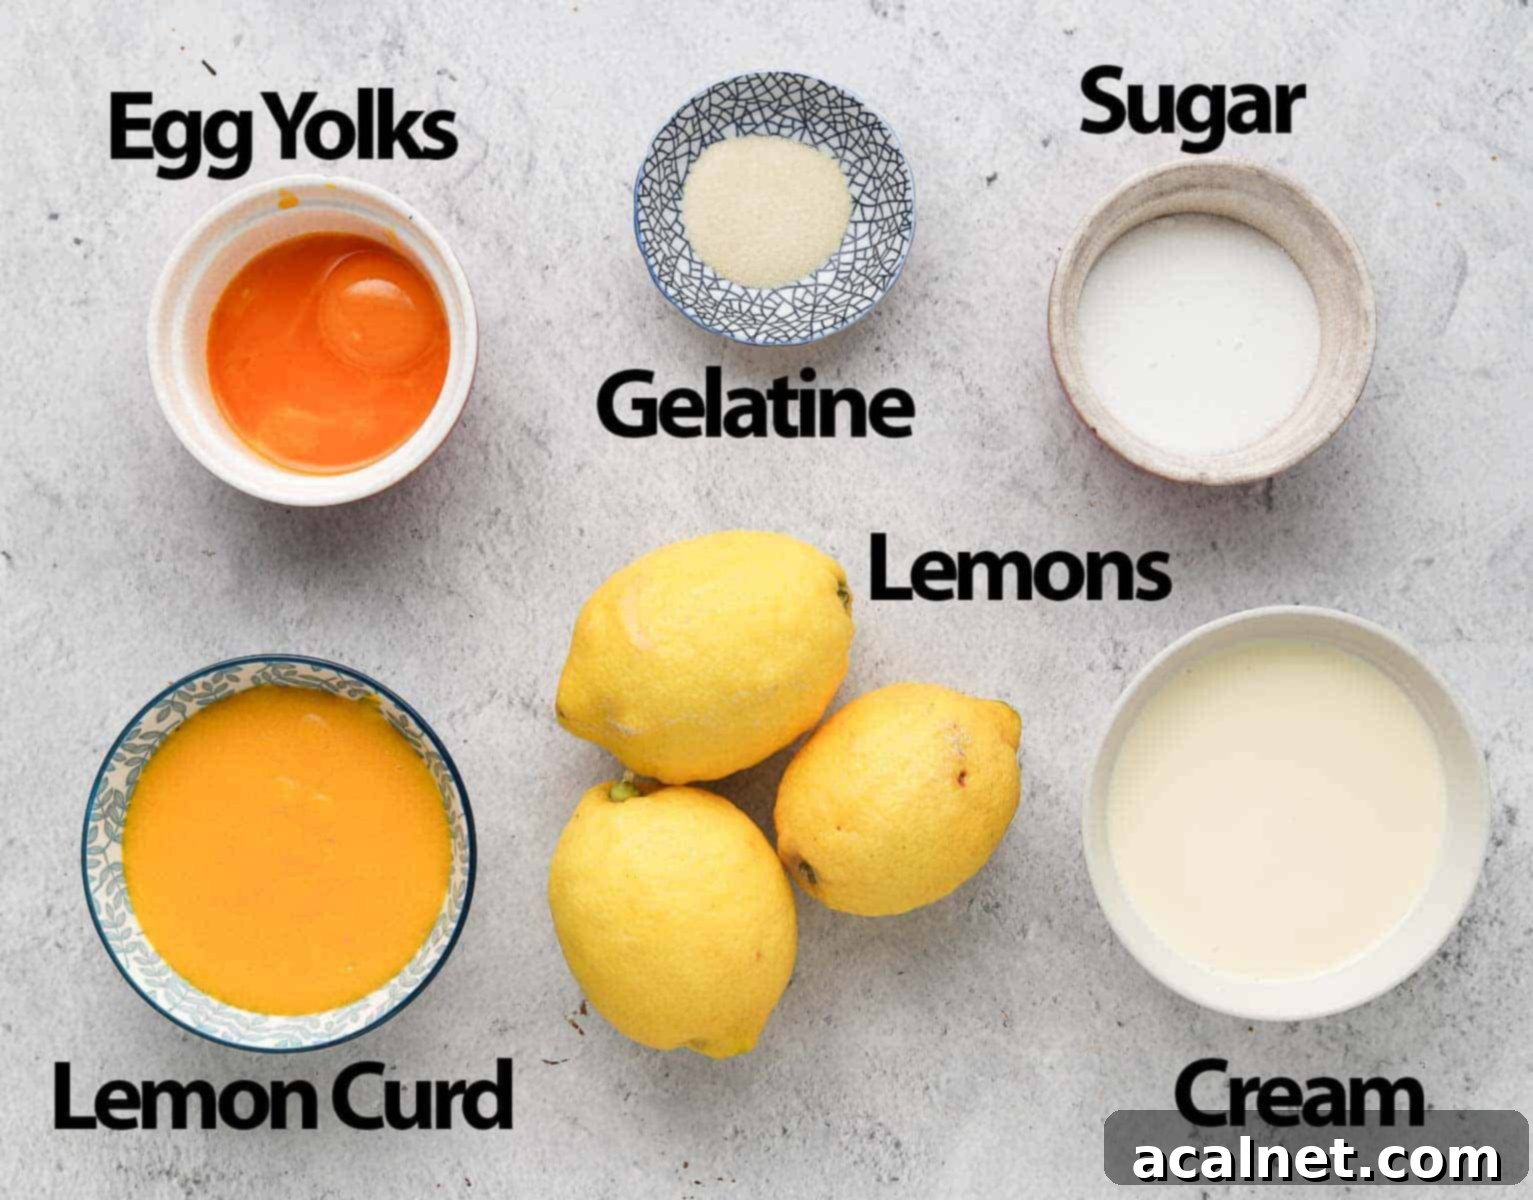
The core of this lemon mousse recipe shares similarities with a classic Lemon Bavarian Cream, providing a wonderfully smooth and rich base, much like the one featured in this Lemon Meringue Cake. What makes it even better is that the mousse layer is crafted from just five fundamental ingredients, ensuring simplicity without compromising on flavor or texture. (For precise quantities, please refer to the detailed recipe card below.)
For the Lemon Mousse:
- Fresh Lemons: You’ll need both the aromatic zest and the tangy juice. Always opt for fresh, unwaxed lemons for the best flavor and fragrance. Zest them before juicing!
- Egg Yolks: These are crucial for creating a rich, smooth custard base and act as a natural thickener when gently cooked. Remember to save those egg whites for other delightful recipes, such as light and chewy Financiers Cakes or meringues!
- Caster Sugar: Also known as fine white granulated sugar, caster sugar dissolves quickly and evenly, ensuring a silky smooth mousse without any graininess. If you prefer a sweeter dessert, you can slightly increase the quantity.
- Gelatine: This ingredient is key to achieving the mousse’s stable yet delicate, airy texture. I typically use gelatine powder, which needs to be “bloomed” in cold water first. If using gelatine sheets, simply rehydrate them in very cold water as per package instructions. For tips on making this recipe without gelatine, check our FAQs section below.
- Heavy/Thickened Cream: For a successful whip, ensure your cream has at least 30% fat content. Look for “Heavy Cream,” “Whipping Cream,” or “Thickened Cream.” Always use very cold cream for the best results when whipping.
For the Tangy Lemon Curd Topping:
While a high-quality store-bought lemon curd is a convenient option, I highly recommend making your own Tangy Lemon Curd for an unparalleled fresh taste and to control its sweetness level. My homemade curd combines: Lemon Juice & Zest, Egg Yolks, Caster Sugar, and a touch of Unsalted Butter for richness and shine.
How to Make the Perfect Lemon Mousse: A Step-by-Step Guide
Creating this delightful lemon mousse involves a few key stages, but each step is straightforward and rewarding. Remember, the mousse needs time to chill and set, so planning ahead is essential!
Phase 1: Preparing the Lemon Mousse Base
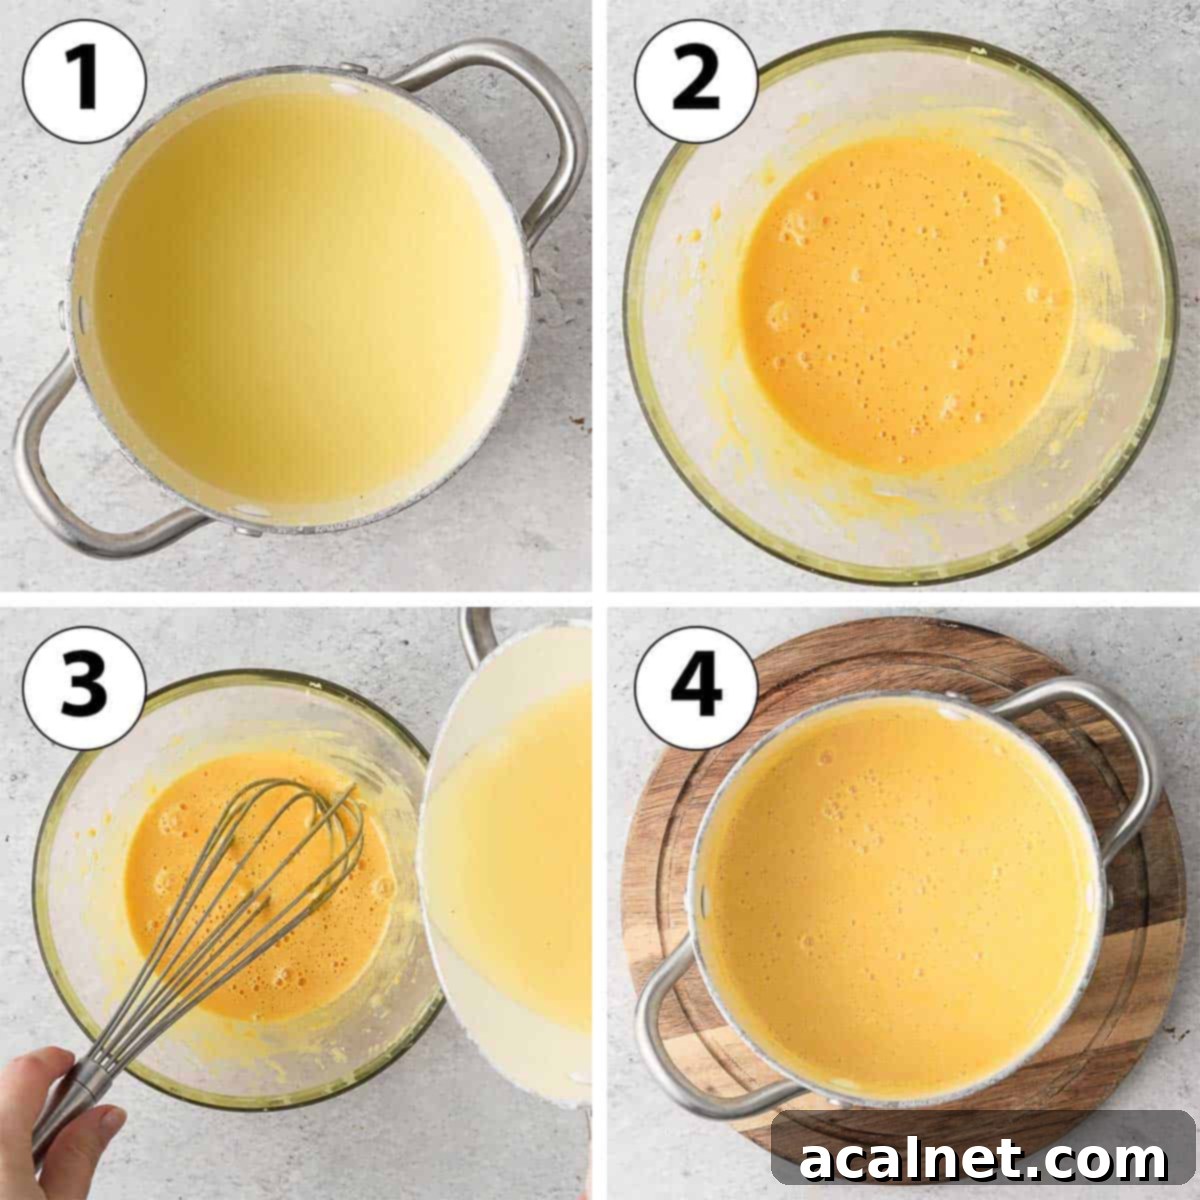
- Bloom the Gelatine: In a small, cold bowl, sprinkle the gelatine powder over the recommended amount of cold water (check your gelatine package for exact quantities; usually about 1 tablespoon per teaspoon of powder). Stir briefly and set aside for 5-10 minutes to allow it to bloom and thicken into a paste.
- Combine Dry Ingredients & Zest: Grate the zest from your lemon directly into a heat-proof mixing bowl. Add the egg yolks and caster sugar to the bowl. Whisk these ingredients vigorously until the mixture is pale yellow and slightly thickened. This process is called creaming, and it helps create a smooth base.
- Prepare Lemon Juice: Pour the fresh lemon juice into a medium-sized pot. Heat it gently over medium-low heat until it just begins to simmer, showing tiny bubbles around the edges.
- Temper the Egg Yolks: This is a crucial step to prevent the egg yolks from scrambling. Slowly and gradually pour the hot lemon juice into the egg yolk mixture while continuously whisking. Whisk well until fully combined, then transfer the entire mixture back into the pot.
- Cook the Lemon Cream: Return the pot to medium-low heat. Continuously stir the mixture with a whisk or a rubber spatula. It will slowly thicken. You’re looking for a consistency that lightly coats the back of a spoon (the “nappe” stage). To test, dip the back of a spoon into the cream, draw a horizontal line across it with your finger (be careful, it’s hot!), then tip the spoon downwards. If the line remains clear and the cream doesn’t run back into it, it’s ready. Alternatively, use a food thermometer; it should reach approximately 82°C / 180°F.
- Dissolve Gelatine & Chill: Immediately remove the pot from the heat. Add the bloomed gelatine paste directly into the hot lemon cream. Whisk thoroughly until the gelatine is completely dissolved and no lumps remain. Transfer this lemon cream into a large, clean bowl. Cover the surface directly with plastic wrap to prevent a skin from forming and place it in the fridge to chill for about an hour, or until it’s cool but not fully set.
Phase 2: Whipping the Cream & Assembling the Mousse
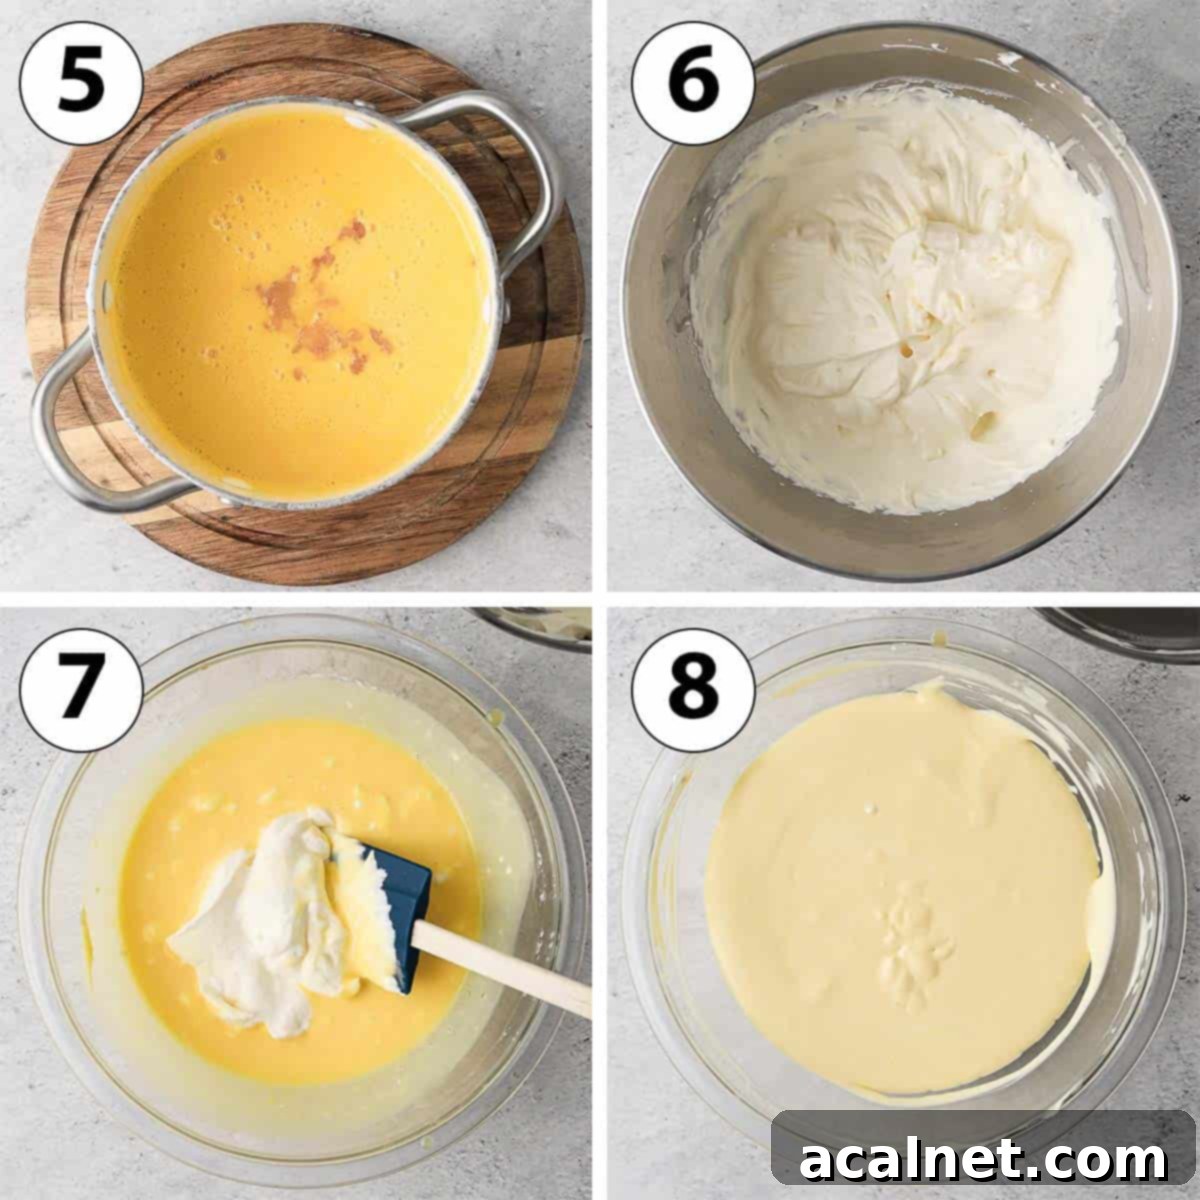
- Whip the Cream: While the lemon cream chills, pour the very cold heavy/thickened cream into the bowl of your stand mixer (or a large mixing bowl if using a hand mixer). Whip the cream on medium-high speed until it forms stiff peaks. Be careful not to over-whisk, as this can cause the cream to become grainy or even turn into butter.
- Lighten the Lemon Cream (if needed): Once the lemon cream is chilled, it might have slightly firmed up. Before folding, give it a quick whisk with a spatula or whisk to loosen it slightly. This makes the folding process easier and helps maintain the airy texture.
- Gently Fold in Whipped Cream: This is where the mousse magic happens! Add about a quarter of the whipped cream into the lemon mixture and gently whisk it in. This step helps to lighten the lemon cream and temper it with the whipped cream, making it easier to incorporate the rest without deflating the air. Then, carefully fold in the remaining whipped cream in two or three additions using a spatula. Use a gentle, sweeping motion, lifting from the bottom and folding over the top, rotating the bowl as you go. The goal is to combine the mixtures without losing the airiness of the whipped cream. You can read more about the “folding” method here.
- Portion and Chill: You should now have a light, fluffy mousse. It might appear slightly runny at this stage, but rest assured, the gelatine will ensure it sets beautifully. Carefully spoon or pipe the lemon mousse into your chosen serving cups or glasses. Place them in the fridge to chill for at least 2 hours, or until fully set.
Phase 3: Crafting the Lemon Curd Topping (Optional, but Recommended!)
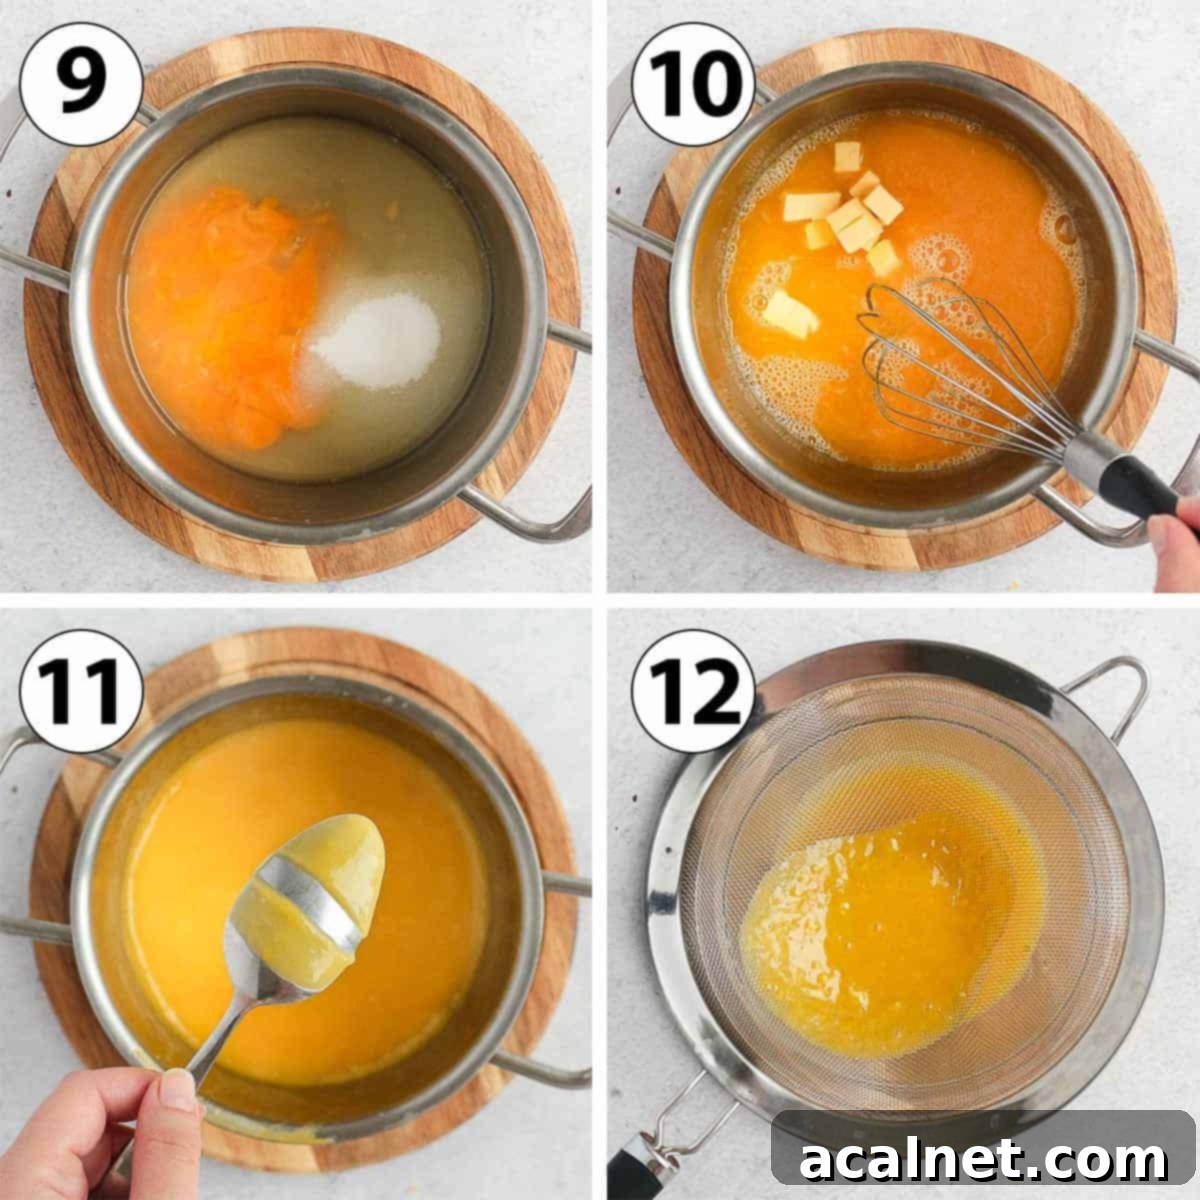
While the mousses are chilling, take this opportunity to prepare your luscious homemade lemon curd, if you’re making it from scratch. This vibrant topping truly elevates the dessert!
- Initial Curd Mixture: In a small, heavy-bottomed pot, whisk together the fresh lemon juice, lemon zest, egg yolks, and caster sugar until well combined.
- Gentle Heat: Place the pot over low heat and continue to whisk constantly for about 5 minutes. The mixture will start to thicken slightly, indicating the eggs are gently cooking.
- Incorporate Butter: Remove the pot from the heat momentarily. Add the cubed unsalted butter, a small amount at a time, whisking continuously until each addition is fully melted and incorporated before adding more. This creates a smooth emulsion.
- Thicken the Curd: Return the pot to low heat. Continue whisking constantly for another 5 to 15 minutes. The time can vary based on your stove’s temperature, so patience is key. The curd is ready when it thickens significantly and coats the back of a spoon, much like the lemon cream (use the same “nappe” test or a thermometer for 82°C/180°F).
- Strain for Silkiness (Optional): For an ultra-smooth and silky curd, pour it through a fine-mesh sieve into a clean bowl. This removes any tiny bits of cooked egg or zest, ensuring a luxurious texture.
- Cool and Top: Allow the lemon curd to cool down slightly at room temperature for about 20 minutes. Once your lemon mousse cups are fully set, carefully spoon or pour the cooled (but still pourable) lemon curd over the top of each mousse layer. Place them back in the fridge to chill until you’re ready to serve.
- Garnish (Optional): Just before serving, add a final flourish with a sprinkle of coconut flakes, a few fresh mint leaves, or a thin slice of candied lemon for an extra touch of elegance.

Frequently Asked Questions About Lemon Mousse
While it is possible to make a lemon cream dessert without gelatine, the texture will be notably different. Without gelatine, it will be closer to a rich, thick lemon cream or a pot de crème, rather than a light, airy mousse. The gelatine is what provides the characteristic stability and fluffiness of a true mousse. If you choose to omit it, I recommend increasing the amount of whipped cream slightly to help stabilize the mixture and give it some body. You can see an example of a gelatine-free mousse in my Mango Mousse recipe.
Absolutely! Using a good quality store-bought lemon curd is a fantastic shortcut if you’re short on time or prefer not to make it from scratch. It will still result in a delicious dessert. However, I personally prefer to make my own, as it allows me to precisely control the level of sweetness and achieve that extra tangy punch that complements the mousse so perfectly.
The lemon mousse is quite fluid before it has fully chilled and set in the refrigerator. Therefore, it might not be the most ideal consistency for a direct cake filling that requires immediate structural integrity. However, if you allow the mousse to set completely in the fridge first, you could then carefully use it as a filling layer. For a more stable cake filling, you might consider a stiffer lemon buttercream or a lemon-flavored pastry cream.
It’s common to have leftover egg whites when making recipes that call for yolks only! There are many delicious ways to use them. My absolute favorite is to bake Financiers, which are delightful French almond tea cakes. You could also make meringues, macarons, angel food cake, or even an egg white omelet for a savory option.
Yes, with some adjustments! You would need to substitute the heavy cream with full-fat canned coconut cream (chilled overnight and only use the thick cream from the top). For the lemon curd, you would replace the butter with a dairy-free butter substitute. Be aware that the flavor profile will have a subtle coconut hint, and the texture might be slightly different.
This recipe is designed to be quite tangy, which many people love! If you prefer a sweeter dessert, you can easily adjust the amount of caster sugar in both the lemon mousse base and the lemon curd topping. Start by adding an extra tablespoon or two to each component and taste as you go. Remember, you can always add more sugar, but you can’t take it away!
Expert Tips for a Flawless Lemon Mousse
- Temperature is Key: Pay close attention to the temperatures of your ingredients and mixtures. Ensure your heavy cream is very cold before whipping. Also, allowing the lemon cream to cool sufficiently before folding in the whipped cream is crucial; a warm lemon cream will melt the whipped cream, resulting in a runny mousse.
- Adjust Sweetness to Your Liking: Both the mousse and the lemon curd in this recipe are intentionally designed to be quite tangy with a moderate amount of sugar. If you prefer a sweeter dessert, feel free to increase the quantity of caster sugar in both components until it suits your palate.
- Don’t Over-Whip the Cream: Whipped cream can go from perfectly fluffy to grainy in a matter of seconds. Keep a close eye on it and stop whisking as soon as stiff peaks form.
- Gentle Folding: When combining the whipped cream with the lemon cream, use a light hand and a folding technique (rather than vigorous stirring) to preserve the airiness of the whipped cream, which gives the mousse its characteristic light texture.
- Fresh Ingredients Matter: Using fresh lemons for both zest and juice will make a significant difference in the vibrancy and depth of flavor of your dessert.
- Experiment with Citrus: While lemon is classic, don’t hesitate to try this recipe with other citrus fruits for a slightly different flavor profile! Lime, mandarin, or orange would be delicious. You could even combine a few citrus fruits. Check out my Orange Curd recipe for inspiration!
- Presentation Enhancements: Serve these mousses in elegant glass cups or small jars to showcase the beautiful layers. Garnish with fresh berries (raspberries or blueberries pair wonderfully), a sprinkle of toasted coconut, or delicate candied lemon peel for an extra touch.
Storing & Freezing Your Lemon Mousse Cups
These delightful lemon mousse cups are best enjoyed fresh, but they also store wonderfully, making them an excellent make-ahead dessert for entertaining.
- Refrigeration: Keep your lemon mousse cups covered loosely with plastic wrap or in an airtight container in the refrigerator. They are at their absolute best when served within 24 hours of preparation, but they will maintain their freshness and texture for up to 3 days.
- Garnish Just Before Serving: To ensure the freshest appearance and taste, I highly recommend adding any garnishes, such as fresh mint, coconut flakes, or berries, just before you plan to serve them. This prevents them from wilting or becoming soggy.
- Make-Ahead Perfection: The chilling time required for this recipe means it’s perfectly suited for preparing in advance. You can assemble them the day before your event, allowing them ample time to set and develop their flavors.
- Freezing is Not Recommended: Unfortunately, this particular lemon mousse recipe does not freeze well. The delicate, airy texture of the mousse, which relies on whipped cream and gelatine, tends to break down upon thawing, resulting in a watery or grainy consistency. It’s best to enjoy these fresh from the fridge!

Discover More Light & Creamy Mousse Recipes
If you loved this lemon mousse, you’ll be thrilled to explore more delightful variations. Mousses are incredibly versatile and perfect for any occasion. Here are some of my other favorite mousse recipes you might enjoy:
- Double Raspberry Mousse: A fruity, vibrant treat with layers of raspberry goodness.
- Classic Dark Chocolate Mousse: Rich, decadent, and intensely chocolatey – a true crowd-pleaser.
- Elegant Coffee Mousse Cups: For coffee lovers, a creamy dessert with a delightful caffeine kick.
- Tropical Mango Mousse: A burst of sunshine in every bite, perfect for exotic flavor cravings.
- Sweet Strawberry Mousse: Light, fresh, and bursting with the flavor of summer berries.
- Exotic Passion Fruit Mousse: Tangy and aromatic, a delightful indulgence.
- Simple Vanilla Mousse Cups: A timeless classic that’s incredibly versatile and comforting.
- Luxurious Chocolate Orange Mousse: A sophisticated blend of rich chocolate and bright orange.
- Bright Orange Mousse Cups: Refreshing and sweet, a lovely citrus alternative.
Made this refreshing dessert?
Let us know if you liked it by leaving a comment below, and tag us on Instagram @a.baking.journey with a photo of your delightful creation!
Recipe Card: Tangy Lemon Mousse with Homemade Curd

Lemon Mousse with Lemon Curd
This Lemon Mousse recipe is a super light and fresh dessert to enjoy on a warm day. Topped with a tangy lemon curd, these lemon mousse cups are perfect for a dinner party or when you are simply after a creamy, refreshing dessert!
Servings: 6
Author: Sylvie
Prep Time: 40 mins
Chilling Time: 3 hrs 30 mins
Total Time: 4 hrs 10 mins
Print Recipe
Ingredients
Lemon Mousse
- 1 teaspoon Gelatine Powder (with 1 tablespoon cold water)
- 1 Lemon Zest
- 3 Egg Yolks
- 120 gr (1/2 cup) Caster Sugar (or Fine White Granulated Sugar)
- 180 ml (3/4 cup) Lemon Juice (about 3 or 4 large lemons)
- 240 ml (1 cup) Heavy / Thickened Cream
Lemon Curd
- 60 ml (1/4 cup) Lemon Juice (about 2 lemons)
- 1 Lemon Zest
- 2 Egg Yolks
- 60 gr (1/4 cup) Caster Sugar (or Fine White Granulated Sugar)
- 40 gr (2 tablespoons + 2 teaspoons) Unsalted Butter (cubed)
Instructions
Lemon Mousse
- Place the Gelatine Powder in a small bowl and mix in some cold water (see ingredients notes below). Set aside.
- Place the zest of 1 Lemon in a heat-proof bowl and mix with the Egg Yolks and Caster Sugar.
- Place the Lemon Juice in a medium size pot. Bring to a simmer, then pour over the egg/sugar mixture. Whisk well to combine, then pour it all back into the pot.
- Turn on medium low heat and keep stirring until the liquid starts to thicken slightly (see note 1). Remove from the heat, add the gelatine and whisk well until dissolved. Transfer into a large clean bowl, cover with plastic wrap touching the surface of the cream and place in the fridge to chill for about an hour.
- Place the Heavy / Thickened Cream in the bowl of your mixer (or a large mixing bowl if using a hand mixer) and whisk until you get stiff peaks.
- Take the Lemon Cream out of the fridge (slightly whisk it to loosen it if required) then gently fold in the whipped cream into the lemon mixture in 3 or 4 times, trying not to deflate the whipped cream (see note 2).
- Pour the lemon mousse into the serving cups and place in the fridge to set for at least 2 hours (see note 3).
Lemon Curd
- In a small Pot, whisk together the Lemon Juice & Zest, Egg Yolks and Sugar. Turn on low heat and whisk for about 5 minutes, or until the liquid starts to slightly thicken.
- Whisk in the cubed Butter a little bit at the time until all melted and combined. Continue to cook on low heat whilst continuously whisking for 5 to 15 minutes, or until the curd has thickened (see note 4).
- (optional) Pour the lemon curd through a thin mesh sieve to remove any lumps or bits of cooked eggs.
- Set aside for about 20 minutes to cool down slightly, then top over the set Lemon Mousses. Place back in the fridge until ready to serve.
- Optional: garnish with Coconut Flakes and fresh Mint Leaves.
Notes
General Disclaimer: I highly recommend using the measurements in grams/ml (instead of cups/spoons) for more accuracy and better results.
Ingredients Notes:
- Gelatine: follow the water quantity recommended on the gelatine package. Different brands have different recommendations; I personally used about 1 tablespoon of cold water.
- Lemon Juice: you might need more or less lemons depending on how big they are and how much juice they will give you.
- Lemon Zest: I used the zest of 1 lemon for the mousse and 1 lemon for the curd. You can add more if preferred for an even tangier flavour.
- Cream: make sure it has at least 30% fat content, or it will not whip.
- Sugar: both the cream and the curd are quite tangy. If you prefer your desserts to be more on the sweet side, feel free to increase the quantity of sugar.
Instruction Notes:
- To know the lemon cream is ready, you can either use a food thermometer (it should be about 82’C / 180’F) or check its consistency with a spoon. Dip the back of a spoon in the cream, draw a horizontal line in the cream with your finger (be careful, it’ll be hot) then tip the spoon down. If the line stays clear (no cream drips back over it), it’s ready.
- A good tip to fold the two creams more easily is to first whisk in a little bit of the whipped cream into the lemon cream. This will thicken the lemon cream slightly, which will make folding in the rest of the whipped cream easier.
- The mousse will appear quite runny when you pour it into the cups, that’s completely normal. It will set once chilled in the fridge.
- Follow the same technique as described in note 1 to check if the curd is cooked enough.
Nutrition (per serving)
- Calories: 362 kcal
- Carbohydrates: 35g
- Protein: 4g
- Fat: 24g
- Saturated Fat: 14g
- Polyunsaturated Fat: 1g
- Monounsaturated Fat: 7g
- Trans Fat: 1g
- Cholesterol: 232mg
- Sodium: 25mg
- Potassium: 95mg
- Fiber: 1g
- Sugar: 31g
- Vitamin A: 975IU
- Vitamin C: 18mg
- Calcium: 53mg
- Iron: 1mg
