Homemade Orange Tartlets: Sweet, Zesty Mini Tarts Perfect for Any Occasion
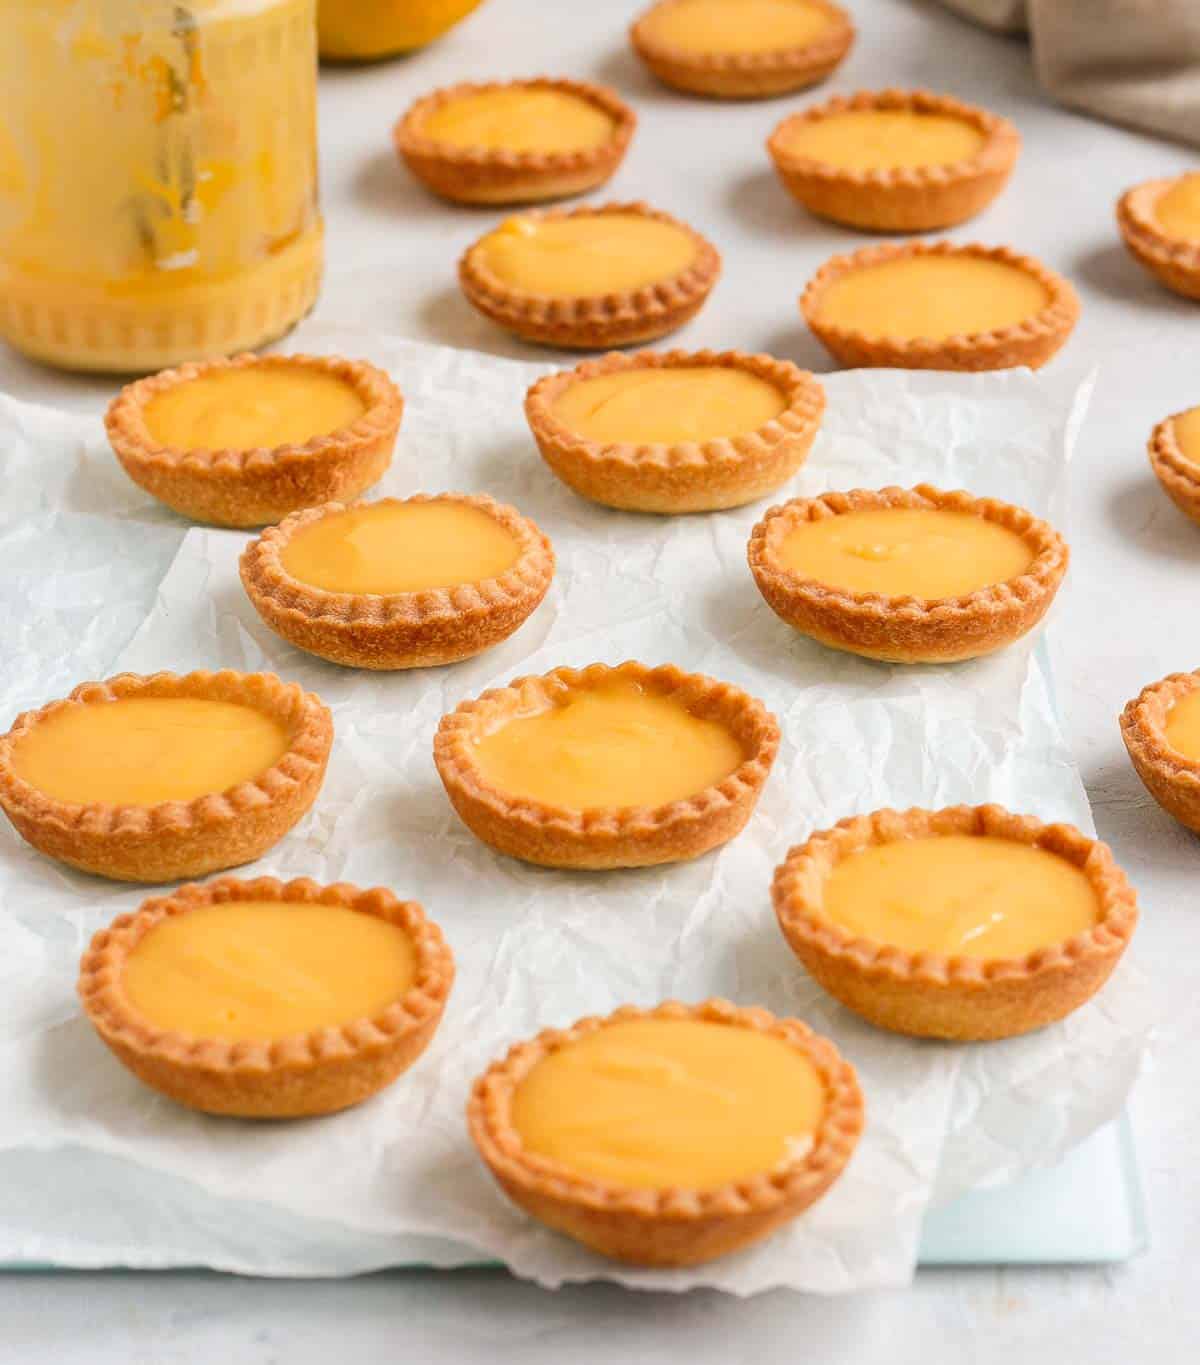
Indulge in the delightful combination of sweet, creamy, and crunchy with these exquisite Orange Tartlets. Perfectly sized for any gathering, they make an ideal treat for parties, birthday celebrations, holiday dessert tables, or a charming afternoon tea. This recipe brings together the joy of homemade baking, featuring delicate Mini Tartlet Shells and a simple yet incredibly flavorful Orange Curd filling. Prepare to impress your guests and delight your taste buds with these vibrant citrus pastries.

Why You’ll Love These Orange Tartlets
These Orange Tartlets aren’t just a dessert; they’re a celebration in miniature form. Their bright, zesty flavor and delicate texture make them an absolute showstopper for any occasion. Here’s why this recipe will quickly become a favorite in your baking repertoire:
- Perfect for Parties: Their individual size makes them easy to serve and enjoy, eliminating the need for plates and forks. They’re a mess-free and elegant option for entertaining.
- Flavorsome Combination: The recipe perfectly marries a crisp, buttery mini tart shell with a smooth, tangy orange curd, creating a harmonious balance that’s hard to resist.
- A Refreshing Twist: While classic Lemon Tartlets are beloved, these orange versions offer a unique, sweeter, and equally vibrant citrus experience. They’re a fantastic way to introduce a novel flavor to your dessert spread.
- Make-Ahead Friendly: Both the pastry shells and the orange cream can be prepared in advance, allowing for easy assembly a few hours before serving. This flexibility takes the stress out of last-minute party preparations.
- Miniature Elegance: These tartlets are a smaller, more accessible version of a traditional French Orange Tart, offering all the intense flavors in a charming, bite-sized package.
- Versatile Dessert: Beyond standalone treats, they complement other miniature desserts beautifully, such as Chocolate Orange Tartlets, Mini Lemon Meringue Tarts, and Mini Chocolate Tarts, creating a diverse and appealing dessert table.
Crafting the Perfect Tartlet Crusts
The foundation of a perfect tartlet lies in its crust. For these mini orange tarts, we’re using a classic French Pâte Sablée, a rich butter shortcrust pastry known for its delicate, crumbly texture and buttery flavor. The beauty of this recipe is that you don’t need specialized tart pans; a simple muffin pan and a cookie cutter are all you need to create these charming crusts. You can even use a mini muffin pan for truly bite-sized treats!
Ingredients for the Pâte Sablée
This simple yet elegant pastry uses just five core ingredients, with an optional sixth for an extra citrus kick:
- Dry Ingredients:
- Plain/AP Flour: The structural base of our pastry.
- Salt: A crucial flavor enhancer, balancing the sweetness.
- Icing Sugar (Powdered Sugar): Contributes to the tender, crumbly texture and sweet flavor. Granulated sugar can make the dough tougher, so icing sugar is preferred for sablée.
- Wet Ingredients:
- Unsalted Butter (very cold): The star ingredient, responsible for the rich flavor and melt-in-your-mouth texture. Keeping it very cold is key to preventing overworking and ensuring a flaky result.
- Medium-sized Egg: Acts as a binder, bringing the dough together without making it overly tough.
- Optional: Orange Zest: For an intensified orange flavor that complements the curd perfectly.
How to Make Mini Tart Shells in a Muffin Pan
Making pastry can seem daunting, but with a food processor, it’s quick and mess-free. If you prefer a hands-on approach, you can find detailed instructions in my Pâte Sablée recipe.
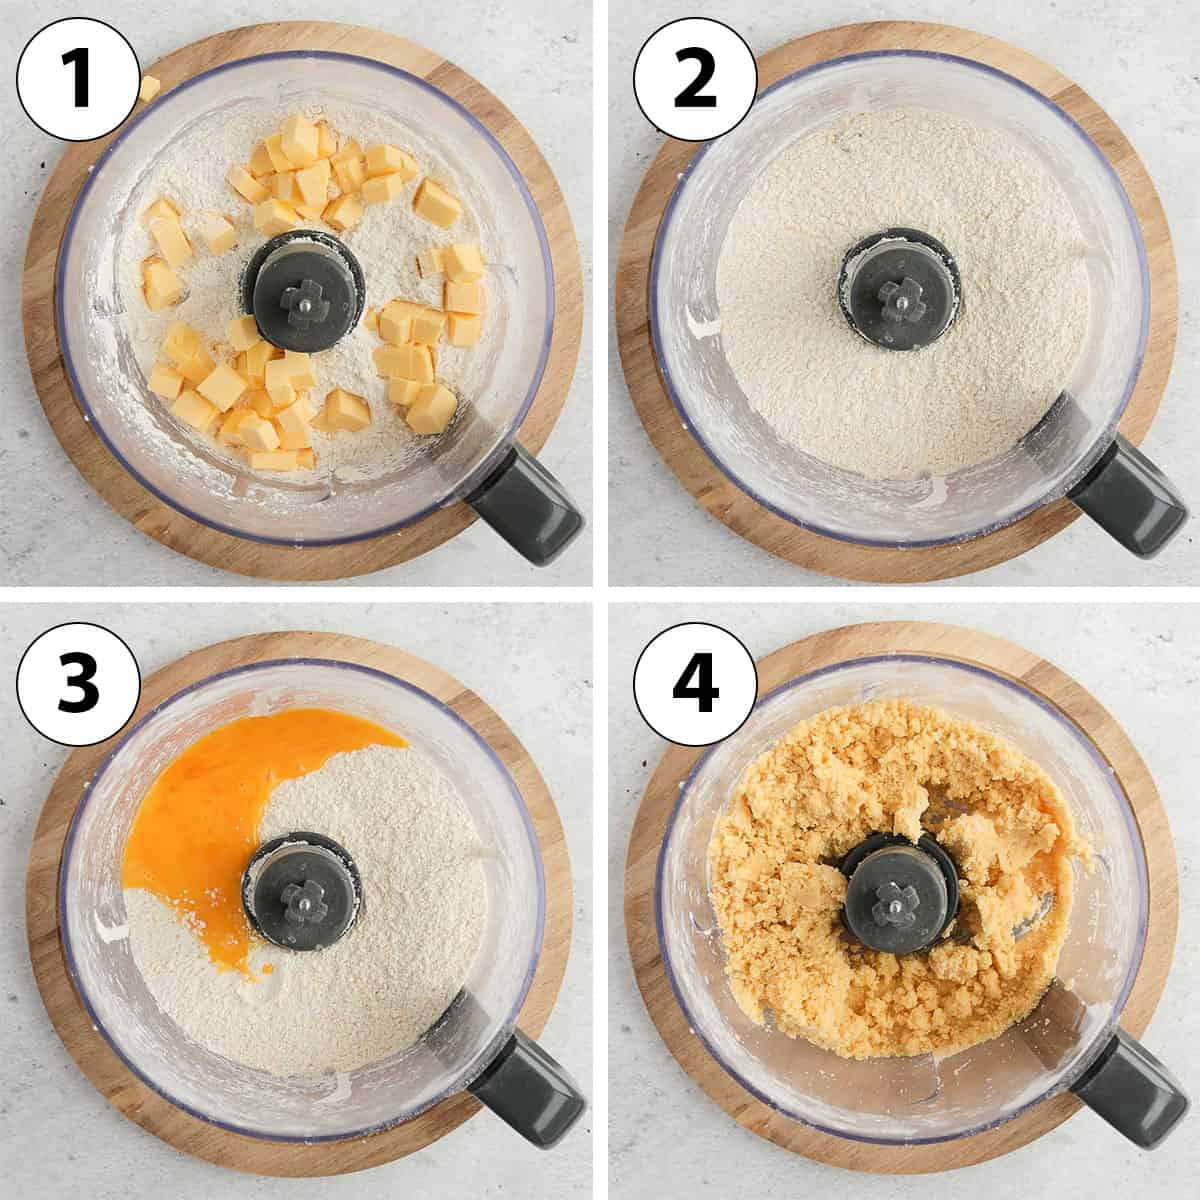
- Combine Dry Ingredients & Butter: In the bowl of your food processor, pulse together the flour, icing sugar, and salt. Add the very cold unsalted butter, cut into small cubes.
- Achieve Crumbly Texture: Pulse until the mixture resembles very small crumbs. It’s important to avoid large chunks of butter, as these can cause the pastry to become too flaky and puff excessively in the oven, leading to misshapen shells.
- Incorporate Egg: Add the egg (and optional orange zest if using). Pulse just until a rough dough begins to form. The key here is to avoid overworking the pastry; over-mixing develops gluten, which can make the crust tough. The dough should just barely come together when pressed between your fingers.
- Chill the Dough: Tip the pastry onto a clean surface and gently gather it into a ball. Place it between two sheets of baking paper and roll it out into a large, thin disk, approximately 3 mm (1/8 inch) thick. Transfer this disk to a flat tray and refrigerate for at least 1 hour, or up to 24 hours. This chilling period is crucial for relaxing the gluten and firming up the butter, which prevents shrinking during baking.
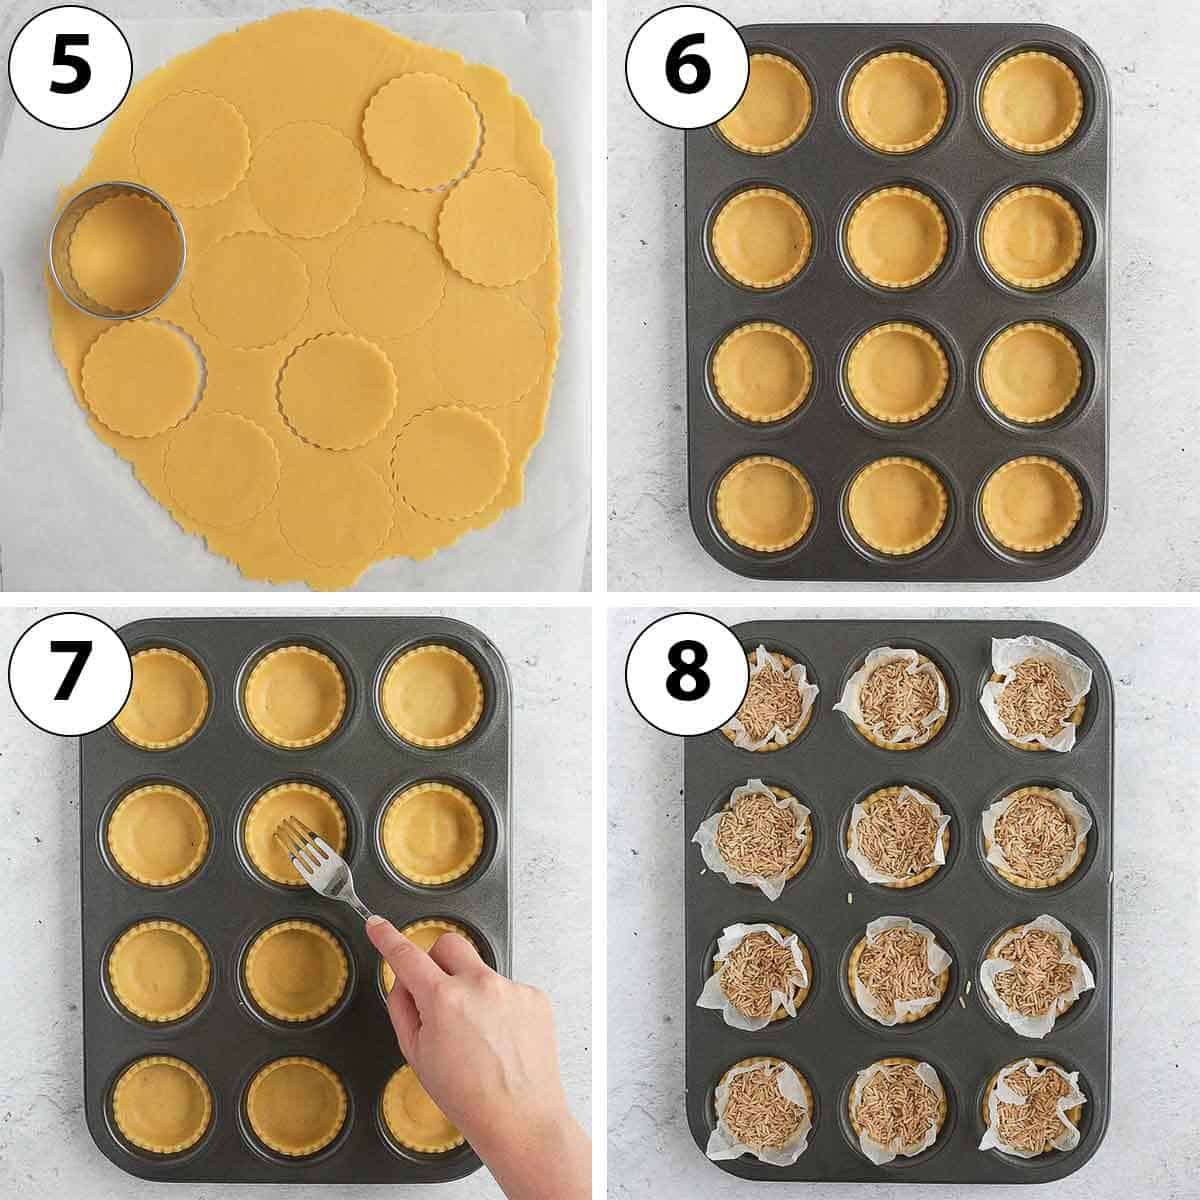
- Cut and Line Muffin Pan: Once chilled, remove the dough from the fridge. Use a fluted or round cookie cutter to cut out small disks of pastry. The size of your cutter will determine the depth of your tartlets; ideally, the cut-out dough should be at least as wide as the openings of your muffin pan.
- Form the Shells: Carefully slide each pastry disk into the muffin pan cavities. Gently press the pastry into the bottom and along the sides, paying special attention to the corner where the bottom meets the sides, to remove any trapped air bubbles and ensure the dough adheres to the pan.
- Second Chill: Prick the bottom of each pastry shell with a fork (this helps prevent bubbling) and place the muffin pan back in the fridge to rest for at least 1 hour, or up to 24 hours. This second chilling step is vital for maintaining the shape of your tartlet shells during baking.
- Preheat and Freeze: Preheat your oven to 160°C (325°F). While the oven is preheating, place the muffin pan in the freezer. This shock of extreme cold to heat helps the pastry set quickly, further preventing shrinkage.
- Blind Bake: Cover each pastry shell with a small piece of crumpled baking paper, then fill with baking beads, dry beans, or rice. Blind bake for 15 minutes. Remove the paper and weights, then return the shells to the oven for an additional 15 minutes, or until they are golden brown and dry to the touch.
- Cool and Store: Once baked, let the tartlet shells cool completely in the muffin pan before carefully removing them. Store them at room temperature until you’re ready to fill them.
Crafting the Zesty Orange Curd Filling
The star of these Orange Tartlets is undoubtedly the vibrant, smooth, and utterly delicious Orange Curd. It’s a bright and tangy counterpoint to the buttery crust, ensuring each bite is bursting with fresh citrus flavor. Making homemade curd is surprisingly simple and yields a far superior result to any store-bought alternative.
Ingredients for the Orange Curd
Similar to a classic Lemon Curd, this Orange Curd relies on a few key ingredients to achieve its luscious texture and intense flavor:
- Egg Yolks: Provide richness, color, and act as a natural thickener, giving the curd its creamy consistency.
- Caster Sugar (Fine White Granulated Sugar): Sweetens the curd and helps dissolve smoothly into the liquid.
- Fresh Orange Juice: The primary source of the tart and sweet orange flavor. Always use freshly squeezed for the best results.
- Orange Zest: Critical for a deep, aromatic orange flavor. The zest contains the essential oils, delivering an intense citrus punch.
- Cornstarch: A secret weapon for a slightly thicker, more stable curd, preventing it from being too runny once set.
- Unsalted Butter: Added at the end, it makes the curd incredibly smooth, silky, and rich, while also adding a beautiful sheen.
How to Make Orange Curd
Patience is key when making curd, as low heat and continuous stirring prevent the eggs from scrambling, ensuring a velvety smooth finish.
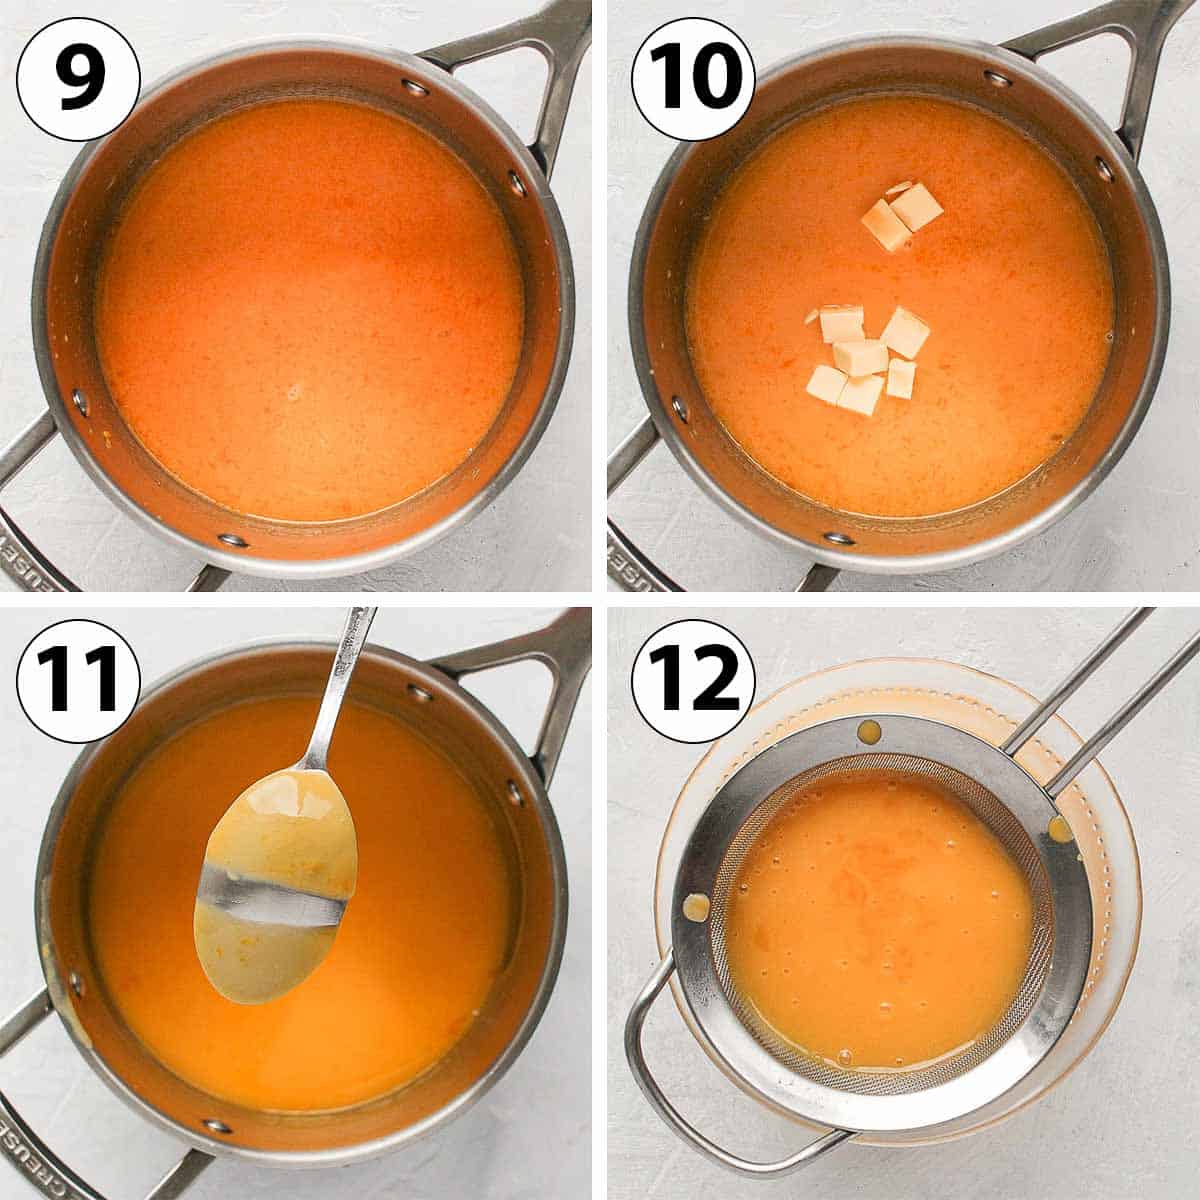
- Combine Wet Ingredients & Sugar: In a small saucepan, whisk together the orange juice, orange zest, egg yolks, sugar, and cornstarch. Ensure there are no lumps from the cornstarch.
- Start Cooking on Low Heat: Place the saucepan over very low heat. Begin stirring continuously. It’s important to keep the heat low to allow the sugar to dissolve gradually and for the liquid to thicken slightly without cooking the eggs too fast. This usually takes 3 to 5 minutes.
- Incorporate Butter: Once the mixture has slightly thickened and the sugar is dissolved, add the cubed unsalted butter, a little at a time. Stir continuously until each addition of butter is fully melted and incorporated before adding more. This emulsifies the butter into the curd, creating a smooth and glossy texture.
- Thicken the Curd: Continue to cook and stir constantly on low heat for several more minutes (the exact time varies depending on your stove’s temperature, usually 5-10 minutes). The curd should never boil vigorously, as this can scramble the eggs. A very gentle simmer is acceptable. The curd is ready when it has thickened significantly.
- Test for Doneness (Nappe Test): To check if the orange curd is properly cooked, dip the back of a spoon into it. Draw a line across the back of the spoon with your finger. If the line remains clear and the curd doesn’t run back into the gap, it’s ready. Alternatively, if you have a food thermometer, the curd should reach 82°C (180°F).
- Strain for Smoothness: Once cooked, immediately pour the curd through a fine-mesh sieve into a clean bowl. This crucial step removes any tiny bits of cooked egg or zest, ensuring your orange curd is perfectly smooth and silky.
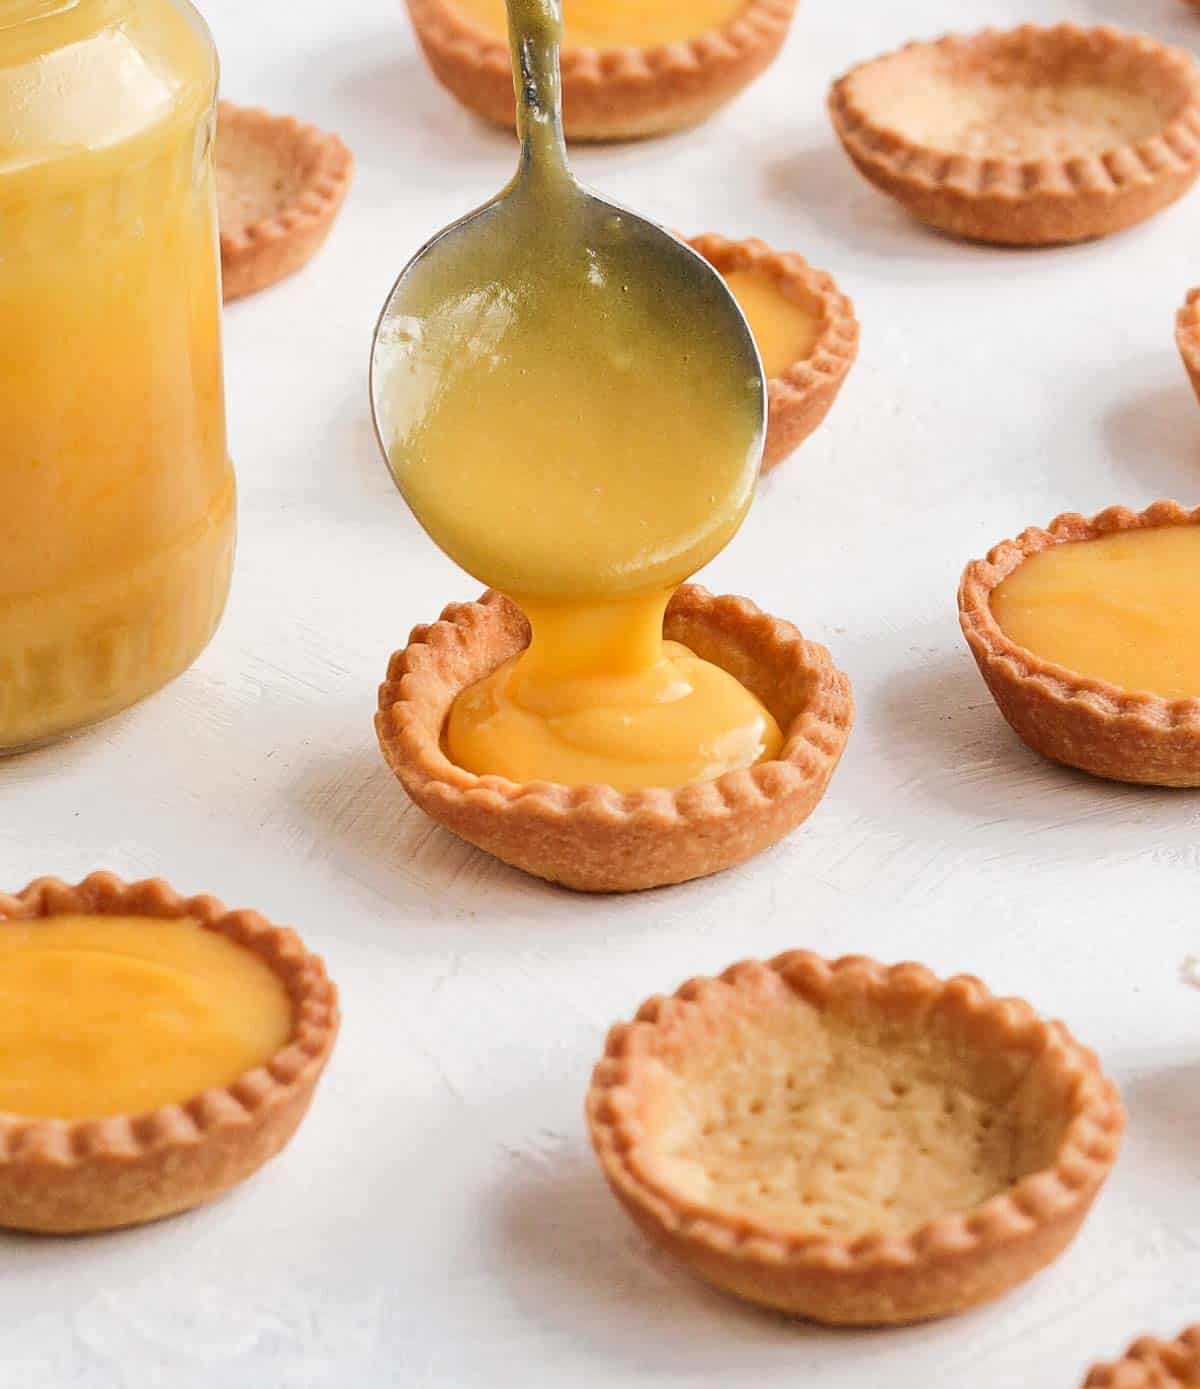
- Fill the Tartlet Shells: While the curd is still warm and more fluid, pour it carefully into the baked and cooled tartlet shells. Gently tap each tartlet on a hard surface a few times to release any trapped air bubbles and create a smooth, even surface.
- Chill to Set: Place the filled tartlets in the refrigerator to set for at least 2 to 3 hours, or preferably overnight. Chilling allows the curd to firm up and reach its ideal creamy consistency.
Essential Tips for Tartlet Perfection
Achieving perfectly crisp shells and a silky smooth curd is easier than you think, especially with these helpful tips:
- Prioritize Chilling for Pastry: Never skip the resting and chilling times for your pastry dough. The longer the dough rests in the fridge (ideally overnight), the more the gluten relaxes, preventing shrinkage in the oven. The cold butter also ensures a tender, crumbly crust rather than a tough one. Placing the muffin pan in the freezer just before baking creates a significant temperature shock, which helps the shells hold their shape beautifully.
- Gentle Heat for Curd: Always cook your orange curd over very low heat. This prevents the eggs from scrambling and ensures a smooth, lump-free consistency. While it takes a little longer, the result is worth the patience. Alternatively, using a double-boiler can provide even more controlled heat.
- Mastering the Curd Doneness Test: Besides the temperature (82°C/180°F), the “nappe” test is a reliable indicator. Dip a spoon into the curd, then run your finger across the back of the spoon. If the line holds clear without the curd flowing back, it’s perfectly cooked. If it drips, it needs more time on the heat.
- Reheating Curd for Easy Assembly: If you’ve prepared the orange curd in advance and stored it in the fridge, it will likely be quite firm. Gently re-warm it in the microwave (in 15-second bursts, stirring in between) or over a double-boiler until it becomes more fluid. This makes filling the tartlet shells much easier and ensures an even, smooth finish.
- Quality Ingredients Matter: Since there are so few ingredients, the quality of each really shines through. Use fresh, juicy oranges for the zest and juice, high-quality butter, and fresh eggs for the best flavor.
- Avoid Overworking the Dough: When mixing the Pâte Sablée, stop as soon as the dough just comes together. Overworking develops gluten, leading to a tough, chewy crust instead of a delicate, crumbly one.

Frequently Asked Questions About Orange Tartlets
While you absolutely can use store-bought tartlet shells for convenience, I highly recommend making your own. Homemade shells, especially a Pâte Sablée, offer an unparalleled flavor and texture that truly elevates these Orange Tartlets, providing that crisp, buttery contrast to the creamy curd. The extra effort is well worth it!
Yes, the beauty of this recipe is its adaptability! I’ve successfully made similar tartlets with lemon (try this Lemon Curd Tartlet Recipe). You could also use lime for a sharper, more vibrant flavor, or even a milder Mandarin Curd. Feel free to experiment by combining a few citrus fruits, such as orange and lemon, for a unique taste profile.
Absolutely! Both the tartlet shells and the orange curd can be prepared separately in advance. The baked tartlet shells can be stored at room temperature for up to 2 days, and the orange curd can be kept refrigerated for up to 3 days. When ready to serve, gently re-warm the curd slightly to loosen it, fill the tart crusts, and then chill them in the fridge for at least 2 to 3 hours (preferably overnight) to allow the curd to set beautifully.
For a professional and appealing finish, consider garnishing your Orange Tartlets. Simple dustings of powdered sugar, a few fresh orange segments, candied orange peel, or a sprig of fresh mint can add both visual appeal and a refreshing aroma. A dollop of whipped cream or meringue can also create a beautiful contrast in texture and flavor.
Storing & Freezing Your Orange Tartlets
Proper storage is essential to keep your Orange Tartlets fresh and delicious. Here’s how to best store both the individual components and the assembled dessert:
- Baked Tartlet Crusts: Empty, baked tartlet shells can be stored at room temperature in an airtight container for up to 2 days. For longer storage, they can be frozen for up to 3 months. My preferred method is to freeze them unbaked, wrapped tightly, and then bake them from frozen or after a short thaw.
- Orange Curd: The prepared orange curd can be stored in an airtight container in the refrigerator for up to 3 days. Ensure it’s covered directly with plastic wrap to prevent a skin from forming on top. I do not recommend freezing the orange curd filling, as it can separate and lose its smooth texture upon thawing.
- Assembled Orange Tartlets: Once the tartlets are assembled with the curd filling, they should be stored in an airtight container in the refrigerator. For the best flavor and texture, they are best enjoyed within 24 hours. However, they will remain delicious for 2 to 3 days.

Explore More Delightful Tartlet Recipes
If you’ve enjoyed these Orange Tartlets, you’ll love exploring other variations of these charming miniature desserts. From fruity delights to rich chocolate concoctions, there’s a tartlet for every taste and occasion. Expand your baking horizons with these delicious recipes:
- Strawberry Custard Tartlets
- Puff Pastry Apple Tartlets
- Pear Frangipane Tartlets
- Puff Pastry Pear Tartlets
- Chocolate Raspberry Tartlets
- Easy Cherry Tartlets with Puff Pastry
- Mini Fruit Tarts
- Salted Caramel Tartlets
- Mini Chocolate Caramel Tarts
- Mini Butterscotch Tartlets
Made this recipe?
Let us know if you liked it by leaving a comment below, and tag us on Instagram @a.baking.journey with a photo of your creation!
Recipe Card: Homemade Orange Tartlets

Orange Tartlets
Servings:
18
tartlets
Author:
Sylvie
45 minutes
30 minutes
4 hours
5 hours 15 minutes
Print Recipe
Ingredients
Tartlet Crusts
- 250 g (1 2/3 cup) Plain / All-Purpose Flour
- 50 g (1/2 cup) Icing Sugar, or powdered sugar
- 1 pinch Table Salt
- 120 g (1/2 cup) Unsalted Butter, very cold, cut into cubes
- 1 Large Egg
- 1 Orange, Zested, optional, for extra orange flavor
Orange Filling
- 5 Egg Yolks, at room temperature
- 60 g (1/4 cup) Caster Sugar, or fine white granulated sugar
- 150 ml (1/2 cup + 2 tablesp.) Fresh Orange Juice, from about 3 large oranges
- 1 Orange Zest, from one orange
- 1 tablesp. Cornstarch
- 90 g (6 tablesp.) Unsalted Butter, cubed, at room temperature
Instructions
Tartlet Shells
- 1. Blend together the Flour, Icing Sugar, and Salt in your food processor. Add the very cold, cubed Butter and pulse until you get very small crumbs (see note 1 & 2).
- 2. Whisk the egg in a separate bowl and add it to the food processor. Pulse slowly until a dough just starts to come together. Avoid overworking.
- 3. Gather the dough into a ball, flatten slightly, then place between two sheets of baking paper. Roll into a large, thin disk, about 3mm (1/8 inch) thick. Chill in the fridge for at least 1 hour, or up to 24 hours.
- 4. Remove from the fridge and cut out small rounds using a cookie cutter (see note 3). Gently press each piece of dough into a muffin pan cavity, ensuring no air bubbles are trapped. Prick the bottom with a fork and chill again for at least 1 hour, or up to 24 hours.
- 5. Preheat your oven to 160°C (325°F). Place the muffin pan in the freezer while the oven preheats.
- 6. Line each tartlet shell with a small piece of baking paper and fill with baking beads, rice, or dry beans. Bake for 15 minutes. Remove the weights and paper, then bake for another 15 minutes, or until golden and dry. Cool completely.
Orange Curd Filling
- 1. In a small saucepan, combine Orange Juice, Zest, Egg Yolks, Sugar, and Cornstarch. Whisk well. Cook over very low heat, stirring constantly, until sugar dissolves and liquid slightly thickens (3-5 minutes).
- 2. Add the cubed Butter, a little at a time, stirring until each addition is fully melted and combined before adding more.
- 3. Continue to cook and stir constantly on low heat for several minutes until the orange curd has significantly thickened (see note 4 & 5). Pour immediately through a thin mesh sieve to remove any lumps.
Assembling the Orange Tartlets
- 1. Pour the warm orange curd into the baked and cooled tartlet shells (see note 6 if curd was made in advance). Gently tap each tartlet on a hard surface to remove any air bubbles.
- 2. Place the filled tartlets in the fridge to set for at least 2 to 3 hours, preferably overnight, before serving. Garnish as desired.
Would you like to save this recipe?
We’ll email this post to you, so you can come back to it later!
Notes
Yield: This recipe yields approximately 18 mini tarts. Your exact yield may vary slightly depending on how thinly you roll the pastry and the size of your cookie cutter. I rolled the pastry to about 3mm (1/8 inch) thick and used a standard muffin pan.
For more in-depth information, detailed step-by-step processes, advanced tips, and troubleshooting for the two main components of this recipe, please refer to my dedicated Mini Tart Shells recipe and my comprehensive Orange Curd recipe.
Instruction Notes:
- If you don’t have a food processor, you can make the pastry by hand or using a pastry blender. Detailed step-by-step instructions for the manual method can be found here.
- To avoid overworking the pastry, stop mixing as soon as the dough just begins to clump together. Test by pressing a small lump between your fingers; if it sticks, it’s ready. If too dry, add a tiny bit of very cold water. If too sticky, dust with a little more flour.
- The diameter of your cookie cutter will influence the depth of your tartlet shells. For sufficiently deep shells to hold a good amount of filling, I recommend using a cutter that is at least as wide as the opening of your muffin pan.
- The exact cooking time for the curd varies depending on your stove’s temperature, typically between 5 to 10 minutes after adding the butter. Ensure the curd never reaches a rolling boil, as this can curdle the eggs; a gentle simmer is ideal.
- To confirm the orange curd is fully cooked, check its temperature with a food thermometer (it should reach 82°C/180°F). Alternatively, perform the “nappe” test: dip the back of a spoon into the curd, draw a line with your finger, and if the line remains clear without the curd running back, it’s ready.
- If you’ve prepared the curd in advance and stored it in the refrigerator, it will be quite firm. Gently warm it in the microwave (in short bursts, stirring) or over a double-boiler until it’s fluid enough to easily pour into the tartlet shells.
Nutrition (per serving)
Carbohydrates: 104g |
Protein: 8g |
Fat: 13g |
Saturated Fat: 7g |
Polyunsaturated Fat: 1g |
Monounsaturated Fat: 3g |
Trans Fat: 1g |
Cholesterol: 88mg |
Sodium: 18mg |
Potassium: 1695mg |
Fiber: 2g |
Sugar: 76g |
Vitamin A: 2046IU |
Vitamin C: 418mg |
Calcium: 106mg |
Iron: 3mg
